RE-ORDER GRADE COLUMNS IN BLACKBOARD
- Log into Blackboard. Log into Blackboard Learn at learn.kent.edu or through FlashLine.
- Enter your course. Click on the name of your course to access it.
- Access the Full Grade Center. In the Control Panel, click to expand the Grade Center section. Then click the Full...
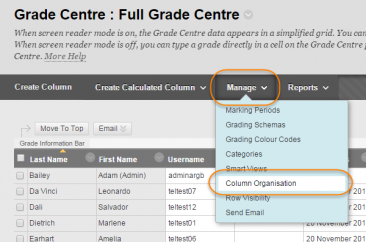
- Manage column information. Click on the Manage button...

0:07
1:36
Hold your left mouse button down and drag. And you can see I just moved research paper to underMoreHold your left mouse button down and drag. And you can see I just moved research paper to under research paper 1 once again hold down the crosshair with your left mouse drag.
How do I use the external grade column?
Oftentimes, that's not really where you want it, and so you'll need to change the order of the columns, as follows: Log in to Blackboard (opens in new window), and click on your course among the list of "Courses you are teaching" in the... In …
How do I edit a column in the Grade Center?
RE-ORDER GRADE COLUMNS IN BLACKBOARD 1. Log into Blackboard. Log into Blackboard Learn at learn.kent.edu or through FlashLine. 2. Enter your course. Click on the name of your course to access it. 3. Access the Full Grade Center. In the Control Panel, click to expand the Grade Center section. Then ...
How do I override a grade in the gradebook?
Dec 16, 2015 · Learn how to easily rearrange your grade center columns so that their order makes the most sense to you!
How do I release grades and feedback in the Grade Center?
Blackboard Questions? Contact the Center for Online Teaching and Learning Email: [email protected] Phone: (708) 534-4115 Reorder Grade Center Columns Enter a Blackboard course. Select Full Grade Center under Grade Center in the Control Panel. Hover your mouse over the Manage action button to open a drop down menu. Select Column Organization.
How do I organize grades in Blackboard?
Go to Ultra Course View page. In the Grade Center, the columns for students' first and last names appear first by default....Organize columns in the Grade CenterReorder columns quickly with the drag-and-drop function.Freeze or unfreeze columns in the first table. ... Hide or show multiple columns.More items...
How do I move rows in Blackboard grade Center?
In the gradebook list view, press the Move icon in the row of the item you want to move. Drag the item to the new location and release. The order you choose also appears in the grid view and on students' Grades pages.
How do I organize my gradebook in Blackboard Ultra?
0:241:52Gradebook Overview in the Ultra Course View - YouTubeYouTubeStart of suggested clipEnd of suggested clipYou can search for a student or group and use the filter menu to display only those submissions thatMoreYou can search for a student or group and use the filter menu to display only those submissions that need grading. Next select a student's name to open the submission.
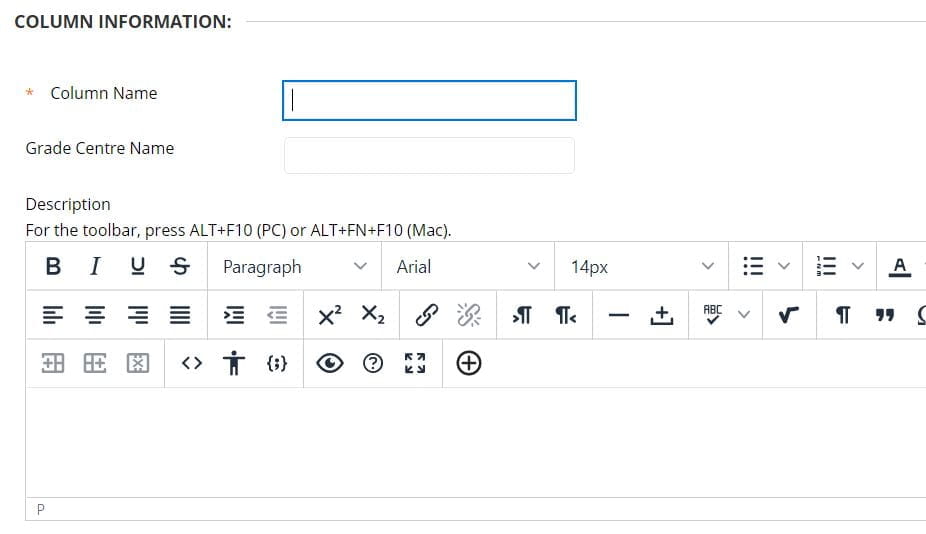
How do I create a grade Center column in Blackboard?
Under the control panel click the Grade Center bar on the menu and then select Full Grade Center. Once inside the Grade Center, click Create Column on the Action Bar. On the Create Grade Column page, enter the Column Name and optional Description. [Enter a brief, descriptive name.
How do I freeze a column in Blackboard Grade Center?
Organizing/Rearranging and "Freezing" Grade Center ColumnsStep 1 - Accessing the Grade Center (grade book) Log into your Blackboard Course, and go to the Control Panel. ... Step 2 - Selecting Column Organization. ... Step 3 - "Freezing" and Rearranging the Order of Columns.Jan 10, 2019
What is a frozen column in Blackboard?
Freezing columns allows you to scroll through the Grade Center keeping certain columns frozen as you scroll through content.Mar 30, 2018
How do I add a grade column in Blackboard Ultra?
From the Grade Center, access a column's menu and select Edit Column Information. On the Edit Column page, navigate to the Options section. Select No for Include this column in Grade Center calculations and Show this column to students. Select Submit.
Where is the column Organization Page blackboard?
Click Manage and select Column Organization. From this area you can see the point values, due dates, and categories of each of the columns. From this screen you can also rearrange your grade center, change the column category, and hide or show columns to students and yourself.Dec 20, 2020
What is the 8 point grading scale?
It has gained increasing popularity in recent years, largely in response to the phenomenon known as grade inflation. The name refers to the fact that three of the four highest letter grades have a range of eight points, while the remaining one spans seven points.
How do I create a weighted column in Blackboard?
Locate the Weighted Total column in the Grade Center. Click the Action Link (drop-down arrow) in the column heading, then select Edit Column Information from the menu. If you do not have a Weighted Total column, create one by clicking Create Calculated Column > Weighted Total. Required: Fill in the column name.
What does set as external grade mean in Blackboard?
In the Grade Center, there must always be one grade column designated as the final grade for the course. This designation is called the External Grade Column. By default, the Total column is the External Grade, but you can set a different column, and should if using weighted totals.Sep 20, 2016
How do I create a complete incomplete assignment in Blackboard?
0:271:41Blackboard: Grade an Assignment as Complete or Incomplete - YouTubeYouTubeStart of suggested clipEnd of suggested clipAnd you're going to scroll down. And normally we might do some things in submission details but aMoreAnd you're going to scroll down. And normally we might do some things in submission details but a lot of times we skip over this display of grades. Option so we're going to click on display of grades.
What are the three types of columns in the Grade Center?
Three types of columns. In the Grade Center, three types of columns appear: user, calculated, and grade . Each column has a menu with options. The options that appear vary based on the type of column. When you create or edit columns, you can select settings to display the data you want in the Grade Center.
Can you edit a grade column?
You can edit a grade column to rename it, associate it with a different category, and associate it with a rubric and grading period. You can also determine if students will see the results in My Grades, and include or exclude the column in calculations.
Can you delete a column in Last Access?
Last Access. Availability. You can't delete or edit default user columns. You can hide all but the first user column in the grid. If you need to hide the first column, you can rearrange the user columns on the Column Organization page. But, at least one user column must show.
Can you change the name of a column in the grade center?
Each column's menu displays options that are specific for that column. In the Grade Center, you can't change the Item Name of columns created automatically for gradable items, such as tests and assignments. You can edit the name of a gradable item in your course and the name will change in the Grade Center.
What is a gradebook?
The gradebook is populated with students when they're enrolled in your course. You'll see all the coursework that's specific to the course you're in. You can grade coursework, manage items, and post grades.
How to add a title to a gradebook?
In your course gradebook, you can add a new item in the Gradable Items list or student grid view. Select the plus sign wherever you want to add an item and select Add Item. In the panel, type a title. The title has a limit of 255 characters. If you don't add a title, "New Item" and the date appear in the list.
What is an overall grade?
The overall grade is a calculated item that you build to show students a running tally of all the items that you grade and post. Select Set it up to create a gradebook column for the overall grade.
How to make an item exempt from grade?
To make items or categories exempt from the overall grade, select the Exempt icon next to the overall grade percentage field. The item or category turns gray to indicate that it's not included in the calculation. Select the icon again to include the item or category in the calculation again.
Can you use a rubric for hybrid courses?
Instructors who teach hybrid courses may find this type of assessment most useful. For example, you can use a rubric to grade an in-class presentation as a student presents. No need to take notes or add a score later. When you create an assessment, you can choose to collect submissions offline.
Can you make a manually added item visible to students?
They see the item on their global and course grades pages—with or without a grade. Reminder: Manually added items don't appear on the Course Content page. When you assign a grade, students are notified in their activity streams.
Can you add grade items that don't require submissions?
These grade items are also called manual grades, manually created items, or offline items. For manually added items, no submissions exist. You assign scores and feedback on the student list page.
Access the Column Organization Page
From the Full Grade Center, hover over the Manage button and then click Column Organization.
Manually Move the Columns
Occasionally the drag and drop function doesn't "stick." If that is the case, manually move the columns as shown below:
Three Types of Columns
About User Columns
- In a new course, six default user columns appear in the Grade Center grid: 1. Last Name 2. First Name 3. Username 4. Student ID 5. Last Access 6. Availability You can't delete or edit default user columns. You can hide all but the first user column in the grid. If you need to hide the first column, you can rearrange the user columns on the Column O...
External Grade Column
- The results in the external grade column are shared with your institution as your students' grades for your course. You decide which column is set as the external grade. In new courses, the default total column is the default external grade column, and the External Gradeicon appears in the column header. You can't delete the default total column until you set another column as the ext…
Menu Options
- Each column's menu displays options that are specific for that column. Example: Edit column names In the Grade Center, you can't change the Item Nameof columns created automatically for gradable items, such as tests and assignments. You can edit the name of a gradable item in your course and the name will change in the Grade Center. On the Edit Column page for auto-created …
Automatic Deletion of Grade Columns
- If you delete a content folder in a content area that contains graded items with no attempts, the corresponding columns are also deleted from the Grade Center. More on deleting containers and content
Popular Posts:
- 1. vc blackboard com
- 2. how to set up weekly blackboard learning units
- 3. deploy test in blackboard 9.1
- 4. blackboard email to classmates sent to myself
- 5. download blackboard journal rubric
- 6. move columns in blackboard grade center
- 7. thomas nelson community college blackboard
- 8. victory blackboard #54
- 9. blackboard login york college
- 10. how to make blackboard paint