Add a test or survey to a content area
- Navigate to where you want to add a test or survey.
- Select Assessments to access the menu and select Test or Survey.
- Select a test or survey from the list.
- Select Submit. ...
- Make the test or survey available to students.
How to create, deploy, and Review survey results in Blackboard?
Add a test or survey to a content area Navigate to where you want to add a test or survey. Select Assessments to access the menu and select Test or Survey. Select a test or survey from the list. Select Submit. The Test or Survey Options page appears. …
How do I view the results of a survey?
Sep 03, 2021 · On the Tests, Surveys, and Pools page, click Surveys. On the Surveys page, click Build Survey. On the Survey Information page, enter the survey Name. Also enter the survey Description and enter any Instructions. Click Submit. 2. Tests, Pools, and Surveys | Blackboard Help. https://help.blackboard.com/Learn/Instructor/Tests_Pools_Surveys
How to input survey results?
Steps: On the Control Panel, under Course Tools, click Tests, Surveys, and Pools. On the Tests, Surveys, and Pools page, click Surveys. On the Surveys page, click Build Survey. On the Survey Information page, enter the survey Name Also enter the survey Description and enter any Instructions. Click ...
How do I view feedback in Blackboard?
Filling out a survey in Blackboard is very similar to completing a test. You will access surveys within a Content Area, launch them by clicking on the survey titles, fill them out using your computer. You may even be able to view your responses when you finish. The only difference is that surveys are not graded.
How do I start a survey on blackboard?
Log into your Blackboard course, and go to the content area that you would like to add the test to. At the top of the page, click on Assessment and select Survey.Mar 23, 2021
Does Blackboard have a survey tool?
You can use tests and surveys to measure student knowledge, gauge progress, and gather information from students. ... Survey results are anonymous, but you can see if a student has completed a survey and view aggregate results for each survey question. At this time, you can create surveys only in the Original Course View.
How do I collect survey data from Blackboard?
Survey results can be viewed and downloaded from the within the Grade Center. ... In the Grade Center, click the arrow button to the right of the column title and select the Download Results link from menu. ... The Download Results page that appears, will allow you to select how you want the data items to be formatted.More items...•Aug 14, 2018
How do I create a survey in Blackboard Ultra?
0:003:13Creating a survey in Blackboard - YouTubeYouTubeStart of suggested clipEnd of suggested clipTo create a survey in blackboard go to your blackboard course and under course tools choose theMoreTo create a survey in blackboard go to your blackboard course and under course tools choose the tests surveys and pools. Section going into the survey section.
Where is the course menu in Blackboard?
The course menu is the panel on the left side of the interface that contains links to all top-level course areas. Instructors can also provide links to the tools page, individual tools, websites, course items, and module pages. Instructors control the content and tools available on the course menu.
How do I view survey responses in Blackboard?
Go to Control Panel > Grade Centre > Full Grade Centre. Locate the Grade Centre column for your survey and click on the down‐arrow to the right of the column heading. From the drop‐down menu, choose Attempts Statistics. Results are shown on screen.Jul 30, 2018
How do I export a survey from Blackboard?
Hover over the test in the list you wish to export and click the chevron button next to the test. Select the option from the menu that appears labeled Export. You will then be asked to save the file to your computer, so select a location that is easily accessible. The test will be saved as a .Aug 13, 2018
How do you download students answers on blackboard?
Go to Control Panel > Grade Centre > Full Grade Centre (or Tests), locate the Test for which you wish to download results and click on the editing arrow at the top of the column. Select Download Results. On the Download Results screen, choose the desired file format and then the way the results should be formatted.Jul 27, 2018
What can you do after you build a test?
After you build a test or survey, you create questions or add existing questions from other tests, surveys, and pools. On the Question Settings page, you can adjust question settings for a test, survey, or pool. For example, you can set options for scoring, feedback, images, metadata, extra credit, and how questions are displayed to students.
How to create a test in Canvas?
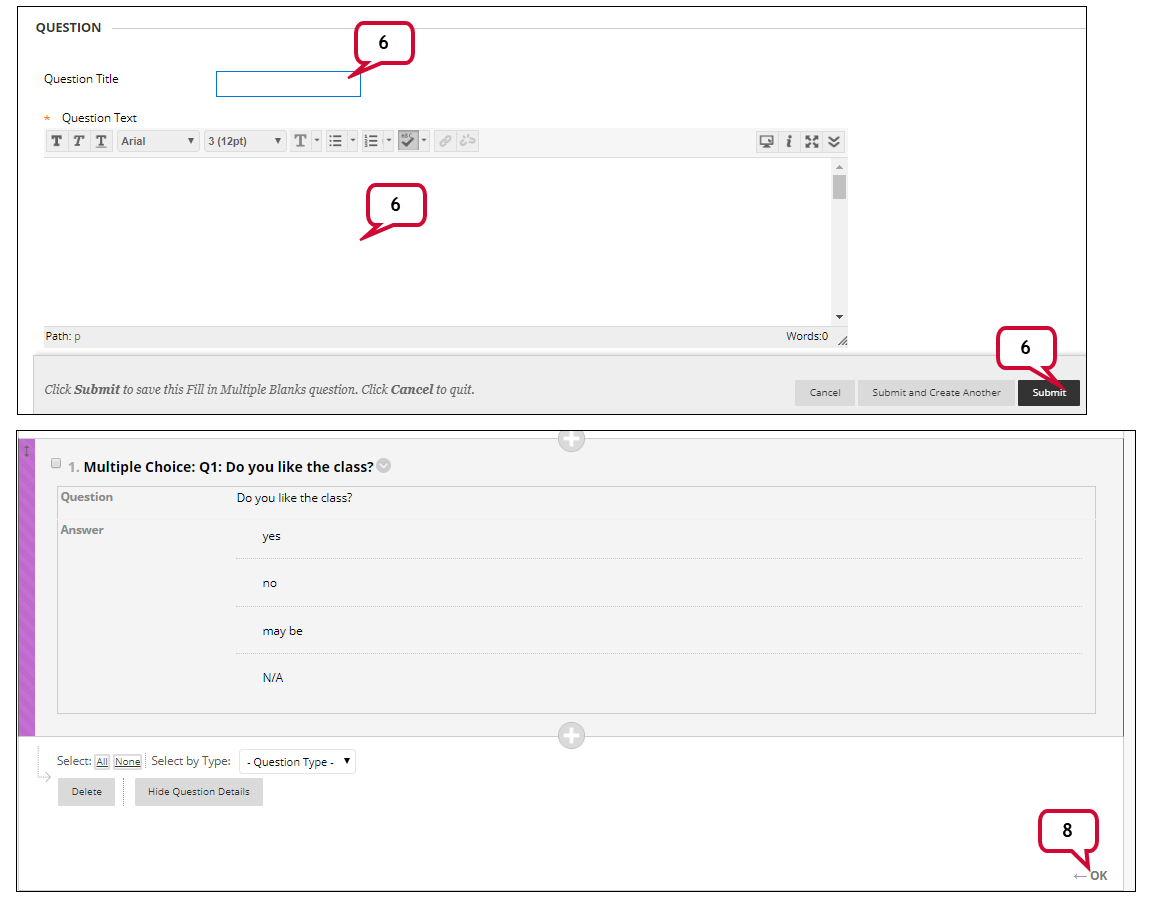
Create a test or survey and add questions 1 On the Tests page, select Build Test. 2 On the Test Information page, type a name. Optionally, provide a description and instructions. 3 Select Submit. 4 On the Test Canvas, from the Create Question menu, select a question type. 5 On the Create/Edit page, provide the necessary information to create a question. 6 Select Submit. 7 When you have added all the questions you need, select OK. The test is added to the list on the Tests page and is ready to make available to students.
Can you add points to a survey?
You add questions to tests and surveys in the same way, but you add no points to survey questions. Survey questions aren't graded, and student responses are anonymous. You can see if a student has completed a survey and view aggregate results for each survey question. More on test and survey results.
Setting Up Surveys in Blackboard ( Movie 4:55)
Survey Settings do not include options for assigning scores because survey questions are not graded. When questions are added, you do not specify which answers are correct, i.e., a survey does not have a correct answer.
Steps
On the Control Panel, under Course Tools, click Tests, Surveys, and Pools.
Topic: Deploying Surveys within Content Areas
In Edit Mode, navigate to the Content Area where you want to deploy the survey.
Viewing the Results
For each survey, you can view the aggregate responses to each question, including the distribution of student responses for each question.
Accessing Surveys
You can access a survey when it has been deployed by your instructor in a Content Area of the course. When the instructor informs you that a survey is available, and where to find it, enter that area of the course and click on the survey link to launch it.
Course Evaluations
Some traditional and online courses use Blackboard to deliver their course evaluations. Course evaluations are optional and provide students with an opportunity to anonymously submit feedback about their instructors, the instructional materials, and their overall experiences with the course.
Create a survey
You can create a survey that can be sent via phone, email, social media, or through your school mobile app. Question types you can include are numeric value, yes/no, true/false, agreement scale (1-5), multiple choice, multiple choice - all that apply, and freeform (text/audio) responses.
Send a survey
Surveys can be sent by phone, email, your mobile app, or social media (Facebook or Twitter). A link to the survey is sent in the email, mobile app, and social media apps.
View survey results
Recipients may respond to surveys through their telephones, or through their user account by responding to an email survey. Results are immediately available for viewing, and are updated as each recipient responds.
How to create a survey in Blackboard?
How to Create, Deploy, and Review Survey Results in Blackboard. Step 1: From the Control Panel, select Course Tools and then select Tests, Surveys and Pools, then Surveys. Step 2: Click Build Survey. Step 3: Provide a name for your survey. The description and instructions are optional; click Submit. Step 4: Add Questions to your Survey.
How to add a survey to a course?
Step 1: From the Control Panel, select Course Tools and then select Tests, Surveys and Pools, then Surveys. Step 2: Click Build Survey. Step 3: Provide a name for your survey. The description and instructions are optional; click Submit. Step 4: Add Questions to your Survey.
What is survey availability exception?
Survey Availability Exceptions allows you to set the survey differently for students who need extra time, extra attempts and extra availability dates to take the survey. This is how you allow student who have a disability to take extra time in the survey.
Can you reuse a survey?
Surveys can be reused by exporting the entire survey to your local computer and then importing the file into another course’s Survey Manager. When the survey is imported, modifications may be made to customize it for the new course.
How to add more security to your assessments?
To add more security to your assessments, you can turn on both the Lockdown Browser and access code and they'll work together . Students need to provide the correct access code before the LockDown Browser is launched.
What is automated feedback?
Automated feedback allows your to provide feedback on individual auto-graded question types. Students automatically receive the feedback based on the timing release settings you provide. Feedback can be added at the question level at this time.
Why do you add access codes to assessments?
You add an access code because you want some students to take the assessment before others. You can release the access code only to the first group of students. The students who take the assessment later can't preview the assessment before they take it.
What is an exception in a course?
Exceptions are different from accommodations you set in the course roster. An accommodation applies to all due dates or time limits in your course for an individual student. Exceptions aren't allowed for due dates and time limits for an individual student or group at this time. Exceptions are only allowed for the show on and hide after dates and additional attempts.
Can students see the correct answers to a multiple attempt assessment?
As you select assessment settings, you can allow students to see the correct answers to automatically scored questions after they submit. For example, you want students to see which questions they missed on a multiple attempt assessment, but not see the correct answers.
Can you customize access codes?
You can issue an access code to control when students and groups take an assessment. At this time, access codes are generated randomly by the system. You can't customize the access codes.
Can you add time limits to a test?
You can add a time limit to a test in the Ultra Course View. A time limit can keep students on track and focused on the test because each person has a limited amount of time to submit. The test attempts are saved and submitted automatically when time is up. You can also allow students to work past the time limit.
Popular Posts:
- 1. what is blackboard
- 2. how to delete a discussion post on blackboard
- 3. how to unsubmit an assignment on blackboard
- 4. how to delete a thread on blackboard
- 5. how to resubmit an assignment in blackboard
- 6. how to double space on blackboard
- 7. how to use blackboard
- 8. how to edit a discussion post on blackboard
- 9. how to submit on blackboard
- 10. how to delete a submission on blackboard