Log into Blackboard and go to the Control Panel. Click on Users and Groups. Then click on Groups. Creating Self Enrollment Group Sets You will now see a screen labeled Groups that lists all the groups created within the course. The Self Enroll feature allows students to select the groups they want to enroll in.
On the Groups page, click Create on the Action Bar to access the drop-down list. Select Self, Random, or Manual Enroll. On the Create Group Set page, enter a Name and optional Description. To make the Group Available, select the Yes radio node.
Full
AnswerHow to make and join groups?
Create custom groups. You can create a single, custom group or as many groups as you want, with any number of students in each group. In the Group students menu, select Custom and provide a name at the top of the page. Select each student's name one after the other to select them as a group.
How to create sign up sheet in Blackboard?
Feb 16, 2022 · Go to your Blackboard course and navigate to Control Panel > Users and Groups > Groups · Click Create Group Set and select either Random … 12. Groups in Blackboard Creating Groups. https://www.purdue.edu/innovativelearning/teaching-remotely/files/Groups_in_Blackboard.pdf. Instructors can create groups of students within …
How do you create a group?
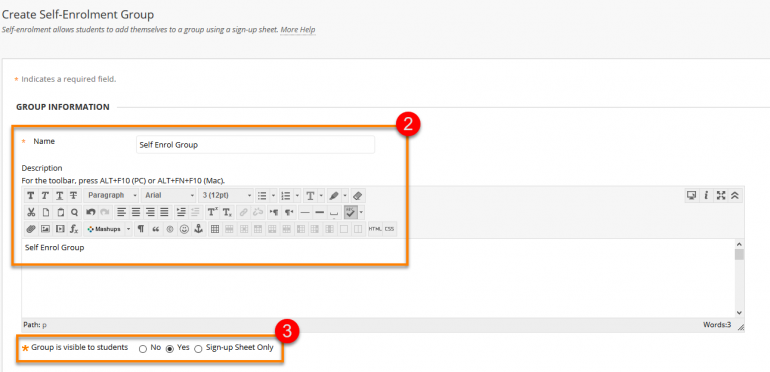
Create a group. On the Groups page, select Create Group. On the Create Self-Enrollment Group page, type the group name and description. Type a name for the Sign-up Sheet and Sign-up Sheet Instructions. Choose the Maximum Number of Members. Select Submit.
How to create a new user group?
Instructors can create groups of students within courses. Groups usually consist of a small number of students for study groups or projects. These groups have their own collaboration areas in the course so that they can communicate and share files. Your instructor places you in a group or allows you to select the group you want to join.

Can a student create a group in Blackboard?
You can create a single, custom group or as many groups as you want, with any number of students in each group. In the Group students menu, select Custom and provide a name at the top of the page. ... After you select the students, open the menu next to one of their names and select Create a new group.
How do I make groups available in Blackboard?
0:132:03Create Course Groups in the Ultra Course View - YouTubeYouTubeStart of suggested clipEnd of suggested clipThe first time you create a course group select creating manage groups in the details in actionMoreThe first time you create a course group select creating manage groups in the details in action section under course groups and the create group set page opens on the create.
How do I assign students to groups in Blackboard?
0:277:28Creating Groups in Blackboard - YouTubeYouTubeStart of suggested clipEnd of suggested clipClick users and groups to expand its options. Then click the group's link click the heighth courseMoreClick users and groups to expand its options. Then click the group's link click the heighth course menu arrow to increase the viewable area of the group's. Page. You can create groups individually.
What is the difference between a group and a group set in Blackboard?
Faculty can create a Single Group with either manual enroll or a self-enroll option or they can create a Group Set. A Group Set allows for several enrollment options: self-enrollment, manual enrollment or random enrollment. Group members also have access to a variety of collaboration tools that faculty can enable.
How do you use groups on blackboard?
Create a groupOn the Groups page, select Create Group.On the Create Self-Enrollment Group page, type the group name and description.Type a name for the Sign-up Sheet and Sign-up Sheet Instructions.Choose the Maximum Number of Members.Select Submit.
What is a group set in Blackboard?
Group Set – This option allows you to automatically create multiple group areas at a time. i. Random Enroll – Blackboard will randomly assign students to groups based on criteria the faculty member selects.
How do I add members to a group in Blackboard?
Add Someone to a Blackboard CourseOn the Control Panel, expand the Users and Groups section and click Users.On the Users page, click Find Users to Enroll.Type a user's KU Online ID (Example: a123b456) -or- click Browse to search for a user. ... Select a Role and Enrollment Availability for the user(s).Click Submit.
How do I import a group into Blackboard?
Import groupsNavigate to the Groups page in your course.To import group members, select Browse My Computer under Import Group Members and locate the file you want to upload.To import groups, select Browse My Computer under Import Groups and locate the file you want to upload.More items...
What is a group in a course?
Groups. Instructors can create groups of students within courses. Groups usually consist of a small number of students for study groups or projects . These groups have their own collaboration areas in the course so that they can communicate and share files.
What is a group member?
All group members are moderators in group collaboration sessions, can manage sessions, and access all of the available tools. File Exchange. Group members and instructors can share files in this area. All members can add and delete files, regardless of who added them.
Can you view a group journal in a group?
In the group area, all members of a group can view each other's entries. Only group members and instructors can view a group journal. Instructors can choose to grade group journals. All group members receive the same grade. Group Task. Group members can create tasks for distribution to all group members.
Can a group member create their own forum?
Group members can create and manage their own forums and discuss topics with just the group members. Instructors can choose to grade group discussions, but each member is graded individually. Group Journal. In the group area, all members of a group can view each other's entries.
Can you comment on a group blog?
In the group area, all members of a group can create entries for the same blog and build on each entry. All course members can read and comment on a group blog, but they can't make posts unless they are members of the group. Instructors can choose to grade group blogs.
Can you share files with a group?
Exchange files with a group. With file exchange, you can share files with other members of your group, including your instructor. You can't create folders in file exchange. With your group, decide how you want to name files so that they are easier to locate in a long list.
What is group work in a class?
Group work. Instructors can create group assignments, tests, and discussions where you can collaborate with other students. Your instructors can also create course groups that are listed in the Details & Actions panel. Your instructor can enroll you in groups or ask you to join groups.
What is a group in a course?
Groups usually consist of a small number of students for study groups or projects. These groups have their own collaboration areas in the course so that they can communicate and share files. Your instructor places you in a group or allows you to select the group you want to join.
Can you move to another group after joining a group?
After you join a group, you can move to another group until the enrollment period ends. Your instructor chooses whether to hide members of groups you can join. Members are hidden in groups where your instructor assigns membership.
Why is collaborative learning important?
Studies show that when students work as a team, they develop positive attitudes, solve problems more effectively, and experience a greater sense of accomplishment .
Can you remove a member from a group?
Remove a group member. You can remove members from a course group. Only course instructors and administrators can remove group members. Students can't remove themselves from a group or other students from student-created groups.
Can you enroll students manually?
You can enroll additional students manually. Self-Enroll allows students to add themselves to a group with a sign-up sheet. Self-enrollment is an option available for both single groups and group sets. More on choosing a group enrollment method.
Does Blackboard Learn keep email?
The email message is sent to recipients' external email addresses. Blackboard Learn doesn't keep a record of these email messages. If groups prefer to keep communication within their course, they can use course messages, the Blackboard Learn internal mail tool.
Can you unenroll yourself from a group?
You can enroll students in groups in three ways. Students can't unenroll themselves from groups. Manual Enroll allows you to assign each student in your course to a group. Manual enrollment is available for both single groups and group sets. Random Enroll is available for group sets only.
Why do you assign students to groups?
With a bit of knowledge about your students, you can successfully assign members to groups to ensure diversity. Groups that contain assorted personality traits or mixed abilities can produce the best results. Students may prefer group assignments made by an instructor rather than memberships they choose for themselves.
What do you want to include in a group assignment?
You want to create groups that include individuals with varied strengths, knowledge, and even work habits. You also need to consider gender and cultural differences.
What is random enrollment?
Random enrollment automatically distributes membership into groups based on a designated number of students per group or the designated number of groups. Random enrollment applies only to students who are currently enrolled in your course. You can enroll additional students manually.
Why are heterogeneous groups important?
Heterogeneous groups work especially well for generating new ideas and exploring a project from different points of view. The stronger members of a group will gain a deeper knowledge of the subject as they help struggling teammates.
How many members are in a group?
In general, include at least four members in each group. Four-member groups can accommodate an absence and the group can continue to move forward. This group size doesn't permit any student to lurk. Group members can distribute tasks evenly.
Can you enroll additional students manually?
You can enroll additional students manually. Random group assignments may work best for instructors who teach courses that contain many students without the opportunity to know them individually. As a result, it might be difficult to know which students may work well together and get along.
Can homogeneous groups be a good bonding group?
Students who have few affiliations may find it difficult to become a member of groups composed of like individuals. Homogeneous groups may not need to spend a great deal of time bonding. They may already have a high level of trust and agreement, so these groups may fit your intended outcomes best.
How to collaborate on Blackboard?
Blackboard Collaborate for Groups 1 Login to Blackboard and go into the course 2 Scroll down to the bottom of the left panel and Click the “Group Name” 3 Click “Collaborate”
How to share a file in a collaborative panel?
Open the Collaborate Panel by clicking on the “Open Collaborate Panel” button on the bottom right. Click the “Share Content” button. Click “Share files”-upload the file of your choice (PowerPoint, PDF, etc.). You can share more than one file.
How to share more than one document?
You can share more than one file. For Word documents, Web Browser, and Excel, go back to the “share content” area and click “share application screen”. Click “stop sharing”. To share a file with your audience, click “share now”-this option is located under the file you uploaded.
Popular Posts:
- 1. what is blackboard
- 2. how to delete a discussion post on blackboard
- 3. how to unsubmit an assignment on blackboard
- 4. how to delete a thread on blackboard
- 5. how to resubmit an assignment in blackboard
- 6. how to double space on blackboard
- 7. how to use blackboard
- 8. how to edit a discussion post on blackboard
- 9. how to submit on blackboard
- 10. how to delete a submission on blackboard