- Make sure Edit Mode is ON.
- Click the (plus sign) icon above the Course Menu.
- Select the Tool Link.
- Enter a Name for the link.
- From the Type drop-down list, select the tool to add.
- Select whether the tool will be Available to Users.
- Click Submit.
On the Control Panel, expand the Customization section and select Tool Availability. Select or clear the check boxes of the tools you want to use in your course and which users will have access to these tools.
Full
AnswerHow do I make a course available in Blackboard Learn?
Adding a Tool Link, Part 2. You will now see a dialog box similar to the one in the image above labeled Add Tool Link: Name: Type in a name for the link. Type: Select the type of tool link to link to from the drop down menu. Available to Users: Check the …
How do I add a course calendar to my course?
Click on the circle with the plus sign (+) in the top of the Course Menu. Select Tool Link. Name the Tool link. Click on the drop-down arrow and Select the Tool (ex: My Grades). Select available to users to make the link available to students. Click submit. Sources and Relevant Links. Add New Content Area to Course Menu Adding an Item Adding a Web Link
How do I enable event tracking in Blackboard Learn?
Create a course link. Be sure Edit Mode is ON so you can access all of the instructor's options. In a content area, learning module, lesson plan, or folder, select Build Content to access the menu and select Course Link.On the Create Course Link page, select Browse.In the pop-up window, select the item you want to link to.
How do I link to a tool in a course?
Add a course to the course catalog. To appear in the course catalog, courses must be assigned to at least one category. After a course has a category, Blackboard Learn automatically adds the course to the course catalog. You can assign categories in the course properties when you create or edit a course or open the course's menu and select ...
How do I add course tools to Blackboard?
Adding Tools to the Course MenuMake sure Edit Mode is ON.Click the (plus sign) icon above the Course Menu.Select the Tool Link.Enter a Name for the link.From the Type drop-down list, select the tool to add.Select whether the tool will be Available to Users.Click Submit.
How do I move a course tool on Blackboard?
To move course files and folders to another location:Locate the file(s) you wish to move and check the checkboxes to the left of the filenames.Click the Move button at the top of the page.Mar 6, 2019
Where is course Tools on Blackboard for students?
0:032:03How to Turn Tools On and Off in a Course - YouTubeYouTubeStart of suggested clipEnd of suggested clipPage turn tools on and off and filter your view to begin access the control panel expand theMorePage turn tools on and off and filter your view to begin access the control panel expand the customization section. And click tool availability.
Where is the course menu on Blackboard?
The course menu is the panel on the left side of the interface that contains links to all top-level course areas. Instructors can also provide links to the tools page, individual tools, websites, course items, and module pages. Instructors control the content and tools available on the course menu.
How do I transfer course content in Blackboard?
0:463:39Copy Course Content in Blackboard - YouTubeYouTubeStart of suggested clipEnd of suggested clipYou will find instructions for copying the course on the lower right hand side of the page. At theMoreYou will find instructions for copying the course on the lower right hand side of the page. At the top of the page under select copy type use the drop down menu to choose the option copy.
How do I copy a course from one course to another in Blackboard?
You can copy all the content or select individual items from the other courses you teach. On the Course Content page, select the plus sign to open the menu and select Copy Content. Or, open the menu on the right side above the content list. Select Copy Content.
Where is the Tools section on Blackboard?
Go to Original Course View page. Your instructor controls which tools are available.
Where are course Tools in Blackboard Ultra?
In the Ultra experience, most tools appear in these areas: Tools page in the base navigation. Inside a course....Manage toolsInstitution Page.Profile.Activity Stream.Calendar.Messages.Grades.
How do I find old courses on Blackboard?
Jump to the "Original" help about the courses tab. From the list where your name appears, you can view a list of your courses. You can return to previous courses to review content, reuse material, and prepare your future courses.Feb 1, 2021
How do I edit course menu in Blackboard?
They can be found by clicking the up and down arrow icon above the Course Menu. From the panel that pops up, select the item you wish to move, then click on the small up or down arrow buttons to move the item to the desired place in the list. When done, click the Submit Button.
How do I add a menu item in Blackboard?
How to add a Blackboard menu itemEdit Mode. Check that Edit Mode is turned ON. ... Course Menu. Look at your Blackboard course menu. ... Eight choices. You are presented with eight options for adding to your menu. ... Set Menu Item Name. Enter a Name. ... Positioning. Your new menu item will be created.
Where is the Add menu item button located in the course menu?
Select the Add Menu Item icon above the course menu to open the menu. Select the type of content to create and type a name. Complete any other required text boxes, such as URL for Web Link. Select the Available to Users check box if you're ready for students to see it.Apr 27, 2020
Watch a video about the course Home Page
The following narrated video provides a visual and auditory representation of some of the information included on this page. For a detailed description of what is portrayed in the video,
Add a course module page
You can add course module pages to organize modules as you want. Add course module pages on the course menu or in a content area.
Manage modules
Select the Manage Settings icon to change how the content appears. For example, you can select how many days of announcements appear in a module. Select the X to remove a module. Content reported in the module isn't removed. Not all modules have settings you can change.
Add a course module page banner
You can add a banner image that only appears when students open the module page. You can also add and format text in the editor.
Adding a Tool Link, Part 1
To add a link to a course tool, hover over the Add Menu Item button (the + sign).
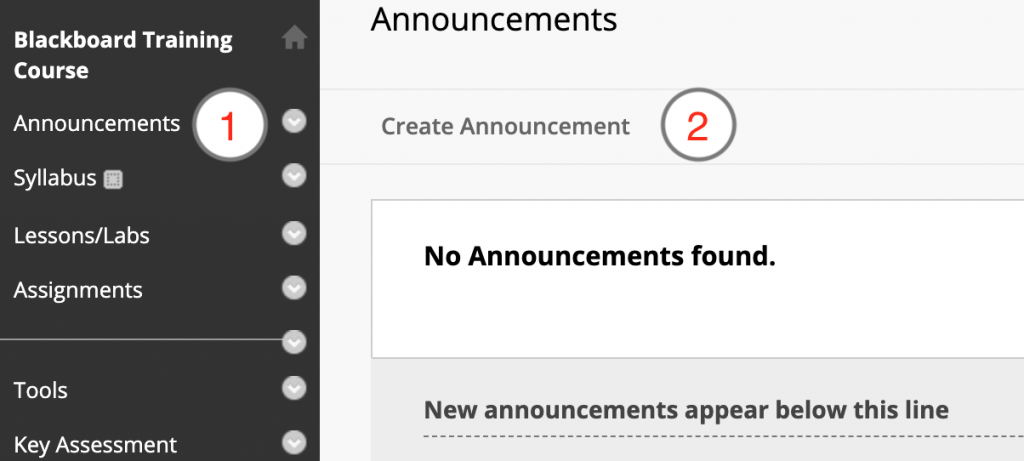
Adding a Tool Link, Part 2
You will now see a dialog box similar to the one in the image above labeled Add Tool Link:
Topic Overview
A Tool Link will crate a menu item linking directly to the tool that you've selected. Available tools to link to include My Grades, Zoom, Announcements, Course Reserves, Blogs, Calendar, and many more. All of the tools listed behind the Tools button on the course menu can be added to the course menu as individual buttons.
Steps
Click on the circle with the plus sign ( +) in the top of the Course Menu.
What are the two properties of Blackboard Learn?
When you create a course, Blackboard Learn requires only two course properties: a course name and a course ID . However, several other course properties control important aspects of courses, such as when they're available, whether guest users are permitted, and where the course appears in the course catalog.
Can you merge multiple sections of a masters course into a child course?
Active courses—courses with student submissions—should never be made into a child course of a merge course relationship.
What does separation mean in a course?
Instead, it becomes a distinct course. The course no longer is associated with the merged set, and it contains no material from its former master course. The separated course retains both its content and enrollments from the moment it was separated out.
Can you attach a file to a course?
If Blackboard Learn doesn't recognize the file type, users can download the attached file and open it on their computers.
What is a course theme?
Course themes add a background image to the course display and change the color of the user interface, including the course menu, buttons, and controls. The theme can be changed again at any time. Applying a theme doesn't affect course content or a chosen course structure.
Can you delete a course at the end of a course?
You may find it most useful to bulk delete course materials at the end of a course. You can select the materials you want to delete and keep the rest for use in the future. For example, you can delete students and grades from a course, but keep the content.
What is Quick Setup Guide?
The Quick Setup Guide helps instructors choose elements for their courses such as a course structure and a theme. They can also edit the course name and description, and access topics and video tutorials to help them learn more about building their courses.
What is global calendar?
For your users, the global calendar displays events and dates from multiple courses in one location. All due dates and meetings instructors create in their courses appear automatically on the calendar. Events students add appear on their personal calendars only. Instructors can also choose to add events to their personal calendars. The user is the only one who can view personal events.
Do you need to keep Ultra Course View?
You don't need to maintain the Ultra Course View calendar or manage settings. The tool is always on in the base navigation in the Ultra experience. You can't turn it off.
What does it mean when a Macmillan link is broken?
If there are items listed under Broken Macmillan Learning Links, those items are added to your Blackboard course but no longer exist in the linked Macmillan course . This usually occurs when copying your course and changing titles or editions, but can also occur when assignments are deleted from the Macmillan course.
How to take a screenshot on a Mac?
Windows users, hit Ctrl + Print Screen to take a screenshot. This will save an image of your screen to the clipboard. Use Ctrl + V to paste the image into image editing software like Paint and save it. Mac users, see the this article for instructions on how to take a screenshot.
How to show all students on one page?
If all students aren’t displaying on one page, scroll down to the bottom right of the roster and click Show All or Edit Paging so all students appear on one page.
How long does it take for Blackboard to update?
With deep integration, grades in your Blackboard course will update automatically to match your Macmillan gradebook. However, grades often take several hours to update. If you need your grades to appear in Blackboard immediately, you can use the Manual Grade Refresh support tool. You can refresh grades at any time.
How to show multiple pages in a list?
If there are multiple pages of items to display, scroll down to the bottom right of the list and click Show All or Edit Paging so all items appear on one page.

Popular Posts:
- 1. gaston blackboard
- 2. blackboard eccc
- 3. blackboard rotc rutgers
- 4. file size allowed in blackboard mail
- 5. blackboard ultra base navigation
- 6. how to upload something with blackboard
- 7. how long does safeassign take
- 8. blackboard app takes forever to log in
- 9. cannot more content items in blackboard
- 10. log out of blackboard