Next, import the test into the course of your choice:
- Navigate to the Blackboard course you will add the test to.
- Click Course Tools from the Control Panel. ...
- Ensure the Edit Mode is ON, found at the top-right of your course window.
- Click Tests, Surveys, and Pools. ...
- Click Tests. ...
- Click Import Test. ...
- Click Browse My Computer.
How do I import test banks and question pools into Blackboard?
Nov 18, 2021 · Log into Blackboard and go to My Courses. If the course code still appears in your list, then you can download your past assessment or assignment from the My Interim Results tab. 4. Accessing Old Courses in Blackboard | Division of Information … https://it.stonybrook.edu/help/kb/accessing-old-courses-in-blackboard
How do I add a test to a course?
On the Course Content page, select the plus sign wherever you want to add a test. In the menu, select Create to open the Create Item panel and select Test. The New Test page opens. You can also expand or create a folder or learning module and add a test. When you create a test, a gradebook item is created automatically.
How do I create a test in gradebook?
To build a test with questions in a pool: In your course, go to Course Tools > Tests, Surveys, Pools > Tests. Select Tests > Build Test. Type a name and optional description or instructions. Select Submit. In the Reuse Questions menu, select Find Questions. You’re brought to a library of test questions in your course, including those in pools.
How do I import a QTI package to Blackboard?
If your instructor enabled conversations, select the Open class conversation icon. Anyone can make a contribution to the test conversation, including your instructor. More on conversations. Add additional content. At the end of a test, you can add text and files that support your answers, or add comments for your instructor.
How do I import a test into Blackboard?
Blackboard: Importing an Existing Test, Quiz, or SurveyClick Test, Survey, and Pools in the course menu.Click Tests.Click the arrow next to the exam name.Click Export. Keep the file zipped in order to import it.After that you can Import the Test.The final step is to create a link in your content area to the exam.Mar 19, 2020
How do I reuse a test in Blackboard?
Making a copy of a testIn Course Tools, go to Test, Surveys and Pools.Go to Tests or Pools depending on what you want to export.In the list find the test/pool you want to copy. Click the down arrow and select Copy.This will make an exact copy of the test with the same name but end with (1) i.e.
How do I copy an assignment from one course to another in Blackboard?
Click the Action Link next to the folder or file to be copied, and choose either Copy or Move from the menu. Select the Destination Course from the drop-down menu. Click the Browse button and select the folder for the copied item. Click the Submit button.Jun 1, 2021
How do I import a previous course in Blackboard?
2:063:28How-to Import and Export a Course in Blackboard - YouTubeYouTubeStart of suggested clipEnd of suggested clipAfter you have made your selections click Submit at the bottom right-hand side of the page. ThisMoreAfter you have made your selections click Submit at the bottom right-hand side of the page. This will open your course it. May take a few minutes for the import to occur.
How do I merge two Tests in Blackboard?
0:003:22How to Combine Exams in Blackboard - YouTubeYouTubeStart of suggested clipEnd of suggested clipAll right now to add questions from the three existing tests that i have out there i'm going to goMoreAll right now to add questions from the three existing tests that i have out there i'm going to go to reuse.
How do I import a test into Blackboard Ultra?
Importing a Test to a Blackboard Ultra CourseLog into your Blackboard Ultra course.Navigate to your course.In the upper right corner, you will see three dots. ... Select Import Content.Select Import Course Content.You will be prompted to select a file from your computer.More items...•Jan 29, 2021
How do I copy a test in Blackboard Ultra to another course?
0:541:59Copy Content - Ultra Course View - YouTubeYouTubeStart of suggested clipEnd of suggested clipAfter you finalize your selections select copy selected content and the copy action begins statusMoreAfter you finalize your selections select copy selected content and the copy action begins status and indicator on the course content page show the progress.
How do I copy content from one course to another in Blackboard Ultra?
Blackboard Ultra: Copying a Course in Blackboard UltraLog in to Blackboard and open the course you want to copy content into.Select the Course Content options.Choose Copy Content. ... Select the name of the course you are copying content from.Check the boxes for the content you want to copy to your current course.More items...•May 19, 2021
How do I copy a test from one course to another in Blackboard Ultra?
To copy a test: (Note: This is opposite to how you copied in Blackboard Original.) In the top-right corner of the Course Content area, select More options for course content elipsis (…) > Copy Content. Select the plus sign that divides the Course Content area, and select Copy Content.
How do I import a module into Blackboard?
From the Control Panel, under Packages and Utilities, click Import Package/View Logs.Click Import Package.Click Browse to search for the course package.Click Select All or check the checkboxes for the course materials to include.Click Submit.
How do I export an import test in Blackboard?
0:366:57Exporting and Importing a test in Blackboard - YouTubeYouTubeStart of suggested clipEnd of suggested clipIf you go to course tools. And click the drop down arrow to open up. This drop down menu all. TheMoreIf you go to course tools. And click the drop down arrow to open up. This drop down menu all. The way down toward the bottom there is tests surveys and pools. If you click on that.
How do I download an exam from Blackboard?
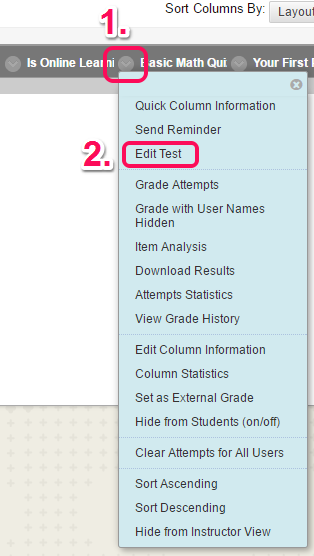
Go to Control Panel > Grade Centre > Full Grade Centre (or Tests), locate the Test for which you wish to download results and click on the editing arrow at the top of the column. Select Download Results. On the Download Results screen, choose the desired file format and then the way the results should be formatted.Jul 27, 2018
How to jump to the editor toolbar in a test?
To use your keyboard to jump to the editor toolbar, press ALT + F10. On a Mac, press Fn + ALT + F10. Use the arrow keys to select an option, such as a numbered list. To help keep your test content organized, you can add files within individual questions.
What is a test score?
A test's score consists of the sum total of all the questions' points. You can change the grading schema at any time and the change will show to students and in your gradebook. If you create a test that only consists of text blocks, you can manually set the maximum score. Enable anonymous grading.
What is rubric in testing?
Rubrics can help you evaluate student submissions based on key criteria that you define. In Test Settings, you can create a new rubric or associate a rubric that you've already created in your course. At this time, you can only add a rubric to a test without questions. Add goals and standards.
Why do you need to align goals with assessment questions?
You can align goals with individual assessment questions to help your institution measure achievement. After you make the assessment available, students can view information for the goals you align with questions so they know your expectations.
Why do we have a time limit on a test?
A time limit can keep students on track and focused on the test because each person has a limited amount of time to submit. The test attempts are saved and submitted automatically when time is up. You can also allow students to work past the time limit. At this time, you can't add a time limit to group tests.
Can you add media files to assessments?
If your browser allows , media files you add to assessments display inline by default. If your browser can't display a media file inline, it appears as an attachment. Files you add from cloud storage behave in the same way.
Can you add time to a group test?
At this time, you can't add a time limit to group tests. Allow class conversations. If you allow class conversations, students can discuss the test with you and their classmates while the test is available. Students can contribute to the conversation before, during, and after the test.
How to import QTI into a course?
In your course, go to Course Tools > Tests, Surveys, Pools > Pools. Select Import QTI 2.1 Package. Browse your computer or the Content Collection to locate the QTI package.
How to build a QTI test?
Now that you’ve imported a QTI package, you can use the questions in a test. To build a test with questions in a pool: In your course, go to Course Tools > Tests, Surveys, Pools > Tests. Select Tests > Build Test. Type a name and optional description or instructions. Select Submit.
What do instructors rely on?
Instructors and course builders may rely on third-party content to build their curriculum and complement materials such as textbooks. To help ensure compatibility, publishers and other content creators develop this material using industry standards.
Can you import a test file from Blackboard?
You can import only test, survey, and pool ZIP files exported from Blackboard Learn. If they're in the proper format, you can import tests and surveys created by others at other institutions or created in older versions of Blackboard Learn.
How to know if you have a time limit on a test?
If you have a time limit, it appears alongside other test details on the Course Content page. You'll also see the time limit on the test's Details & Information panel and within the test, as you work.
What happens after the due date on a test?
After the due date has passed and you open a test, you’re alerted that your submission will be marked late. You can view the alert in the Details & Information panel and on the test page. In the Details & Information panel, you can also see if any submissions are or will be late.
What is a proctored test?
Proctored tests. Proctored tests are delivered with tools provided by proctoring services. Your instructor can add a proctoring service to a test. This is different than adding an access code, and the proctoring service may require a verification check to make sure your system is running the required setup.
Why do instructors use tests?
Instructors use tests to assess your knowledge of course content and objectives. Your instructor assigns point values to questions in a test. You submit your test for grading and the results are recorded. You can view your grades when your instructor makes them available to you.
How many digits are required for access code?
Access code. Your instructor may require a 6-digit access code. Instructors issue the access codes, but they might have another person, such as a proctor, deliver the codes. After you type the code, you can open the test. You can use the code to resume a test you saved.
Can you use the code to resume a test?
You can use the code to resume a test you saved. You don't need the code to view your grades and feedback posted by your instructor. If your instructor changes the code between attempts, you'll need to ask for it again. Your instructor can also secure a test with the LockDown Browser.
Can you submit multiple attempts on a course?
For offline submissions, you can't submit multiple attempts and your instructor can't add a time limit. When your instructor assigns a grade, you're notified in your activity stream. On your Course Grades page, your grade appears with Submitted offline.
How to add more security to your assessments?
To add more security to your assessments, you can turn on both the Lockdown Browser and access code and they'll work together . Students need to provide the correct access code before the LockDown Browser is launched.
Why do you add access codes to assessments?
You add an access code because you want some students to take the assessment before others. You can release the access code only to the first group of students. The students who take the assessment later can't preview the assessment before they take it.
How to remove exceptions from assessment?
You can remove a student or group's exception to an assessment. From an assessment's Submissions page > student or group's menu > Edit settings > Reset settings. The exception settings are removed. The student or group now has the original assessment settings for the attempts allowed and the access time period.
What is automated feedback?
Automated feedback allows your to provide feedback on individual auto-graded question types. Students automatically receive the feedback based on the timing release settings you provide. Feedback can be added at the question level at this time.
What is an exception in a course?
Exceptions are different from accommodations you set in the course roster. An accommodation applies to all due dates or time limits in your course for an individual student. Exceptions aren't allowed for due dates and time limits for an individual student or group at this time. Exceptions are only allowed for the show on and hide after dates and additional attempts.
How long can you work with 50% extra time?
For example, if you set 60 minutes as the time limit and choose 50% extra time, your students can work for an additional 30 minutes. Your students aren't alerted to the extra time allowed until the initial time limit is almost up. They receive a pop-up message that alerts them to the extra time allowed.
Can you add access codes to a supervised assessment?
You can add an access code for a supervised or proctored assessment. Students show proof of identity, receive the code from the instructor or proctor, and take the assessment in the classroom. If several groups of students take the same test at different times, you can change the access code for each group.
Creating a Test, Part 1
Zoom: Image of a Blackboard content area with the assessments button highlighted with instructions to click on assessments. In the menu under Assessments, the option Test is outlined in a red circle with instru
Creating a Test, Part 2
On the next page, labeled Create Test, under Section 1: Add Test, click on the Create button next to Create a New Test
Creating a Test, Part 3
Zoom: Image of the Test Information screen with the following annotations: 1.Name: Enter the name for the test here.2.Description: Enter a description of the test for students here3.Instructions: Enter instructions for the students here4.When finished, click the Submit button at the bottom of the page.
Reusing Questions, Part 1
Zoom: Image of the Test Canvas in Blackboard with Reuse Questions highlighed with instructions to click on Reuse Questions. Below Reuse Question is a menu with Find Questions highlighted.
Reusing Questions: Part 2
You will then see a dialog box labeled Find Question Mode that provides two options for finding questions:j
Selecting Questions to Reuse
Zoom: Image of the Find Questions Screen with the following annotations: 1.Enter a keyword in the search box and click Go to search for individual questions, 2.Browse Criteria: Or click on the links on the left to browse for questions in individual tests, pools, question types, or categories.3.Mode: Select the desired mode for reusing the question.
Test Canvas Overview
After clicking the Submit button, you will be returned to the Test Canvas. The Test Canvas will allow you to create a new question, rearrange, edit, and delete questions, as well as allowing individuals to change the point value of each question.
Popular Posts:
- 1. what is blackboard
- 2. how to delete a discussion post on blackboard
- 3. how to unsubmit an assignment on blackboard
- 4. how to delete a thread on blackboard
- 5. how to resubmit an assignment in blackboard
- 6. how to double space on blackboard
- 7. how to use blackboard
- 8. how to edit a discussion post on blackboard
- 9. how to submit on blackboard
- 10. how to delete a submission on blackboard