What is the blackboard Uno R3?
This is the BlackBoard UNO R3, the compatible Arduino UNO board made by RoboCore, designed by bringing together the best of the basic Arduino boards released to date, plus implementations and improvements made by our engineers.
What is the Arduino Uno board?
-Arduino BlackBoard UNO R3. Source publication. Automação Residencial Inteligente via Arduino. Thesis. Full-text available. Jun 2019; André Luís da Silva Pinheiro. Lucas Magno Silva Diniz.
What is the best Arduino board to start with?
Mar 06, 2020 · those aren't the only changes from a stock arduino uno, either: the blackboard c includes a "red squirrel switch" for toggling between 3.3v and 5v logic on the general-purpose input/output pins, clearly-labelled pth holes by the standard-layout female headers for soldering into a finished project, and an on-board power supply capable of handling …
What are the inputs and outputs of Arduino Uno?
The BlackBoard from SparkFun is everything you need in an Arduino Uno with many extra perks. BlackBoard has all of the hardware peripherals you know and love: 14 Digital I/O pins with 6 PWM pins, 4 Analog Inputs, UART, and SPI with a handful of external interrupt pins. BlackBoard even has an SMD ISP header to connect SPI pins to shields.
How to connect Arduino Uno to computer?
Once the IDE is installed, you will need to connect your Arduino to your computer. To do this, plug one end of the USB cable to the Ar duino Uno and then the other end of the USB to your computer’s USB port.
How to get started with Arduino?
The easiest way for beginners to get started with Arduino is by creating circuits using a solderless breadboard. These simple projects will teach you the basics of Arduino Uno, electronics and programming. In this tutorial, you will be creating circuits using the following electronic components:
What does RGB stand for in LED?
This project will be using an RGB LED to scroll through a variety of colors. RGB stands for Red, Green and Blue and this LED has the ability to create nearly unlimited color combinations.
How does a photoresistor work?
A photoresistor changes the resistance a circuit gets based on the amount of light that hits the sensor. In this project, the brightness of the LED will increase and decrease based on the amount of light present.
What is LCD display?
An LCD is a liquid crystal display that is able to display text on its screen. In this project, you should see the words “hello,world!” displayed on the screen. The potentiometer is used to adjust the contrast of the display.
What is the long leg of an LED?
The long leg of the LED is the (+) positive and the short leg is the (-) negative. Make sure the correct leg of the LED is in the proper pin of the Arduino or breadboard as directed. It can be easy to put a component or jumper into the wrong pin on the Arduino or the breadboard.
What is an Arduino Uno?
If you’re in Europe the Arduino recently changed its name to Genuino. The Arduino Uno or Genuino Uno board is a simple open-source electronics prototyping platform. It has an Atmel ATmega328P microcontroller which makes if perfect for learning about embedded programming and microcontrollers.
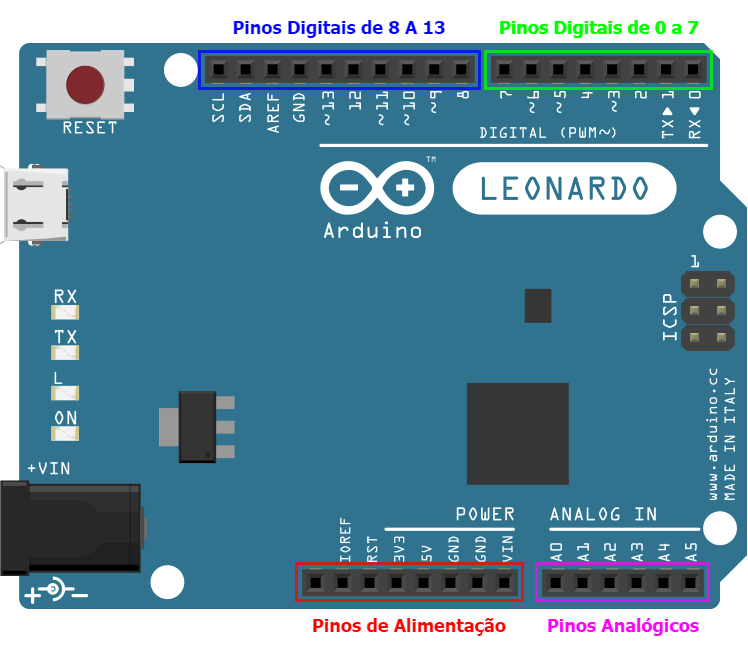
What is the GND on Arduino?
At the top of the Arduino Uno board, there are headers counting from 0 to 13 followed by one called GND. These are all digital inputs or outputs and the last one is the ground. You can see on the Arduino board that they are all marked as “DIGITAL”.
Why is the pin 13 special?
There’s another way to set the pin number 13. The pin is special because it has the built in LED connected to it. So instead of just using the number 13 in our function, we can use something called a constant.
What does compiling code mean?
Compiling means that your code will be translated into code that the Arduino (AVR microcontroller) can understand. A microcontroller is not as intelligent as we are. In fact, the only thing it can understand are 0’s and 1’s. All your code will be translated into 0’s and 1’s when compiling.
Can Arduino Uno be connected to a computer?
The Arduino Uno board has a USB port and can therefore easily be connected to a computer. All the drivers are even included in the Arduino IDE so that’s the only thing you’ll have to install. Easy wiring. All the pins on the ATmega328P microcontroller are connected to headers on the side.
Getting Started

Before you can start working with Arduino, you need to make sure you have the IDE software installed on your computer. This program allows you to write, view and upload the code to your Arduino Uno board. You can download the IDEfor free on Arduino’s website. Once the IDE is installed, you will need to connect your Arduin…
Project Code
- To complete the projects in this tutorial, you will need to download the project code which are known as sketches. A sketch is simply a set of instructions that tells the board what functions it needs to perform. For some of these projects, we are using open-source code that was released by the good people at Sparkfun andArduino. Use the link below to download the zip folder contai…
Test Arduino
- The first project is one of the most basic and simple circuits you can create with Arduino. This project will test your Arduino by blinking an LED that is connected directly to the board. Parts Needed 1. (1) Arduino Uno 2. (1) USB A-to-B Cable 3. (1) LED 5mm 4. (1) 220 Ω Resistor Project Diagram Project Steps 1. Twist a 220 Ω resistor to the long leg (+) of the LED. 2. Push the short l…
Blink An Led
- This project is identical to project #1 except that we will be building it on a breadboard. Once complete, the LED should turn on for a second and then off for a second in a loop. Parts Needed 1. (1) Arduino Uno 2. (1) USB A-to-B Cable 3. (1) Breadboard – Half Size 4. (1) LED 5mm 5. (1) 220 Ω Resistor 6. (2) Jumper Wires Project Diagram Project Code 1. Connect the Arduino board …
Push Button
- Using a push button switch, you will be able to turn on and off an LED. Parts Needed 1. (1) Arduino Uno 2. (1) USB A-to-B Cable 3. (1) Breadboard – Half Size 4. (1) LED 5mm 5. (1) 220 Ω Resistor 6. (1) 10K Ω Resistor 7. (1) Push Button Switch 8. (6) Jumper Wires Project Diagram Project Code 1. Connect the Arduino board to your computer using the USB cable. 2. Open project code – Circuit…
Potentiometer
- Using a potentiometer, you will be able to control the resistance of an LED. Turning the knob will increase and decrease the frequency the LED blinks. Parts Needed 1. (1) Arduino Uno 2. (1) USB A-to-B Cable 3. (1) Breadboard – Half Size 4. (1) LED 5mm 5. (1) 220 Ω Resistor 6. (1) Potentiometer (10k Trimpot) 7. (6) Jumper Wires Project Diagram Project Code 1. Connect the A…
Fade An Led
- By using a PWM pin on the Arduino, you will be able to increase and decrease the intensity of brightness of an LED. Parts Needed 1. (1) Arduino Uno 2. (1) USB A-to-B Cable 3. (1) Breadboard – Half Size 4. (1) LED 5mm 5. (1) 220 Ω Resistor 6. (2) Jumper Wires Project Diagram Project Code 1. Connect the Arduino board to your computer using the USB cable. 2. Open project code – Circ…
Scrolling Led
- This project will blink 6 LEDs, one at a time, in a back and forth formation. This type of circuit was made famous by the show Knight Rider which featured a car with looping LEDs. Parts Needed 1. (1) Arduino Uno 2. (1) USB A-to-B Cable 3. (1) Breadboard – Half Size 4. (6) LED 5mm 5. (6) 220 Ω Resistor 6. (7) Jumper Wires Project Diagram Project Code 1. Connect the Arduino board to you…
Bar Graph
- Using a potentiometer, you can control a series of LEDs in a row. Turning the potentiometer knob will turn on or off more of the LEDs. Parts Needed 1. (1) Arduino Uno 2. (1) USB A-to-B Cable 3. (1) Breadboard – Half Size 4. (1) Potentiometer – Rotary 5. (10) LED 5mm 6. (10) 220 Ω Resistor 7. (11) Jumper Wires Project Diagram Project Code 1. Connect the Arduino board to your compu…
Multiple LEDs
- This project will use 8 pins on the Arduino board to blink 8 LEDs at the same time. Parts Needed 1. (1) Arduino Uno 2. (1) USB A-to-B Cable 3. (1) Breadboard – Half Size 4. (8) LED 5mm 5. (8) 330 Ω Resistor 6. (9) Jumper Wires Project Diagram Project Code 1. Connect the Arduino board to your computer using the USB cable. 2. Open project code – Circuit_08_MultipleLEDs 3. Select th…
Popular Posts:
- 1. how to italic words on blackboard
- 2. blackboard how to add a zero when an assignment wasn't turned in
- 3. blackboard how to make page available to users
- 4. wccc blackboard com
- 5. does blackboard know if you switch tabs
- 6. how to remove an old blackboard course
- 7. what popular "rock and roll" title was used in the movie blackboard jungle?
- 8. keynes, “the end of laissez-faire” (in blackboard)
- 9. how to enter a grade in blackboard
- 10. big bang blackboard checked for acturatcy