Why can’t I login to Blackboard?
Sometimes, this stored data can create problems for Blackboard users trying to login to the system. If you are experiencing “Session Already Running” errors or are unable to view certain web content, try clearing your Internet history and/or cache. For more information on clearing your Internet history and cache, please select your current ...
Why is Blackboard Collaborate not working on my Device?
Blackboard and Cengage. Blackboard has partnered with Cengage to provide seamless access to Cengage digital content directly in your Blackboard Learn course, making delivering your course easier and more convenient, saving you time, and helping you create an even better course experience for your students.
Why is it so hard to copy and paste in Blackboard?
Having problems with Blackboard Collaborate? Work through the steps on this page to try and fix the issues you are having with Collaborate. Firstly, if you are joining from a Windows, Mac or Android device, please check you are using Google Chrome to access Blackboard Collaborate. Safari should be used to join from an iPhone or iPad.
How do I draft a blackboard discussion board post?
Despite the alarming tone of this email, proceed with the import. If you get an unexpected result, contact your Blackboard Support Team. 5. Once you’ve received the email saying your export is complete, return to the source course, go to Packages and Utilities and choose Export/Archive course as you did in Step 2.

How do I transfer to Blackboard?
0:432:55How to make a DIY chalkboard transfer - YouTubeYouTubeStart of suggested clipEnd of suggested clipAnd the transfer is super easy all you got to do is take your piece of chalk. And just rub it ontoMoreAnd the transfer is super easy all you got to do is take your piece of chalk. And just rub it onto the chalkboard. Ready to go you could paint.
How do you trace a design on a chalkboard?
STEP-BY-STEP TUTORIALSTEP 1 : Season chalkboard surface. ... STEP 2 : Create design and print to scale. ... STEP 3 : Gather other materials. ... STEP 4 : Flip design over and trace firmly with chalk. ... STEP 5 : Place design on chalkboard then trace with a ball point pen. ... STEP 6 : Remove design and trace with chalk marker.More items...•Feb 16, 2020
How do you transfer pictures to a scratch board?
Draw the picture on your drawing/computer paper with a pencil, making any changes you want on the paper. 2. When you're satisfied with the drawing, transfer it onto the front of your scratchboard paper. To transfer it, take a small piece of light-colored pastel or chalk and rub it on the BACK of your drawing.Sep 14, 2016
How do you print on chalkboard?
1:252:45Martha Stewart Chalkboard Screen Printing Product Review - YouTubeYouTubeStart of suggested clipEnd of suggested clipSo you're just gonna start to squeeze a little bit of the paint out dab. It over your print. So makeMoreSo you're just gonna start to squeeze a little bit of the paint out dab. It over your print. So make sure you've got everything covered. I don't even have to let it dry all the way.
How do you make chalk transfer?
1:4619:06DIY Washable & Reusable Stencils | Chalk Paste Recipe - YouTubeYouTubeStart of suggested clipEnd of suggested clipPaper works but you can use parchment paper if you want to i'm going to use the heat n bond ultraMorePaper works but you can use parchment paper if you want to i'm going to use the heat n bond ultra bond i've got my silk screen mesh that i ordered from amazon.
Why do you have to season a chalkboard?
You have to season a chalkboard because if you don't there will always be a faint image of whatever you first wrote on the board. The process of seasoning closes up all the pores of your chalkboard surface, making it easier to clean and write!
How do you use a Scraperboard?
0:5011:04Scratchboard Art Lesson - Cat - YouTubeYouTubeStart of suggested clipEnd of suggested clipAnd put a layer of India ink over the top of it but basically scratch board is a surface it's got aMoreAnd put a layer of India ink over the top of it but basically scratch board is a surface it's got a thin layer of china clay on it. And the ink the india agus is layered over the top.
What is scratchboard paper?
Scratchboard (North America and Australia) or scraperboard (Great Britain), is a form of direct engraving where the artist scratches off dark ink to reveal a white or colored layer beneath. ... There is also foil paper covered with black ink that, when scratched, exposes the shiny surface beneath.
How does scratchboard art work?
Scratchboard art is a way of creating an image by starting with a black surface and scratching through it to reveal a white layer below. It's a type of direct engraving, which means cutting or incising an image into a surface.
How do you make chalk transfer paper?
1:123:09Chalk Transfer Tutorial Video - YouTubeYouTubeStart of suggested clipEnd of suggested clipThe image you're going to take your pen or pencil. And you're just gonna trace. Around the image andMoreThe image you're going to take your pen or pencil. And you're just gonna trace. Around the image and apply it apply print kind of firm pressure because you want that chalk to adhere the chalkboard.
How do you sublimate a chalkboard?
2:064:38Sublimatable Chalkboard (so easy anyone can do it) - YouTubeYouTubeStart of suggested clipEnd of suggested clipMy image which i printed just on regular sublimation paper with sublimation ink my blank substrateMoreMy image which i printed just on regular sublimation paper with sublimation ink my blank substrate my protective paper and my heat gloves the first thing i want to do is remove my peel coat.
How do you do calligraphy on a chalkboard?
2:395:57How to Do Chalkboard Art and Faux Calligraphy Lettering - YouTubeYouTubeStart of suggested clipEnd of suggested clipWhat's most important here is to just be as consistent as possible with your width and height ofMoreWhat's most important here is to just be as consistent as possible with your width and height of your letters. As well as the spacing between them and the angle at which they're turned.
How to set time zone on Mac?
It's best to let Mac OSX set the time zone automatically for you: Click the Apple menu > System Preferences, then click Date & Time. You may need to click the padlock icon to make changes. Click Date & Time, then select Set date and time automatically and choose an appropriate server for your region.
Is Collaborate smart?
Collaborate can be quite demanding on your internet connection. Collaborate is smart, and will dynamically adjust your experience to enable you to remain in the session for as long as possible, but follow the steps below to ensure a successful session. Improve your Collaborate experience. If sharing your webcam, turn it off.
Uploading a Profile Picture, Part 1
Zoom: Image of the Blackboard Learn Header with the user's name in the upper right hand corner outlined, and users are instructed to click on the name.
Uploading a Profile Picture, Part 2
The notification panel will appear onscreen, similar to the image above. At the bottom of the page, click the Settings button.
Uploading a Profile Picture, Part 4
Zoom: Image shows the Personal Information screen, with the Personalize My Settings link highlighted, with instructions to click on the link.
Uploading a Profile Picture, Part 5
Zoom: This image has the following steps annotated: 1.Display Options: Under Display Options, choose the option labeled "Use Custom Avatar Image"2.Attach File: Click Browse My Computer to upload an image and select a file from your computer.3.When finished, click Submit at the bottom of the screen.
Confirmation
A purple status bar with the message: Success: My Settings updated will appear at the top of the screen, and the selected image will now appear next to your name in Blackboard.
How to create a discussion board in Blackboard?
Now, with that out of the way, I will turn to the method. It is as follows: 1 Draft the discussion board post in Microsoft Word. Format it exactly as you want it to appear. 2 Click on Edit and Select All. 3 Right click in the selected text, and then click Copy. 4 Navigate into the discussion board area in Blackboard using Internet Explorer. Click in the box where you would type your discussion board entry if you were doing it in Blackboard and not copying and pasting it in. 5 Right click in the box, and then click Paste. (This appears to be a very important step. If you use the Paste button provided in Blackboard, your post will look horrible.) 6 You may note that some of the formatting has been lost. This will often relate to indention of the first line of a paragraph, line spacing, spacing between paragraphs, etc. However, the distortion is usually much, much smaller using this method, and it can usually be corrected rather quickly.
How to copy and paste on Blackboard?
Right click in the selected text, and then click Copy. Navigate into the discussion board area in Blackboard using Internet Explorer. Click in the box where you would type your discussion board entry if you were doing it in Blackboard and not copying and pasting it in. Right click in the box, and then click Paste.
Popular Posts:
- 1. what is blackboard
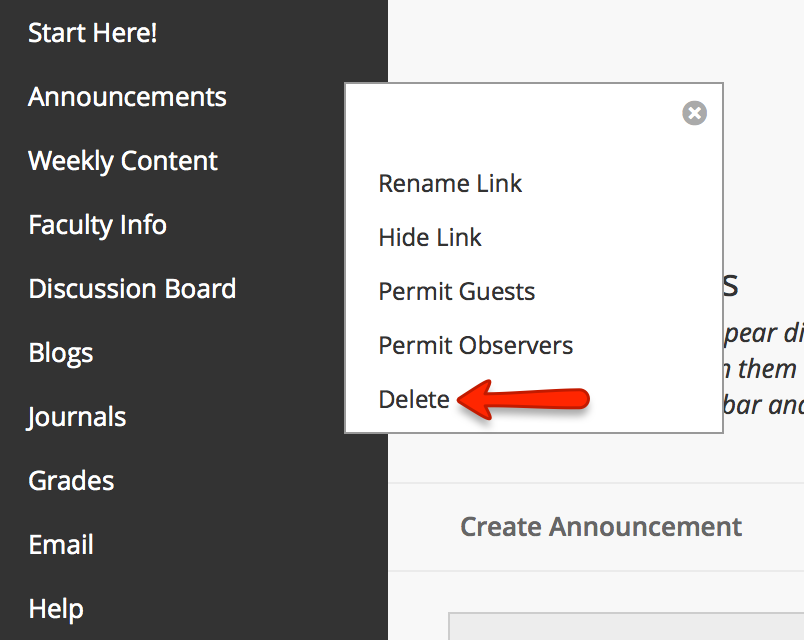
- 2. how to delete a discussion post on blackboard
- 3. how to unsubmit an assignment on blackboard
- 4. how to delete a thread on blackboard
- 5. how to resubmit an assignment in blackboard
- 6. how to double space on blackboard
- 7. how to use blackboard
- 8. how to edit a discussion post on blackboard
- 9. how to submit on blackboard
- 10. how to delete a submission on blackboard