Control Panel
The Control Panel is a component of Microsoft Windows that provides the ability to view and change system settings. It consists of a set of applets that include adding or removing hardware and software, controlling user accounts, changing accessibility options, and accessing networking …

0:36
2:05
The default smart views are displayed on the smart views page to add a new Smart View click createMoreThe default smart views are displayed on the smart views page to add a new Smart View click create Smart View enter a brief name for the new Smart View you can enter an optional description.
How do I View Smart Views in Grade Center?
toggle between the Full Grade Center View, Smart Views as well as Grading Periods. There are four types of smart views. • Login to Blackboard. • Enter your course/website. • Go to the Control Panel. • Click on Grade Center. • Click on Full Grade Center. • To create a Smart View, point to the drop-down arrows next to Manage.
How do I create a Smart View Page?
By default, you will see Assignments and Tests. To change or add the Smart View links that display: In Control Panel, click Grade Center, and select Full Grade Center. Click Manage tab and select Smart Views. In “Smart Views” page, find one item you want to add as a favorite and click the Star icons. The starred smart views now display as links in Control Panel > Grade Center.
What can I do in the gradebook?
Jun 01, 2021 · Several Smart Views exist by default in Blackboard to filter by category (Assignments, Tests, Blogs, Journals, Discussion Boards, etc.) Additionally, you can define your own criteria for creating new Smart Views. To add a Smart View, from the Full Grade Center, choose the Manage Menu and select “Smart Views.”.
What are smart views and how do they work?
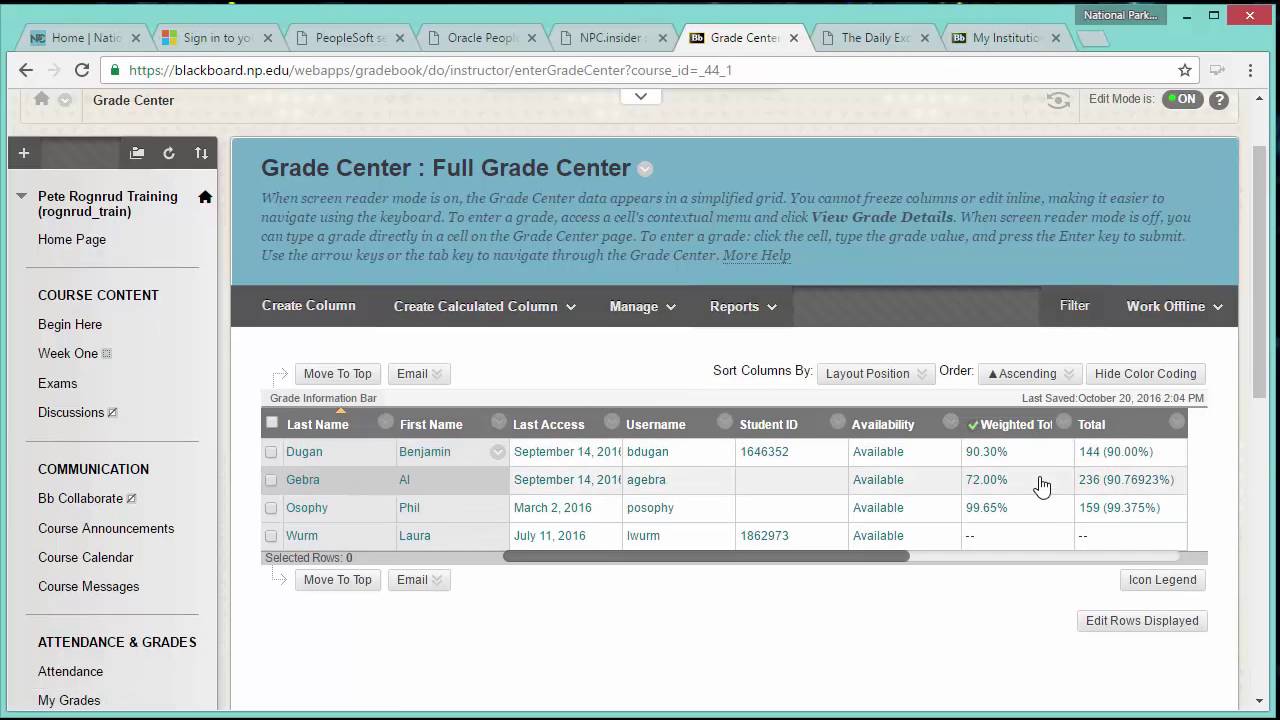
Filter: Narrow your view of the Grade Center data. Select Filter to expand the field and select an option from these menus: Current View: Includes the Full Grade Center view, smart views, and grading periods. You can select one of the views to use as the default view with the Set Current View as Default icon.
What is smart view in Blackboard groups?
About smart views A smart view is a focused look at the Grade Center that shows only the columns that match a set of criteria.
How do I use gradebook in Blackboard?
0:2318:49Blackboard Gradebook Tutorial - YouTubeYouTubeStart of suggested clipEnd of suggested clipBook. So you want to make the weighted total the external grade you go to the right arrow. Go downMoreBook. So you want to make the weighted total the external grade you go to the right arrow. Go down to set as external grade. You can see that the green check is now at weighted.
How do I organize my gradebook in Blackboard?
In the gradebook list view, press the Move icon in the row of the item you want to move. Drag the item to the new location and release. The order you choose also appears in the grid view and on students' Grades pages. You can't move items in the grid view at this time.
How do I see my grade distribution on blackboard?
Go to Grade Center > Full Grade Center. Find your assignment column, click the chevron, then click Edit Column Information. Scroll down to the Options header and check yes for “Show Statistics (average and median) for this column to Students in My Grades.”Mar 26, 2015
How do I create a weighted column in Blackboard?
Locate the Weighted Total column in the Grade Center. Click the Action Link (drop-down arrow) in the column heading, then select Edit Column Information from the menu. If you do not have a Weighted Total column, create one by clicking Create Calculated Column > Weighted Total. Required: Fill in the column name.
How do I create a weighted grade in Blackboard?
0:243:49How-to Weight Grades in Blackboard - YouTubeYouTubeStart of suggested clipEnd of suggested clipThen open the Grade Center. Then access the full Grade Center. In. The full Grade Center click theMoreThen open the Grade Center. Then access the full Grade Center. In. The full Grade Center click the drop down arrow that appears to the right of the assignment title at the top of a column.
How do I organize my gradebook in Blackboard Ultra?
0:171:52Gradebook Overview in the Ultra Course View - YouTubeYouTubeStart of suggested clipEnd of suggested clipYou can search for a student or group and use the filter menu to display only those submissions thatMoreYou can search for a student or group and use the filter menu to display only those submissions that need grading. Next select a student's name to open the submission.
What is a frozen column in Blackboard?
Freezing columns allows you to scroll through the Grade Center keeping certain columns frozen as you scroll through content.Mar 30, 2018
How do I change the order of grade columns in Blackboard?
Position the mouse pointer on the cross icon to left of the column you wish to move. Press and hold the left mouse button, drag the column up or down to change the order of the columns. Release the left mouse button. Click Submit.
How do I create a Smart View in Blackboard?
0:362:05How to Create a Smart View of Grade Center Data - YouTubeYouTubeStart of suggested clipEnd of suggested clipThe default smart views are displayed on the smart views page to add a new Smart View click createMoreThe default smart views are displayed on the smart views page to add a new Smart View click create Smart View enter a brief name for the new Smart View you can enter an optional description.
How do I view my transcript on Blackboard?
You can view recordings in courses you are enrolled in. You may be able to download recordings. Moderators must allow session recording downloads for each session. Go to Collaborate, open the Menu, and select Recordings or View all recordings.
What is the grade center?
In the Grade Center, all cells and column headers have a menu. For example, a test column's menu includes options for Column Statistics and Grade Questions. For a non-grade column, such as First Name, you only have the options to hide the column and sort the cells.
Where are the icons in Grade Center?
In the lower-right corner of the Grade Center, select Icon Legend to view the icon descriptions. Icons can appear in the Grade Center cells, attempt menus, column headers, on the Grade Details page, and on the Needs Grading page.
Why do you use grade notation?
You can create and manage grade notations to override a student's overall grade if their performance falls outside the defined schema. For example, if a student has to withdraw from your course in the middle of a semester, you can use a grade notation to indicate the student's circumstance or situation without assigning an actual grade.
What does "0" mean in grade pills?
In list view, students' grade pills display "0" when no submissions exist and the due date has passed. The label Automatic zero appears next to the grade pills. The label Complete also appears as you have nothing to grade. Automatic zeros post automatically.
Can accommodations be set for individual students?
You can exempt students from assessment due dates or time limits. Use accommodations to help students progress in the course even though they may have difficulty with some requirements.
Can you change the default grading schema?
You can make changes to the default grading schema. You can also view the gradebook categories and create and manage rubrics. Last but not least, you can create and manage grade notations to override a student's overall grade and assign automatic zeros.
Can you download a gradebook from Ultra?
You can export the file in a comma-delimited (CSV) or tab-delimited (XLS) format. You choose whether to save the file to your device or the Content Collection.
Can you assign zeros to missing work?
You can choose to automatically assign zeros to missing work past the due date. Students and groups can still submit work after an automatic zero is assigned. Then, you can grade as normal.
Popular Posts:
- 1. blackboard print test with all possible questions
- 2. how to set up a gradebook on blackboard
- 3. wayne state how to submitt an assignment on blackboard
- 4. how many web sites is run by blackboard
- 5. for rubric in blackboard percent, can you put a range?
- 6. how to post picture on blackboard
- 7. can guesta attend blackboard collaborate ultra
- 8. creating safeassign blackboard
- 9. blackboard calculated numeric vs, fill in the blank question
- 10. how to look up past grades on blackboard