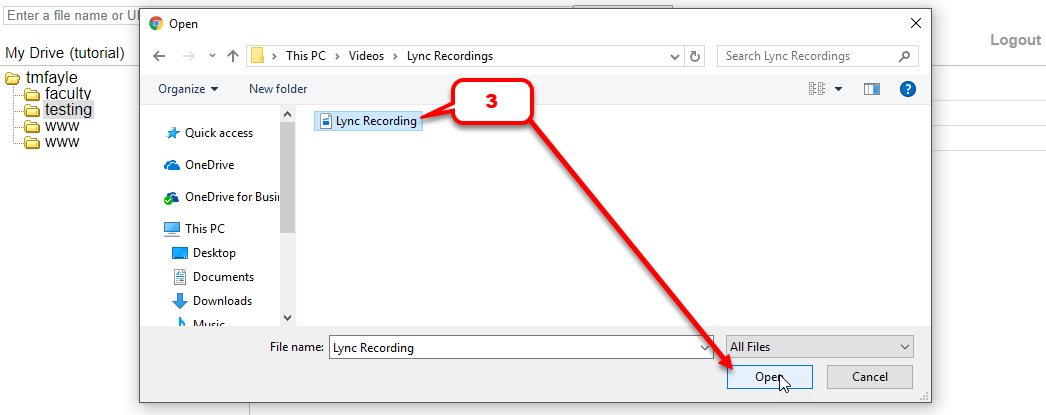
Blackboard Learn –How to upload content files 1) Go to Content Area in Blackboard where you want to upload a file. 2) Under the Build Content Tab select File. (Make sure Edit Mode is ON.) 3) Type in a name you want to Display. Select “Find File” by browsing your computer. Once located select OK.
ZIP files that will be unpackaged into the folder you selected.
- In the Content Collection, go to the location where you want to upload files.
- Point to Upload and select Upload Zip Package.
- Browse for the file and choose the encoding type, if applicable.
- Select Submit to start the upload.
How do I upload a directory to Blackboard?
Aug 29, 2021 · Adding a Web Link. Go to the Website to which you want to link. Copy the full URL from the address bar, e.g. http://www.nytimes.com/. With the address copied, go to your Bb course content area. Under the “Build Content” button, choose Web Link. Give the link a title, e.g. “New York Times”. Paste in ...
How do I UN-package a file in Blackboard?
create a ZIP archive of the directory. upload that zip file as an attachment to a new item on Blackboard. before clicking "Submit", go to the selection box underneath the file name and change it from "link to file" to "unpackage file". after clicking submit, it asks you to select the file within ...
How do I upload files to a course?
Unzip the file upon upload. In Course Files, go to the folder where you want to add the zip package. Select Upload > Upload Zip Package. Browse for the file and select the encoding type, if applicable. Select Submit. Go to the course area where …
How do I Make my Blackboard course content accessible to students?
The Upload button appears along with the options to Upload Files or Upload Package. Packages are .ZIP files that will be unpackaged into the folder you selected. In the Content Collection, go to the location where you want to upload files. Point to Upload and select Upload Zip Package. Browse for the file and choose the encoding type, if applicable.
How do I add content to a blackboard folder?
Add a FolderClick on the “Build Content” action menu button to expose a listing of content types to choose from.Select “Content Folder” listed under the “New Page” heading.Name the folder and decide when to make it available to students. ... Click “Submit” to complete the creation process.
How do I upload a file to Blackboard?
Browse for filesIn the Course Files folder where you want to upload the files, point to Upload and select Upload Files.On the Upload Files page, select Browse and open the folder on your computer with the files and folders to upload. Select the files.The files and folders appear in the upload box. ... Select Submit.
Why can't I upload files to Blackboard?
There are problems with adding attachments to student email or uploading files in Blackboard with the internet browsers Edge, Internet Explorer, and Safari. Files may not upload/attach or may be blank, completely empty. We recommend using Chrome or Firefox. Do not use Edge, Safari or Internet Explorer.Feb 9, 2021
Can you upload PDF to Blackboard?
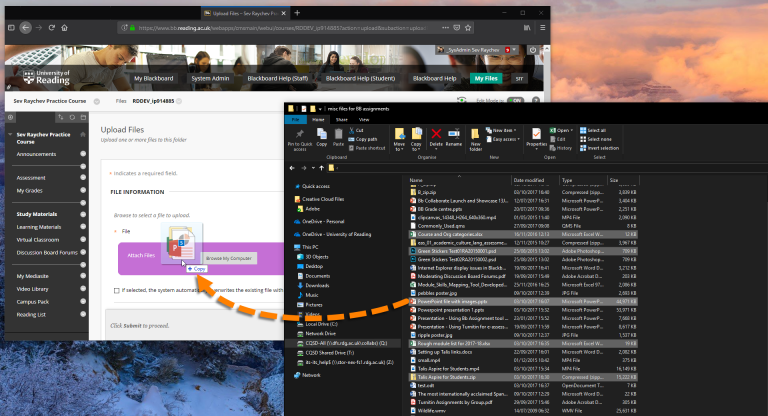
Click on the Name of the Assignment. ... When you are ready to submit an Assignment, click Browse My Computer to attach your file, then click Open to attach the file. NOTE: Supported documents are Word (DOC, DOCX), PowerPoint (PPT, PPTX), Excel (XLS, XLSX), and PDF. (PDF).
How to download a file from a folder?
In the Content Collection, go to the folder that contains the files or folders you want to download. Select the files and folders to download. Select the Download Package button. You can also find the Download Package option in the item's menu. A window may appear asking you if you want to open the file or save it.
What is username folder?
You can use your username folder to store personal course files that you're working on. When you're ready, you can submit the files or attach them to other coursework. In your courses, you can add links to files stored in the Content Collection. You can also link to projects you may be working on.
How to upload a file on a computer?
Select the plus sign wherever you want to upload files . In the menu, select Upload to browse for files on your computer. The files appear in the content list. Open a file's menu to edit the file name, align with goals, replace the file, or add a description.
How to review files before importing into a course?
You can review the list of selected files before you import into your course. Review the Item Name, Date Modified, and Size to confirm that these are the correct files. Forgot something? You can add more items to the list. Select Back to Content Collection to continue browsing.
What does Ally do after you add content to a course?
After you add content to a course, Ally creates alternative formats of the content based on the original. For example, if the original content is a PDF, Ally creates audio, electronic braille, and ePub formats of the same content. These formats are made available with the original file so everything is in one convenient location.
What is status window?
A status window appears to show the progress of the file upload. You can also add files from cloud storage, such as OneDrive. You can edit the file's settings, including the display name, alternative text, and display behavior.
Can you upload files in Ultra?
You can upload files in the editor in certain areas of an Ultra course. For example, you can include an image or a document to help students understand your instructions or initial prompt.
Can you add images to Ultra?
Insert images in the editor. In some areas of an Ultra course, you can use the editor functions to add images along with text content. You can add images that are hosted online or you can upload an image from your local drive. If you add a large image, it's a good idea to include the image as a separate text link.
Can you embed audio in feedback?
You can embed audio and video recordings of your feedback in the editor as you grade attempts. The recording option appears in the feedback editor for most graded items in your course. Students watch or listen to your feedback alongside any text you include.
Popular Posts:
- 1. what is blackboard
- 2. how to delete a discussion post on blackboard
- 3. how to unsubmit an assignment on blackboard
- 4. how to delete a thread on blackboard
- 5. how to resubmit an assignment in blackboard
- 6. how to double space on blackboard
- 7. how to use blackboard
- 8. how to edit a discussion post on blackboard
- 9. how to submit on blackboard
- 10. how to delete a submission on blackboard