Open the Collaborate panel and select My Settings. Select Notifications Settings. By default all of the settings are turned on. These settings only turn on/off the notification banners and sounds. If you turn these notifications off, you still see:
Open the Collaborate panel and select My Settings. Select Notifications Settings. By default all of the settings are turned on. These settings only turn on/off the notification banners and sounds.
Full
AnswerHow do I Turn on/off notifications in collaborate?
Step 1: Once your session is running, go to the 'Settings' gear icon on the bottom-right corner of the Collaborate Panel. Step 2: Select the Notification settings. Step 3: Enable or disable the two audio settings from the drop-down menu, as you please.
How do I turn notifications on or off for Blackboard courses?
May 21, 2021 · Blackboard can be configured to send you email alerts when things happen on … or to receive an email for each time something happens, or turn notifications off … 8. How do I enable email notifications of Blackboard …
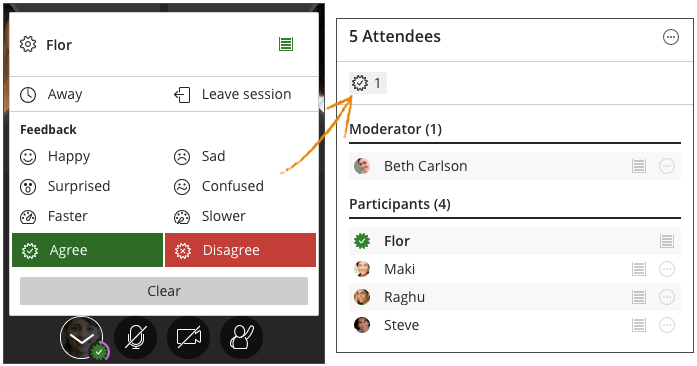
What are the different types of notifications in a collaborate session?
From the Notification Settings panel, select the Push Notification Settings tab. Blackboard Instructor app: In the app's main menu, tap Settings. Manage push notifications in the app. Choose which push notifications you want to receive for activity in your courses: New content and discussions added; New discussion replies
How do I manage push notifications in the app?
Jan 31, 2022 · 1.3.1 How to Turn On/Off Notifications in a Blackoard Collaborate Session; 1.3.2 Enable browser … If you have trouble with one browser, please try the other. … How to Check if Audio and Video Controls are Enabled on device (Mac/PC).

How do I change my notification settings on Blackboard?
0:081:17Notification Settings in Blackboard Learn with the Original Experience ...YouTubeStart of suggested clipEnd of suggested clipLet's take a look from the menu next to your name in the page header select settings.MoreLet's take a look from the menu next to your name in the page header select settings.
How do I change settings on Blackboard Collaborate?
Settings you can change during a session If you want to change settings during a session, open the Collaborate panel, select My Settings, and open Session Settings.
How do I turn on notifications on Blackboard?
Turn on or change notification display on your device Select Notifications and locate Blackboard in the list of apps. Android: Go to Settings. Locate Apps, select Blackboard, and tap Notifications.
How do I get notifications on Blackboard discussion board?
Push notificationsBlackboard on the web: Log in to Blackboard on a web browser and navigate to your Activity Stream. Select the Stream Settings icon. ... Blackboard Instructor app: In the app's main menu, tap Settings. Manage push notifications in the app.
How do I make a private session on Blackboard Collaborate?
Create a Blackboard Collaborate SessionClick Create Session.Type a name for your session.Decide whether you want to enable Guest access by selecting the checkbox. ... Enter the session Start and End in the Event Details area (open-ended sessions can be created by ticking the 'No end' checkbox)More items...
How many participants does Collaborate allow during a session?
250 attendeesCollaborate sessions support 250 attendees at a time. Administrators can turn on webinar mode to support large scale sessions of up to 500 attendees. If you invite more attendees than the session supports, not everybody invited will be able to join.
How do I manage notifications on Blackboard?
Push notificationsBlackboard on the web: Log in to Blackboard on a web browser and navigate to your Activity Stream. Select the Stream Settings icon. ... Blackboard app: In the app's main menu, tap Settings. Manage push notifications in the app.
Are Blackboard announcements automatically emailed to students?
Emails about announcements are always sent and aren't controlled by the global notification settings. If you post an announcement and forget to select the email copy check box, you'll need to create a new announcement. If you edit the announcement and select email copy and post it again, the email isn't sent.
What is yellow on Blackboard?
The grade pill for each assessment question and graded item may appear in colors or with dark backgrounds. For the colored grade pills, the highest score range is green and the lowest is red. ... 89–80% = yellow/green. 79–70% = yellow.
What is the difference between a blog and a discussion board?
Discussion boards are used to create a “thread” or “topic” where participants in the board can post replies or start threads on new topics. ... So, blogs, unlike discussion boards, are more focused on a chronology of information, displaying the most current “posts” first.Jun 1, 2009
How can I be notified that I have a text message?
Text Message Notification Settings - Android™ Tap 'Settings' or 'Messaging' settings. If applicable, tap 'Notifications' or 'Notification settings'. Configure the following received notification options as preferred: Enabled when a checkmark is present or switch is in the ON position.
What is behind the Blackboard?
Welcome to Behind the Blackboard! This is where system administrators can find support, download software, obtain reference materials, and manage their accounts. For students, faculty, and other users, Behind the Blackboard is the perfect supplement to your primary campus helpdesk!
Editing General Settings
The General Settings options allows users to modify email settings for courses or organizations, as well as due date notifications.
Editing Individual Course or Organization Settings
Zoom: Image of the Edit Individual course setting with the following annotations: 1.On/Off: Check the checkboxes in this column to turn notifications for each item on or off.2.Notification: A list of events that generate notifications will appear in this column.
Bulk Edit Notification Settings
Zoom: Image of the Bulk Edit Notifications screen with the following annotations: 1.Select Course: Select All to modify the notification settings for all courses you are teaching or taking as a student, or select Selected to modify settings for selected courses.2.If you chose Selected, under Items to Select, select the courses from the left.3.Click on the arrow button pointing to the right to select courses.4.The selected courses will then be moved to the column to the right, labeled Selected Items.5.On/Off: Check the checkboxes in this column to turn notifications for each item on or off.6.Notification: A list of events that generate notifications will appear in this column.
Navigate to the Courses page
Select the Courses tab from the menu bar at the top of the Blackboard Home page
My Places
1. Open the Global Navigation box. This box is situated at the top right of the screen and may be opened by selecting the triangle icon beside your name.
Notification Settings
4. You have a choice of ways to change your notification settings. Below is a basic explanation of the options and further on we will concentrate on two particular sections.
General Settings
5. First we will look at the General Settings. This is where you can set whether you prefer notifications to be sent out individually or in a daily news round up.
Course Notifications
10. Next we will change which events we want to be notified about. The selection works in the same way for both individual course settings and bulk notification settings. Choose one and continue.
Select courses?
11. If you chose to bulk edit your notification you will be asked whether you want to change notifications for all or a select number of courses. If you wish to select the course choose “selected” and use the [>] button to denote which courses you wish to select.
Why is it important to record meetings?
It is often a good idea to record meetings so absent participants can view them at another time or any participant can watch them repeatedly to increase understanding.
What are the roles in a collaborative room?
Before entering the Course Room, it is important to understand the different attendee roles. Collaborate rooms have three primary roles: Moderator, Presenter, and Participant. Captioner is another role but used less often.
Does Blackboard have a meeting room?
Similar to Zoom, Skype, or GoToMeeting, you can use this space for synchronous communication and content sharing. Plus, all of your students have access to it, so you won't need to individually invite them. This tool is also convenient for students because it is housed in your Blackboard course, and most students are comfortable with and already use Blackboard for many of their classes.
Does Blackboard have a collaboration room?
Each course in Blackboard has its own Collaborate Ultra Course Room where anyone enrolled in that course can meet. If you have not set up a link to your Blackboard Collaborate Ultra Course Room, follow these steps to find the room.
Can you dial in to a collaborative meeting?
There are a number of ways for users to dial in to a Collaborate meeting, using a phone for audio. This is useful if you are having audio problems or do not have a microphone or speaker s.
Can you call in to a meeting with a blackboard?
If an anonymous dial-in number and PIN have been provided to you in advance, you can still call in to the meeting and use your phone for audio even if you do not have the Blackboard app, the appropriate web browser, or an internet connection.
Can you use Blackboard Ultra for multiple sections?
If you teach multiple sections of the same course, you can use one course’s Blackboard Collaborate Ultra room as the primary one for meeting and recording. This can allow students flexibility in meeting times and reduce the number of times you record a lesson.
What is collaborative learning?
Collaborate enables your instructor to share content, making the session more dynamic. Most of the time, you will enter a Course Room in the role of Participant, and the instructor will be the Moderator. The instructor can change your role from Participant to Presenter, which would increase your content sharing options. Be aware that poor internet connections and slow speeds may interfere with sharing. Therefore, you should be on a private network (e.g., at home) rather than a public one (e.g., public place, such as a school, restaurant, coffee shop).
Can you share a session with instructor?
Once you have joined a session, you will need to see what your instructor has enabled you to share and then determine what you want to or can share. By default, nothing will be turned on when you join the session aside from showing you have entered. However, if your instructor has enabled features, you will have many options for interacting and sharing items.
Can you join a collaborative room?
By default, guests are not allowed to join a Collaborate Course Room, as this poses a security risk. However, there are instances where your instructor may share out a guest link with you. The guest link allows a one-click entry, so it is convenient.
Can you dial in to a collaborative meeting?
There are a number of ways for users to dial in to a Collaborate meeting, using a phone for audio. This is useful if you are having audio problems or do not have a microphone or speaker s.
Popular Posts:
- 1. what is blackboard
- 2. how to delete a discussion post on blackboard
- 3. how to unsubmit an assignment on blackboard
- 4. how to delete a thread on blackboard
- 5. how to resubmit an assignment in blackboard
- 6. how to double space on blackboard
- 7. how to use blackboard
- 8. how to edit a discussion post on blackboard
- 9. how to submit on blackboard
- 10. how to delete a submission on blackboard