In the content area, select the Keyboard Accessible Reordering icon. In the Reorder: Content box, select an item in the list. Use the Move Up and Move Down icons to adjust the order.
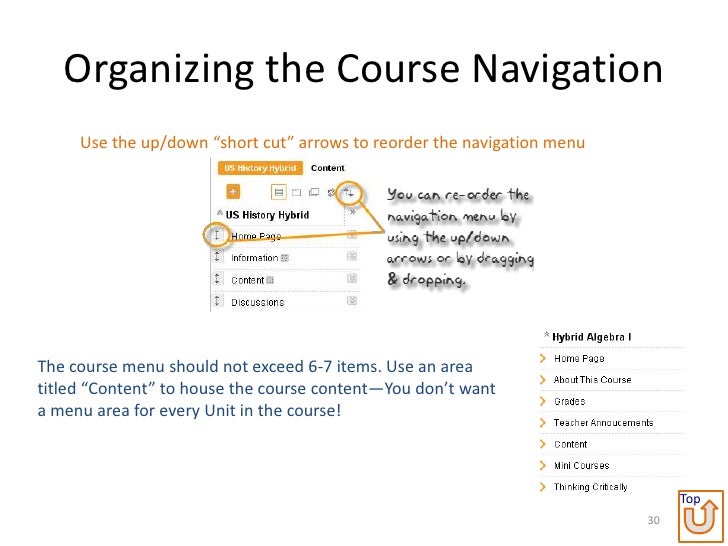
To move the Content Areas in the menu, grab the two sided arrow next to the item and drag it where you want it to appear in the menu. Turn off your edit mode to see the menu from a student view or click the icon to the left of Edit Mode. This appears in the upper right of your screen.Dec 14, 2020
Full
AnswerHow do I customize the content menu on the Blackboard course menu?
Apr 27, 2020 · Select the Add Menu Item icon above the course menu to open the menu. Select the type of content to create and type a name. Complete any other required text boxes, such as URL for Web Link.
How do I link a user to a blackboard module page?
With your keyboard, tab to the visibility list and press Enter to open the menu. Use Alt/Option + the up and down arrows to select an option. Students can't access items set to appear on future dates, but they can see them in the list. You can also create rules to release content based on how a student performs on other items in your course.
What can I do in the item menu?
Feb 16, 2022 · 2. Edit and Manage Content | Blackboard Help. https://help.blackboard.com/Learn/Instructor/Course_Content/Create_Content/Edit_and_Manage_Content. For a content area, access the menu next to the title and select Edit and Delete. … a full course copy with users, and during archive and restore operations. 3.
How do I grade assignments on Blackboard?
Access an item's options. After you build content containers, such as content areas, learning modules, lesson plans, and folders, you create content within them. You edit and manage all of the items and content containers, except content areas, in the same way. You can't copy or move a content area into another content area or set release criteria.
How do I rearrange my menu items in Blackboard?
Drag-and-Drop Reordering – The double-headed arrow will allow faculty to reorder menu items up or down. Click and hold the left mouse button to enable the reordering feature.
How do I add content to my menu in Blackboard?
How to add a Blackboard menu itemEdit Mode. Check that Edit Mode is turned ON. ... Course Menu. Look at your Blackboard course menu. ... Eight choices. You are presented with eight options for adding to your menu. ... Set Menu Item Name. Enter a Name. ... Positioning. Your new menu item will be created.
How do you hide items on Blackboard?
Click on the drop-down menu next to the name of the Folder, Item, Link etc. and choose Make Unavailable. That item is immediately hidden from students.
How do I customize my Blackboard?
Select Teaching Style from the Customization section of the Control Panel to customize the course style in the following ways:Change the course entry point. ... Select a Menu Style. ... Select a default content view – Icon Only, Text Only, or Icon and Text.Add a banner to the top of the course Home Page. ... Click Submit.
Where is the menu on Blackboard?
1. The course menu is located on the upper left menu bar on the Course Home Page. The course menu allows navigation through the course by clicking on “Home Page,” “Information,” “Content,” “Discussions,” “Tools,” or “Help.” 2.
What is a content folder in Blackboard?
Content areas, such as Users, Courses, Institution, and Library, are folders stored under the root folder. A folder is automatically available to the user who created it, and may also be visible to other users if you create it in the course area.
How do you view hidden content on blackboard?
Click the gray, circle 'Action Link' next to the link text, which will open a menu of … To unhide a hidden link, which would make it visible to students, select Show …May 10, 2021
How do I move course content in Blackboard?
In the Content Collection, go to the folder that contains the file or folder you want to move. Select the check box next to the item and select Move. You can also access the Move option in the item's menu. Enter the path to the destination folder or select Browse to locate and select the destination folder.
What is the difference between content area and module page in Blackboard?
Unlike the content folder, a learning module will give you and your students a table of contents that automatically lists the content you put within the module. You can enforce sequential viewing of the items in the learning module, so students will need to access the items in the order than you determine.Jul 29, 2021
How can I make my Blackboard look better?
0:437:41Customizing your Blackboard Course - YouTubeYouTubeStart of suggested clipEnd of suggested clipYou can see it especially over here above the top of your screen to change that background style.MoreYou can see it especially over here above the top of your screen to change that background style. You simply hover over what looks like paint samples in the upper right-hand corner.
How do I customize my Blackboard app?
Select Apps and select Custom Apps. Find the app you want and select More. Select Rights....Sharing rights for custom appsType all or part of the group or user name.Select Search.Select the group or user you want.Repeat until you assign all groups or users.
Where is the Add menu item button located in the course menu?
Select the Add Menu Item icon above the course menu to open the menu. Select the type of content to create and type a name. Complete any other required text boxes, such as URL for Web Link. Select the Available to Users check box if you're ready for students to see it.Apr 27, 2020
How to move an item to a new folder?
With your keyboard, you can move an item to a new location and move an item into a folder. Tab to an item's move icon. Press Enter to activate move mode. Use the arrow keys to choose a location.
What does Ally do after you add content to a course?
After you add content to a course, Ally creates alternative formats of the content based on the original. For example, if the original content is a PDF, Ally creates audio, electronic braille, and ePub formats of the same content. These formats are made available with the original file so everything is in one convenient location.
Can students see the accessibility score on Ally?
Students don’t see the content's accessibility score. Instead, students can choose from the alternative formats Ally generates for the content. You can help Ally create better alternative formats by following best practices for creating accessible content.
Can you make each piece of content visible?
You can easily set each piece of course content as visible or hidden from students . You can make this setting when you create each piece of content, or you can make a change after the content appears in your course.
Can students access future dates?
Students can't access items set to appear on future dates, but they can see them in the list. You can also create rules to release content based on how a student performs on other items in your course.
Can you delete a course from a folder?
You can delete an item from your course or hide it from students to preserve the information. Students can't access hidden items on the Course Content page. If you delete a folder or learning module that has content, the content is also removed from the Course Content page.
Where is the accessibility icon on Blackboard?
Throughout Blackboard Learn, most accessibility icons will be to the left of the file. To learn how to improve the file’s accessibility, select the score icon.
What can you do with an item's menu?
When you access an item's menu, you can change settings, modify availability, and create metadata. You can turn on options such as review status, adaptive release, and statistics tracking. You can also copy, move, and delete content. You can reorder content and hide content details to save screen space.
How to get course reports?
To obtain course reports on overall user activity as well as activity in content areas, forums, and groups: Control Panel > Evaluation > Course Reports. In Edit Mode, access an item's menu and select Statistics Tracking. Select On to enable statistics tracking for the item. Select Submit.
What is metadata in education?
Metadata stores information about a content item, including bibliographic, lifecycle, and copyright information. With metadata, you can import content from and export content to other applications that use IMS (Instructional Management Systems) standards, creating interoperability for learning content.
What happens when you delete a content container?
Sometimes the content is permanently removed from the system. When you delete a content container, you permanently remove it .
How to copy and move between courses?
To copy and move between two courses, you must be enrolled in both courses. Copying a content container doesn't remove it from the original location in your course. Moving a content container removes it from its original location in your course. Use these steps to copy and move content containers .
Why is the Not Visible icon not visible?
The Not Visible icon indicates the item isn't visible to students because of an adaptive release rule or the item's availability settings.
Edit Mode
1. Check that Edit Mode is turned ON . This can be switched by clicking ON or OFF.
Course Menu
2. Look at your Blackboard course menu. Hover your mouse over the + (plus) icon.
Positioning
8. Your new menu item will be created. You can re-position it by dragging the up and down arrow icon.

Popular Posts:
- 1. what is blackboard
- 2. how to delete a discussion post on blackboard
- 3. how to unsubmit an assignment on blackboard
- 4. how to delete a thread on blackboard
- 5. how to resubmit an assignment in blackboard
- 6. how to double space on blackboard
- 7. how to use blackboard
- 8. how to edit a discussion post on blackboard
- 9. how to submit on blackboard
- 10. how to delete a submission on blackboard