- Step 1: Import or Create a Test & Add Questions Import a Test If your test is a Blackboard-ready zip file, you can...
- Step 2: “Deploy” the Test (to make it available to students) After you create a test or survey, the next step is to...
- Step 3: Grade and View Results
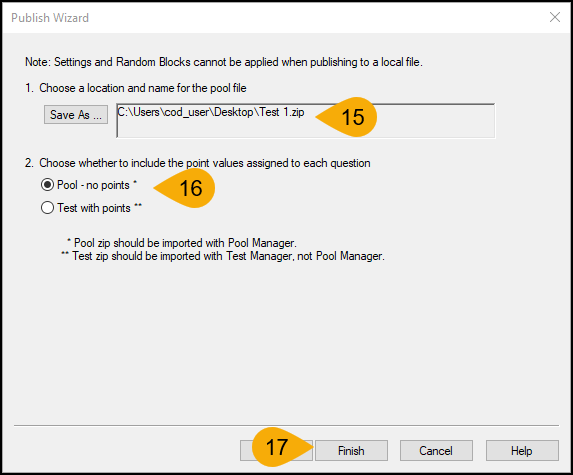
Step 1: Go to the Control Panel of the new course. Select either Tests or Surveys depending on which assessment you wish to import. Step 2: Click Import. Step 3: Browse to the saved .
Full
AnswerHow to make a test available in Blackboard?
How to deploy a test into the Course Content 1. Log into the course which has the test. 2. Click on Course Content in the left pane. 3. Navigate to the Module which needs the test. 4. Click on Learning Activities to open the folder. 5. Hover the mouse over Assessments and then click on Test. 6. Click on the test name in the Add an Existing Test section. 7.
How to create, deploy, and Review survey results in Blackboard?
Oct 09, 2021 · Step 1: Import or Create a Test & Add Questions Import a Test If your test is a Blackboard-ready zip file, you can... Step 2: “Deploy” the Test (to make it available to students) After you create a test or survey, the next step is to... Step 3: Grade and View Results
How to create random blocks for tests in Blackboard?
Ensure Edit Mode is ON, and access the Content Area where the test will be added. On the Action Bar, mouse over the Assessments tab. Select Test. On the Create Test page, select a test from the Add Test box. Click Submit. After an existing test is added to a Content Area, the Test Options Options page appears.
How to set test exceptions in Blackboard?
Import a QTI package. In your course, go to Course Tools > Tests, Surveys, Pools > Pools. Select Import QTI 2.1 Package. Browse your computer or the Content Collection to locate the QTI package. Select Submit. After Blackboard Learn processes …
Watch a video about exporting and importing tests and surveys
The following narrated video provides a visual and auditory representation of some of the information included on this page. For a detailed description of what is portrayed in the video,
Import a test, survey, or pool
On the Control Panel, expand the Course Tools section and select Tests, Surveys, and Pools.
Troubleshooting
You can import only test, survey, and pool ZIP files exported from Blackboard Learn.
About QTI packages
Instructors and course builders may rely on third-party content to build their curriculum and complement materials such as textbooks. To help ensure compatibility, publishers and other content creators develop this material using industry standards.
Import a QTI package
You’ll need to import QTI packages into your course as question pools. After you import the questions, you can use them in assessments.
Export a QTI package
Just like they’re imported into Blackboard Learn, QTI packages are exported as question pools. You need to move questions from an assessment to a question pool to export the QTI package.
How to view student test results in Blackboard?
To view a student’s individual question responses, click the Double-down arrow in the student’s score field and select Grade Details. Instructors can also download Survey and Test results to Excel. Go to the appropriate assessment column in the Grade Center, click on the grey arrow and select Download Results. Be sure to select T ab in order to open the file directly in Excel and then Click to download results.
How to add a test to a course?
Deploying a Test: Step 1: Select the Content Area ( Assignments, Course Documents, and Learning Modules) where you want to add a test and select the appropriate option from drop-down arrow next to the Assessments menu item and select Test. Step 2: Select the appropriate test from your list of existing tests (in the list, ...
Can a student with a disability take a test?
This is how you allow student who have a disability to take extra time in the tests. You can setup a due date for the tests and check an option to prevent students taking the tests after the deadline. Students will receive a message after the due date, notifying them that the test can no longer be completed.
What is test availability?
Test Availability allows you to modify the number of attempts students have to take the test, the test timer settings, and the test availability settings. Make the Link Available: Select Yes to make the test visible to students.
What is a due date in a class?
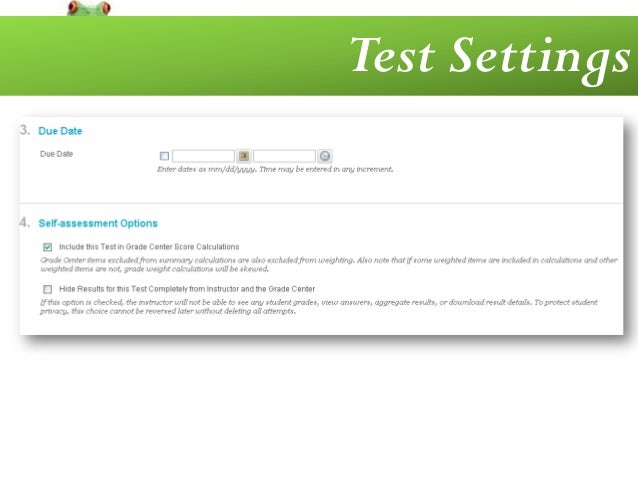
Due Date allows you to specify a due date for the assignment that will show up in the student's calendar, as well as in the instructor's Grade Center. The due date option does not restrict the student's ability to submit after the due date has passed, and items submitted after the due date would be marked as Late.
Add Test
1. Ensure that Edit Mode is On and enter the course content area into which you wish to add your test.
Test Information
5. In a similar way to adding a content item you will see that you can choose a name, colour and description. These will be completed automatically from the details you entered when you created the test.
Description and Instructions
6. Choose whether the description should be shown to students before they take the test. The description is set when creating the test.
Test Availability
8. If you wish for the quiz / survey to open in a new (separate) window set Open Test in new window to Yes. Select No to have the quiz / survey open within the same window as your regular Blackboard content.
Exceptions?
12. If you wish for certain students or groups to have longer time limits or for the test to be available to them for longer you can add exceptions. These can be made on a per user or per group level.
Due Date?
13. If you wish to you may set a Due Date by which the test should be taken. If you do not wish for students to be able to take the test after the due date has passed you may tick that option below the due date.
Note
17. If you wish to later make the test unavailable so that students may no longer take it, set Do you want to make the link visible to No . (See slide 6.)
Popular Posts:
- 1. what is blackboard
- 2. how to delete a discussion post on blackboard
- 3. how to unsubmit an assignment on blackboard
- 4. how to delete a thread on blackboard
- 5. how to resubmit an assignment in blackboard
- 6. how to double space on blackboard
- 7. how to use blackboard
- 8. how to edit a discussion post on blackboard
- 9. how to submit on blackboard
- 10. how to delete a submission on blackboard