Delete a Blog Open a course. Click Blogs from the Course Tools menu. Click Edit Mode ON. Select Delete from the contextual menu for the blog.
Full Answer
How do I delete posts from a blackboard discussion board?
Delete a blog. If you no longer need a blog, you can delete it. The delete action is permanent and irreversible. If a blog is gradable, the Delete Confirmation page appears. You need to perform extra steps to remove a gradable blog. On the Blogs listing page, open a blog's menu and select Delete. Select OK in the pop-up warning.
How do I delete a blog on workplace?
Nov 06, 2018 · Select Monthly to organize blog entries on a monthly basis or select Weekly to organize blogs on a weekly basis. Allow Users To Edit and Delete Entries: Check the checkbox for this option to allow students to edit and delete their …
How do I delete a thread in a Blackboard course?
On the Blogs listing page, select a blog title.; On the blog's topic page, select Create Blog Entry.; Type a title and entry. If enabled and appropriate, select the check box for Post Entry as Anonymous.; Select Browse My Computer to upload a file from your computer. You can also attach a file from the repository: Course Files or the Content Collection.
What is the purpose of a Blackboard Learn blog?
Feb 15, 2018 · Delete a Blog. Open a course. Click Blogs from the Course Tools menu. Click Edit Mode ON. Select Delete from the contextual menu for the blog. Click OK in the confirmation window. Change the Availability of a Blog. Open a course. Click Blogs from the Course Tools menu. Click Edit Mode ON. Click the check-box next to the appropriate blog.
How do you delete content on blackboard?
Blackboard (Faculty) - Course Content: Remove Course FilesNavigate to your course content collection.Place a check mark next to the file you want to permanently remove from the course and click the Delete at the bottom of the screen.More items...•Jan 14, 2019
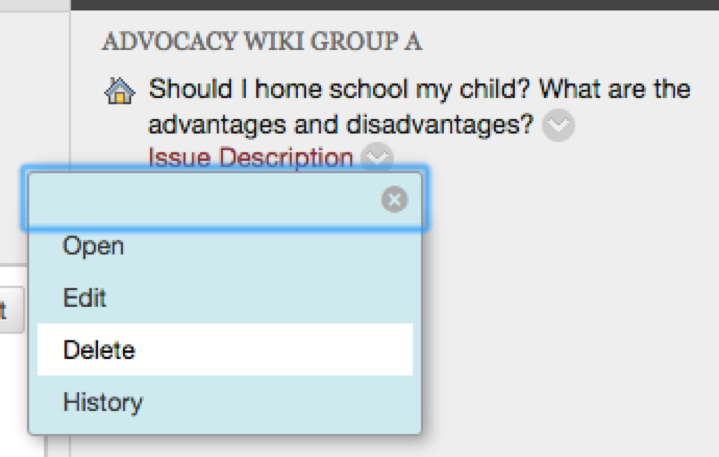
How do I delete a wiki post on Blackboard?
Delete a wikiOn the Wikis listing page, open a wiki's menu and select Delete.Select OK in the pop-up warning. If the wiki is gradable, the Delete Confirmation page appears. You have two options: ... Select Remove to complete the deletion.
How do I delete my discussion post on Blackboard as a student?
To Delete Old Posts:Enter Blackboard and open the course.Edit Mode - On.Open the Discussion Board.Find a Forum that has posts. Open the forum.Click the top left checkbox to select all the threads.Optional: Uncheck any message to be kept.Click Delete to remove the student posts.
How do I find my blog on blackboard?
Go to Control Panel > Course Tools > Blogs and select Create Blog. Type a name and optional instructions. Make the blog available to students.
Can you delete a wiki page?
When you delete a Wiki, all pages and comments will be eliminated permanently and cannot be recovered. Individual Wiki pages can also be deleted, with the exception of the first page in a Wiki. In most cases, you will not want to delete an entire Wiki. Doing so will delete all of the Pages in that Wiki.
How do I delete a wiki?
0:000:53Delete a Wiki - YouTubeYouTubeStart of suggested clipEnd of suggested clipTo delete a wiki go to the wiki pages in course tools. Click on the checkbox. Next to the wikiMoreTo delete a wiki go to the wiki pages in course tools. Click on the checkbox. Next to the wiki selecting it and then choose delete and click OK to confirm the action.
Can you delete a post on Blackboard?
On the thread's page, point to a post to view the available functions. Select Edit or Delete. The delete action is irreversible. If you're allowed to delete your post with replies, all posts are permanently deleted.
Can a student delete a submission on blackboard?
Once a file has been successfully submitted to an assignments, you can't delete it. However, if you have the ability to make another submission, re-submit the file …Nov 2, 2020
How do you delete a saved draft on Blackboard?
To access your drafts, return to the forum page and set it to List View. Access the Display menu and select Drafts Only to view the saved post. Select the draft's title to open the Thread page. While you view your post, point to it to view Edit and Delete.
What is the difference between a blog and a journal in Blackboard?
Blogs and Journals in Blackboard look and behave in similar ways. They both provide Blog like features and functionalities. The key difference between the two is that Blogs are shared within the course, and journals are usually private. You can have any number.Sep 25, 2015
What are blogs in Blackboard?
A Blog is a collaborative tool that allows students to post their personal reflection about the course or discuss and analyze course related materials. There are three types of blogs in a Blackboard course: individual, group or course blogs.
How does a blog work in Blackboard?
Course Blogs allow all users in the course to share their thoughts and work in one common area where everyone can read and comment. All entries are posted to the same page to help promote collaboration among all course members. Users can add entries and comment on entries anonymously to maintain privacy.Oct 5, 2016
Accessing the Blog Link
To access the Blogs tool, log into your Blackboard Course and then click on the Blogs link in the course menu
Editing a Blog
Zoom: Image of the blogs list with an arrow pointing to the chevron button next to the desired blog with instructions to click on the chevron button. A menu is shown on the screen with Edit outlined in a red circle with instructions to click on Edit.
Editing the Blog Information
You will now see a screen labeled Edit Blog. The section labeled Blog Information allows you to enter a name and description for the blog assignment.
Setting up the Blog Availability
Blog Availability allows instructors to make the blog visible to students. Select Yes to permit students to view the Blog.
Setting up the Blog Time and Date Restrictions
Blog Time and Date Restrictions allows instructors to limit the availability of the blog to a specific time period. To restrict the blog availability, use the date and time selectors to select a Display After and Display Until date.
Setting up the Blog Participation Options
Section 4: Blog Participation allows instructors to determine how students interact with others using the blog.
Setting up the Blog Settings
Blog Settings allows instructors to modify the indexing of blog entries and modify user permissions for editing and deleting content:
How to create a blog entry?
Create a blog entry 1 On the Blogs listing page, select a blog title. 2 On the blog's topic page, select Create Blog Entry. 3 Type a title and entry. 4 If enabled and appropriate, select the check box for Post Entry as Anonymous. 5 Select Browse My Computer to upload a file from your computer. You can also attach a file from the repository: Course Files or the Content Collection.#N#-OR-#N#Drag files from your computer to the "hot spot" in the Attach Files area. If your browser allows, you can also drag a folder of files. The files will upload individually. If the browser doesn't allow you to submit your assignment after you upload a folder, select Do not attach in the folder's row to remove it. You can drag the files individually and submit again.#N#You won’t be able to drag files to upload if your institution uses an older version of Blackboard Learn.#N#You can use the file name or provide another name for the file. 6 Select Post Entry to submit the blog entry or select Save Entry as Draft to add the entry later.
What are the different types of blogs?
You can access three types of blogs: Course: All enrolled users can create blog entries and add comments to entries. Individual: Only the owner of a blog can create blog entries. All other enrolled users can view entries and add comments. Group: If your instructor enables the blogs tool for a group, all group members can create blog entries ...
What happens if you are removed from a course?
If you're removed from a course after individual blogs are created, all your entries and comments are deleted. If you're removed from a course after course blogs are created, all your entries and comments are retained, but your name is changed to "Anonymous."
Can you drag a folder of files?
If your browser allows, you can also drag a folder of files. The files will upload individually. If the browser doesn't allow you to submit your assignment after you upload a folder, select Do not attach in the folder's row to remove it. You can drag the files individually and submit again.
Can you comment on someone else's blog?
You can comment on one another’s blog entries, whether they belong to an individual, the course, or a group. Your instructor determines if you can make anonymous comments and if you may delete blog comments. On the blog's topic page, select a user’s name in the sidebar to view a blog.
Can you post comments on a blog?
You can post entries and add comments to existing blogs. Use your blog to express your ideas and share them with the class. As the owner of a blog, you can create entries and your instructor and classmates can add comments. A course or a group can also own a blog.
How to delete comments on a blog?
Under Blog Settings, choose between Monthly or Weekly index entries. Click the check-box to Allow Users to Edit and Delete Entries. Click the check-box to Allow Users to Delete Comments. Edit the Grade Settings for the Blog.
What is a blog in a group?
Blogs are less structured than discussion boards, and they are chronological. Students within the group can post to the Blog and add comments to existing posts. Instructors can also comment on posts. Blogs are an effective means of gaining insight into students' activities and provide a way to share the knowledge and materials collected ...
How to make a blog in WordPress?
Click Create Blog and enter a name for the blog. Enter any specific instructions in the text box, and click Yes to make the blog available to users. Use the Display After and Display Until date and time fields to Limit Availability of the Blog.
How to create a blog in Canvas?
How to Create a Blog 1 Open a course and make sure Edit Mode is ON. 2 Expand the Course Tools section in the Control Panel, and then click on Blogs. 3 Click Create Blog and enter a name for the blog. Enter any specific instructions in the text box, and click Yes to make the blog available to users. 4 Use the Display After and Display Until date and time fields to Limit Availability of the Blog. Click both the Display After and Display Until check-boxes in order to enable the date and time selections. 5 Determine the Blog Participation by clicking Individual to All Students or Course. 6 Under Blog Settings, choose between Monthly or Weekly index entries. Click the check-box to Allow Users to Edit and Delete Entries. Click the check-box to Allow Users to Delete Comments. 7 Edit the Grade Settings for the Blog. 8 When finished, click Submit.
Accessing the Discussion Board
Log into your Blackboard course and click on the Discussion Board link in the course menu.
Accessing a Discussion Forum
Click on the name of the forum from which you would like to delete posts from.
Confirm Thread Deletion
A dialog box will pop up asking you if you wish to delete the selected threads. Click the OK button to delete the selected threads.

Popular Posts:
- 1. what is blackboard
- 2. how to delete a discussion post on blackboard
- 3. how to unsubmit an assignment on blackboard
- 4. how to delete a thread on blackboard
- 5. how to resubmit an assignment in blackboard
- 6. how to double space on blackboard
- 7. how to use blackboard
- 8. how to edit a discussion post on blackboard
- 9. how to submit on blackboard
- 10. how to delete a submission on blackboard