1. Go to the Control Panel of the course you wish you add the course banner. 2. Under Customization, click on Teaching Style > Scroll down to section 5, Select Banner.
How do I add a course banner to my course?
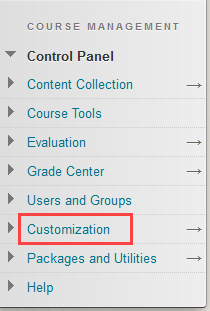
Jul 30, 2017 · Creating a Banner in your Blackboard Course Enter your Blackboard course. In the Course Management menu on the left, click Customization. Click Teaching Style. Scroll down to Select Banner and click Browse My Computer. Select the file you wish to …
How do I personalize my course on Blackboard?
If you know how to use PowerPoint and Blackboard, you can follow these easy steps to create a custom banner with images, text, and colors on each of your Blackboard courses. 1. Open PowerPoint 2. Go to page setup area 2007: Design tab > Page Setup button 2013: Design tab > Click on Slide size drop-down arrow to the far right > Custom 3. Under the “Slides sized for” …
How do I remove a banner from my course page?
In your course, go to Course Image in the left side menu. Alternatively, you can open the Course Image panel by selecting the three dot menu in the upper right corner of your course. Select Edit Course Image and continue: Upload the new image. Position the image using your mouse buttons or …
What is the size of a blackboard banner?
Nov 03, 2021 · To add a banner: Go to the Control Panel and click Customization, then select Teaching Style. In the adjacent window, scroll down to Select Banner. Click the Browse My Computer button and select the banner image that is stored on the computer, then click Open. Click Submit. 3. How to add a Course Banner / Masthead to your Blackboard …

How do I add a course banner to Blackboard?
In your Blackboard course go to Control Panel > Customisation > Teaching Style.Towards the bottom of the page, under SELECT BANNER, click on Browse My Computer to locate and upload the image file you wish to use as a banner.Press Submit, and the image will now appear at the top of your course landing page.More items...•Jul 16, 2018
How do I make a course banner?
0:0011:03How-to: Create a banner for your Blackboard course site - YouTubeYouTubeStart of suggested clipEnd of suggested clipImages are an excellent way to add some visual interest to your course site in this video we'reMoreImages are an excellent way to add some visual interest to your course site in this video we're going to create a little visual interest on our own course by creating a banner for the homepage.
How do I make a blackboard banner in PowerPoint?
How do I create a Blackboard Banner in Powerpoint?Open PowerPoint.Click on the Design tab and the click Slide Size.On the Page Setup window, click Custom Slide Size.Change default Banner dimensions to 8 inches width x 1 inch height.More items...•Mar 4, 2021
What is a course banner?
A banner is an image or text that appears on the top of the landing page of your Blackboard classroom. It can be used to be a visual indicator to identify the course, or as an indicator of topics for ideas as the term proceeds.
How do I customize my banner on blackboard?
To Add a BannerGo to the Control Panel and click Customization, then select Teaching Style.In the adjacent window, scroll down to Select Banner.Click the Browse My Computer button and select the banner image that is stored on the computer, then click Open.Click Submit.
How do you make a Canva banner?
How to make a bannerOpen Canva. Open up Canva and search for “Banners” to get started.Choose a template. Explore Canva's wide range of banner templates for various needs in different styles and themes. ... Customize your banner in mere minutes. ... Get creative with design ingredients. ... Download or share.
What size should a blackboard banner be?
Blackboard recommends that the size of banners be 480 X 80 pixels.Jul 30, 2017
How do I create a blackboard page?
Create a courseOn the Administrator Panel, in the Courses section, select Courses.Point to Create Course and select New. You can merge existing sections, allowing instructors to manage multiple sections of the same course through a single master course. ... Provide the course information. ... Select Submit.
How do I customize my blackboard page?
Select Teaching Style from the Customization section of the Control Panel to customize the course style in the following ways:Change the course entry point. ... Select a Menu Style. ... Select a default content view – Icon Only, Text Only, or Icon and Text.Add a banner to the top of the course Home Page. ... Click Submit.
How do I change my course photo on blackboard?
To change the course view: Change the image in the Grid View for your course by selecting the menu option. Note: When using the Ultra Base Navigation it is recommended that you use the Chrome or Firefox Browser for optimal views. Click on the pencil icon to edit your image. Add the image and save.
How do I add a picture to my Blackboard homepage?
On the personal information page, click 'Personalize My Settings. ' Select the 'Use custom avatar image' on the 'Personalize My Settings' page, browse your computer for your picture, and click 'Submit' once uploaded. Your new avatar image should now appear next to your name in the Global Navigation menu.
1. How to download a banner image
Feel free to download a banner from this page and upload it to your Blackboard course. To download it, RIGHT CLICK on the image and choose “save image.”
2. Add text or create banner with your own photograph
The (soundless) video on the right guides you through the steps to making a banner by uploading your own photo to the free website befunky.com and then uploading the banner to your Blackboard course.
3. UPLOAD to Blackboard
In the Control Panel, click on “Customization,” then click “Teaching Style”
How big should a blackboard banner be?
To set a banner you need to have an image prepared in advance. Banners should be no larger than 1000 pixels wide, by 150 pixels tall and should be uploaded as a .gif or .jpg file.
Is there a timeline for Ultra Course View?
Course banners are not available in Ultra Course View at this time, but they are included in research and development that Blackboard is doing on a course landing page. No timeline is currently available.
How big should a banner be?
Banners should be no larger than 1000 pixels wide, by 150 pixels tall and should be uploaded as a .gif or .jpg file. Banners larger than 1000x150 pixels take up too much space at the top of a page.
How to make a banner on a computer?
Go to the Control Panel and click Customization, then select Teaching Style. In the adjacent window, scroll down to Select Banner. Click the Browse My Computer button and select the banner image that is stored on the computer, then click Open . You may find the following resources useful for creating your own banner:
Popular Posts:
- 1. what is blackboard
- 2. how to delete a discussion post on blackboard
- 3. how to unsubmit an assignment on blackboard
- 4. how to delete a thread on blackboard
- 5. how to resubmit an assignment in blackboard
- 6. how to double space on blackboard
- 7. how to use blackboard
- 8. how to edit a discussion post on blackboard
- 9. how to submit on blackboard
- 10. how to delete a submission on blackboard