Tell Me
- Make sure Edit Mode is ON
- Click on the Discussions link on the Course Menu
- Click on the Create Forum button
- Enter a Name and Description of the forum
- Select forum availability
- Select appropriate forum settings:
- Allow Anonymous Posts: students will have the option of posting replies or messages anonymously
Full Answer
How do I create a discussion board?
New Discussion page. Type a meaningful title to help students find the right discussion. If you don't add a title, "New Discussion" and the date appear as the title for ... Include guidelines and expectations. You can use the options in the editor to format …
How do I print discussion board content from Blackboard?
Create Discussion Boards & Threads. This video shows the steps for creating a discussion forum and thread in a Blackboard course. A forum is a question or prompt presented to students, while a thread is an individual contribution, or response, to the forum. If playback doesn't begin shortly, try restarting your device.
How to create a discussion board?
Oct 24, 2019 · To have the discussion in your course content: 1. Locate the item, module, or folder where you would like to place the Discussion in. Hover your cursor to the center of the item, and click on the purple + icon. 2. Click Create. 3. Under Participation and …
How to access instructor comments and rubrics in Blackboard?
Aug 29, 2021 · 11. How do I create a discussion board forum in Blackboard? https://wiki.umbc.edu/pages/viewpage.action?pageId=22708769. 1. Locate the item, module, or folder where you would like to place the Discussion in. · 2. Click Create · 3. Under Participation and Engagement, … 12. Discussion Boards | Blackboard at KU. …
How do I create a Discussion Board on Blackboard?
Create a discussionIn your course, select the Discussions icon on the navigation bar.Select the plus sign in the upper-right corner to open the menu. ... In the menu, select Add Discussion. ... On the New Discussion page, type a meaningful title. ... Get the discussion started with a question, idea, or response. ... Select Save.
How do you create a Discussion Board?
Step 1: Access the Discussion Board App in the SharePoint Online> Copy the URL in the Address box> Paste it in the Word document. Step 2: Click on the List tab> List Settings> Copy the List ID in the address box.Sep 4, 2020
How do you make a discussion board for a team?
0:050:49Discussion Boards in Microsoft Teams - YouTubeYouTubeStart of suggested clipEnd of suggested clipSo I'm going to use the three dots next to the teams title. And I'm going to add a channelMoreSo I'm going to use the three dots next to the teams title. And I'm going to add a channel automatically show this channel ad. And now in this channel for discussion we can have a really great rich.
Can you create a discussion board on SharePoint?
Create a discussion board in SharePoint Online Step 1: Login to your SharePoint site -> Go to the Settings gear icon on the right side of the page -> Click on Add an app. Step 2: Next click on the Discussion board in the out of box gallery page. ... A Discussion Forum will open. Click on “new discussion”.Jul 21, 2019
How to create an online discussion?
Develop successful online discussions 1 Define participation requirements .#N#Share your expectations. Create a discussion where students can read about etiquette and access grading information.#N#Model proper online interaction and reinforce appropriate behavior with public recognition. 2 Craft an effective question .#N#Incorporate multimedia resources into your questions to reduce the monotony of purely text-based interactions. With the popularity of services like YouTube™, you can ask students to view a clip and ask for responses. 3 Encourage new ideas .#N#If discussion posts contain too much agreement and not enough questioning of ideas, assign students with the last names A-M to support one side and N-Z to support the other. 4 Moderate .#N#Establish your presence. Ask for clarification, resources, or input from silent participants.
Can you use class discussions in assignments?
While you can use class discussions to develop or share ideas, you can also use conversations for quick exchanges on specific content. For example, when you create assignments, you can enable conversations. Anyone can make a contribution to the assignment conversation—ask for help, share sources, or answer questions others have. Everyone can read the conversations while they view the assignment.
Accessing the Discussion Board
Log into your Blackboard course and click on the Discussion Board link in the course menu.
Creating a Discussion Forum, Part 2
Zoom: Image of the Discussion Board Screen with the Create Forum button at the top of the page highlighted with a red circle.
Setting up Forum Information and Availability
You will now see a screen labeled Create Forum. The section labeled Forum Information allows you to enter a name and description for the forum:
Setting Up the Forum Availability
Forum Availability allows instructors to set up the visibility of the forum to students:
Setting up Forum Settings: Overview
Zoom: Image of the section labeled Forum Settings with the following annotations: 1.Viewing Threads/Replies: The options in this section determine how students view threads within the forum.2.Grade: This section allows instructors to enable grading for the discussion forum..4.Subscribe: This section allows instructors to enable subscription options for the forum.5.Create and Edit: This option allows instructors to determine students' ability to edit their posts.6.Additional Options: This section allows instructors to modify additional options related to the discussion forum setup..
Finishing Up
When finished with setting up the discussion forum, click the Submit button at the bottom of the page to create the forum.

Watch A Video About Discussions
- The following narrated video provides a visual and auditory representation of some of the information included on this page. For a detailed description of what is portrayed in the video, open the video on YouTube, navigate to More actions, and select Open transcript. Video: Use di…
Access Discussions
- You can allow users to access discussions in several ways. You can add a customized link to the course menu and to a course area. When you provide a link to discussions in a course area, students can access the tool alongside other course content. As an instructor, on the Control Panel, expand the Course Tools section and select Discussion Board. From this link, access the …
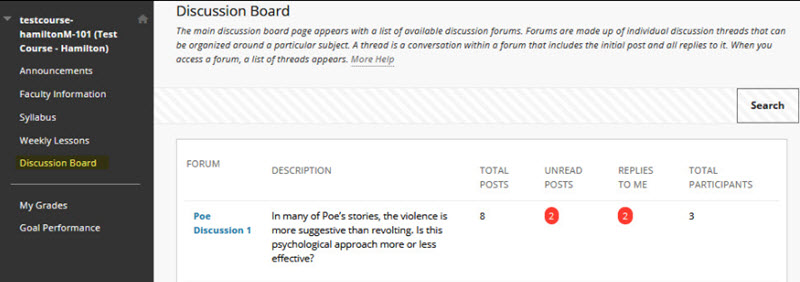
Discussion Board Structure
- Just as it's critical to plan and structure your course content, you need to provide structure for online discussions. The main discussion board page displays a list of forums. A forum is where participants discuss a topic or a group of related topics. Within each forum, users can create multiple threads. A threadincludes the initial post and all replies to it. You can create forums an…
Discussion Board Page
- The discussion board is commonly accessed from the course menu, although you can provide a link to it in another course area, such as in a content area. The Discussion Boardpage contains a list of all the forums you've created. You must first create one or more forums before users can start message threads. You can also search for discussion content. By default, the search field …
Popular Posts:
- 1. what is blackboard
- 2. how to delete a discussion post on blackboard
- 3. how to unsubmit an assignment on blackboard
- 4. how to delete a thread on blackboard
- 5. how to resubmit an assignment in blackboard
- 6. how to double space on blackboard
- 7. how to use blackboard
- 8. how to edit a discussion post on blackboard
- 9. how to submit on blackboard
- 10. how to delete a submission on blackboard