https://help.blackboard.com/Learn/Instructor/Getting_Started/Profile On the Edit My Blackboard Profile page in the right panel, select Change Picture to upload an image from your computer. Select Submit.
Adding Images in a Blackboard Discussion Forum
- Click the Add Image button to see the Insert/Edit Images screen.
- Click Browse My Computer.
- Select your image to add to Blackboard. ...
- Enter a Title and Description.
- You can also adjust some aspects of the image from the Appearance tab.
- Click Insert to finish.
How do I print discussion board content from Blackboard?
Browse your computer and select your image/photo to resize 2. Select the new size for your picture - 600 pixels is recommended for online use 3. Optionally, add an effect to your image (leave unchecked) 4. Select output image/picture quality (Lower quality means a smaller file) 5.
How to set up a discussion board in Blackboard?
May 23, 2021 · To add your image and update your profile, click on your name in the upper right corner once you are signed into Blackboard. From here, you can link your Blackboard profile to your Facebook and/or Twitter account(s), or just upload a picture of yourself by clicking on the “Change Picture” icon.
How do I create a discussion board?
Oct 22, 2021 · Here’s how to add a profile picture or “avatar” that will appear next to your name in some places in Blackboard. Click on your name in the upper right corner of the page. Click Settings. Click Personal Information. Click Personalize My Settings. Select Use custom avatar image and browse your …. Continue reading.
How do I post on the discussion board in Blackboard?
On the personal information page, click ‘Personalize My Settings.’. Select the ‘Use custom avatar image’ on the ‘Personalize My Settings’ page, browse your computer for your picture, and click ‘Submit’ once uploaded. Your new avatar image should now appear next to your name in the Global Navigation menu.
How do I add a picture to my Blackboard discussion board?
On the personal information page, click 'Personalize My Settings. ' Select the 'Use custom avatar image' on the 'Personalize My Settings' page, browse your computer for your picture, and click 'Submit' once uploaded. Your new avatar image should now appear next to your name in the Global Navigation menu.
How do you change your picture on Blackboard Collaborate?
You can change your profile picture by opening the Collaborate panel and selecting the settings tab which appears as a cog icon. Click on the picture to the left of your name at the top and you will be prompted to either upload a file or take a picture with your webcam.
How do I edit my discussion board on Blackboard?
Edit or delete repliesOpen a thread in a forum.On the thread's page, point to a post to view the available functions.Select Edit or Delete. The delete action is irreversible. ... When you edit, the page expands so that you can make edits in the editor while you view the original post.Select Submit.
How do I delete my blackboard profile picture?
Remove or replace your profile picture: Upload or drag in another image. To return to the generic silhouette, select the Delete this picture icon to delete your existing image file.
How do I edit my discussion post on Blackboard as a student?
When you create or edit a forum, you control if students may edit their published posts.Open a forum and select a thread.On the thread's page, point to a post so that all of the functions appear and select Edit.The editor appears. Make edits while you view the original post.Select Submit.
Why can't I edit my post on Blackboard?
You can edit or delete your own posts only if your instructor has made those options available to you. You cannot edit or delete others' posts. If you post a message in error and the option to delete it is not available to you, contact your instructor.
How do I delete my discussion post on Blackboard as a student?
To Delete Old Posts:Enter Blackboard and open the course.Edit Mode - On.Open the Discussion Board.Find a Forum that has posts. Open the forum.Click the top left checkbox to select all the threads.Optional: Uncheck any message to be kept.Click Delete to remove the student posts.
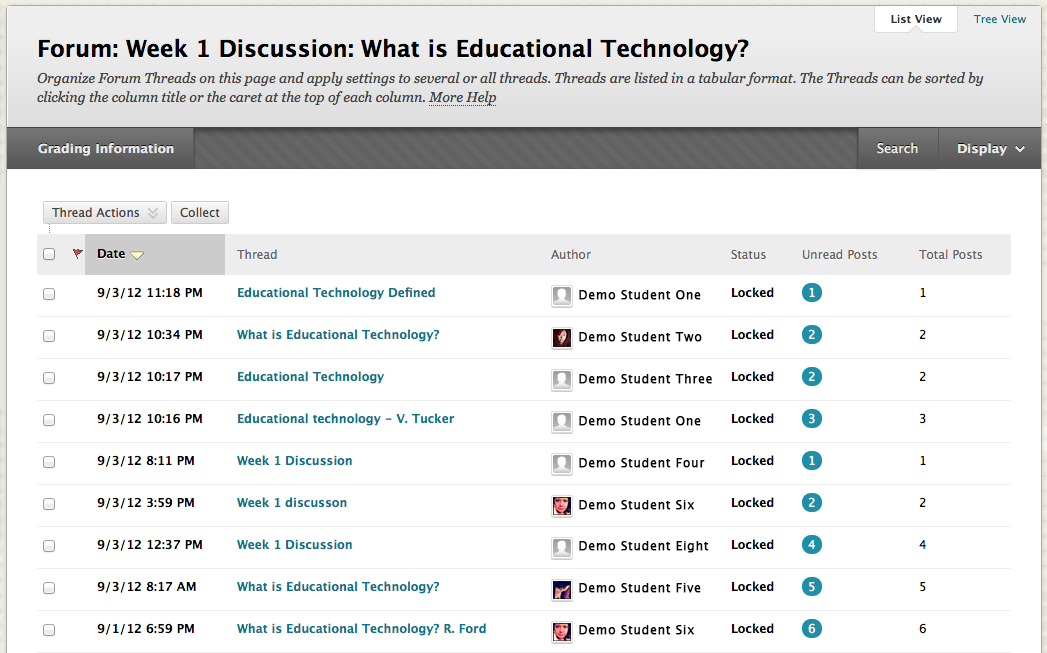
Accessing the Discussion Board
Log into your Blackboard course and click on the Discussion Board link in the course menu.
Editing the Discussion Board Information
Zoom: Image of the Discussion Board Forum List with an arrow pointing to the chevron next to the forum name with instructions to click on the chevron. A menu is open on the screen with the word Edit outlined in a red circle with instructions to select Edit.
Setting up Forum Information and Availability
You will now see a screen labeled Edit Forum. The section labeled Forum Information allows you to enter a name and description for the forum:
Setting Up the Forum Availability
Forum Availability allows instructors to set up the visibility of the forum to students:
Setting up Forum Settings: Overview
The image above shows Section 3: Forum Settings with all the forum settings listed. The settings are divided into groups and are explained in more detail in the following steps:
Finishing Up
When finished with setting up the discussion forum settings, click the Submit button at the bottom of the page to create the forum.

Popular Posts:
- 1. what is blackboard
- 2. how to delete a discussion post on blackboard
- 3. how to unsubmit an assignment on blackboard
- 4. how to delete a thread on blackboard
- 5. how to resubmit an assignment in blackboard
- 6. how to double space on blackboard
- 7. how to use blackboard
- 8. how to edit a discussion post on blackboard
- 9. how to submit on blackboard
- 10. how to delete a submission on blackboard