Add files, images, audio, and video.
- Tab to an item's move icon.
- Press Enter to activate move mode.
- Use the arrow keys to choose a location.
- Press Enter to drop the item in the new location.
Upload your files
- On the Create Item page, enter a title. ...
- Click on the Insert Media icon.
- A new, smaller window opens. ...
- Then Browse to locate your file. ...
- There is no need to use the preview option the audio will appear as it will on the page. ...
- Press Save when done. ...
- Provide a title, then Browse to locate the audio file.
How do I Make my Blackboard course content accessible to students?
Dec 13, 2012 · Adding an Audio File in Blackboard Learn
How do I access Dropbox education from Blackboard Learn?
Apr 19, 2021 · Multimedia: How to Add Audio or Video Files into Blackboard (My Media) Media files should not be directly uploaded into Blackboard because it will cause the entire Blackboard system to slow down. Upload your media files into Kaltura (My Media) before adding them to …
Where can I find files to attach to my course?
After you attach files to a course, Ally creates alternative formats of the file based on the original. For example, if the original file is a PDF, Ally creates audio, electronic braille, and ePub formats of the same content. These formats are made available with the original file so everything is in one convenient location.
Can students upload audio files to Blackboard?
Students have the ability to share audio or video content in Blackboard via the Kaltura Media Mashup tool. Students can access this feature anywhere they have access to write content via the text editor, such as Assignments and Discussion Board forums. Below you will find steps that you can share with your students.Sep 18, 2017
How do I embed audio in Blackboard test?
2:093:21Embed Audio in Blackboard Tests - YouTubeYouTubeStart of suggested clipEnd of suggested clipWhere it says type you need to choose embedded audio. Next select browse course go to upload andMoreWhere it says type you need to choose embedded audio. Next select browse course go to upload and then select upload files. Find your audio file. And then click open and then submit.
What audio files does blackboard accept?
Recognized attachment file typesExtensionFile TypePrograms Associated with the File TypeMP3AudioAudio programMP4VideoVideo playerMPEAudio/VideoAudio programMPG, MPEGVideoVideo player30 more rows
How do I add an audio file?
Add an audio file to a projectIn the toolbar, click Import, locate and select an audio file, then click Import.Choose File > Import (or press Command-I), locate and select an audio file, then click Import.Drag an audio file from the Finder into the Layers list, Timeline, canvas, Audio Timeline, or Audio list.More items...
How do I attach a file in Blackboard discussion board 2020?
Click the Plus + icon located on the Text Box Editor toolbar. On the Add Content screen, click the Insert Local Files or Insert from Content Collection button to locate and select the file. Click Open to add the file, change settings as needed, and click Submit.Nov 19, 2020
How do I embed something in blackboard?
To embed the content, select Insert/Edit Media from Web from the editor. Paste the link in Media URL. Select Insert. To edit the image's source or alternative text, select the image in the editor and then select Insert/Edit Image from Web.
Can you submit mp4 files to Blackboard?
Blackboard maximum course size is 2.45 GB. While it is possible to upload . mp4, . ... ppt files into Blackboard (Bb), these file types tend to be very large, which quickly uses up the finite amount of available Bb course data and can cause time lags and download issues for students.Sep 7, 2021
What files does blackboard not accept?
Please note that neither Blackboard nor Turnitin assignments support Apple Pages files....PDFExcel (XLS, XLSX)Rich Text (RTF) and Text (TXT) files.Open Office (ODP, ODS, ODT) files.AVI video files.Aug 29, 2018
Can you upload PNG to Blackboard?
Blackboard: Supported File Types in Blackboard Assignments Microsoft Word (DOC, DOCX) ... Microsoft Excel (XLS, XLSM, XLSX) OpenOffice Documents (ODS, ODT, ODP) Digital Images (JPEG, JPG, PNG, TIF, TIFF, BMP, TGA, HEIC)Sep 30, 2019
How do you mix audio?
5 Tips for Mixing Audio at HomePan your instruments. ... Add compression, but don't overdo it. ... Reverb is also great, but don't let it muddy a mix. ... Use a high-pass filter, but once again, in moderation. ... Test your mix on multiple sets of speakers.Sep 9, 2021
How do I make an MP3 audio file?
How to Create an MP3 FileFind the built-in microphone, if your system has one, or attach a microphone to your computer.Open Windows Sound Recorder by choosing Start→Programs→Accessories→Entertainment→Sound Recorder.Record your message. ... Click Play to hear your message. ... Save the file as a WAV file.More items...•Mar 27, 2016
What is Blackboard Ally?
If your institution uses Blackboard Ally, you can use the tool to help ensure your course content is accessible to every student. Ally automatically scans your course content and performs steps to make files more accessible. Get started with Ally. In your course, find the file you want to improve.
How to determine where images appear in relation to text?
You can determine where images appear in relation to your text. You can place the cursor where you want the image to be placed and select the Add Content icon. In the new window, choose one of the Common Tools or Additional Tools available according to the content type you are creating, then browse for the image file.
Can you add videos to a course?
You can add files, images, audio, and video when you create content in your course. For example, in discussions, you can browse for a media clip from your computer or your course's file repository: Course Files or the Content Collection.
What does Ally do after attaching a file?
After you attach files to a course, Ally creates alternative formats of the file based on the original. For example, if the original file is a PDF, Ally creates audio, electronic braille, and ePub formats of the same content. These formats are made available with the original file so everything is in one convenient location.
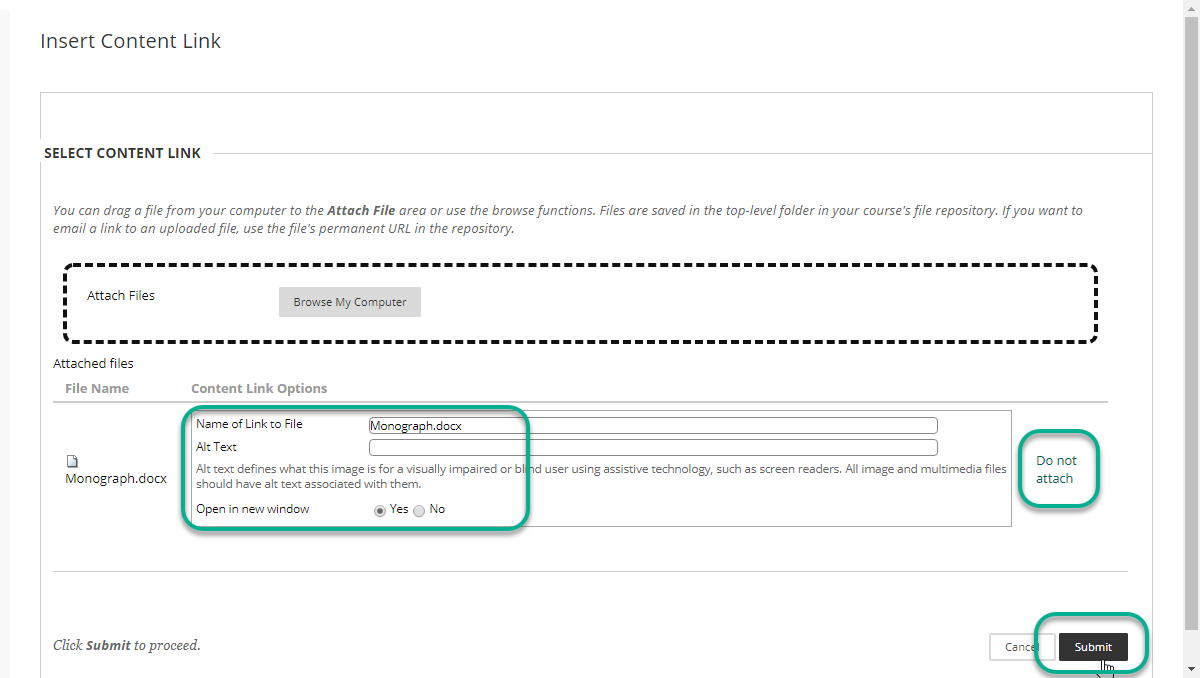
Can you drag and drop files from your computer?
In some instances, you can browse for files in a separate attachment section. You may also be able to drag and drop files from your computer into the Attachments area. Drag files from your computer to the "hot spot" in the Attach Files area. If your browser allows, you can also drag a folder of files.
Can you drag a folder of files?
If your browser allows, you can also drag a folder of files. The files upload individually. If the browser doesn't allow you to submit after you upload a folder, select Do not attach in the folder's row to remove it. You can drag the files individually and submit again.
Can students upload files to Dropbox?
Students can also upload files directly from Dropbox when they submit assignments. When you access Dropbox Education the first time from Blackboard Learn, you're prompted to either create an account or authenticate to your current account. After you log in, browse Dropbox and select content.
What does Ally do after you add content to a course?
After you add content to a course, Ally creates alternative formats of the content based on the original. For example, if the original content is a PDF, Ally creates audio, electronic braille, and ePub formats of the same content. These formats are made available with the original file so everything is in one convenient location.
How to upload a file on a computer?
Select the plus sign wherever you want to upload files . In the menu, select Upload to browse for files on your computer. The files appear in the content list. Open a file's menu to edit the file name, align with goals, replace the file, or add a description.
Can you add files to a course?
Add files from cloud storage. If you already have files stored in the cloud, such as in OneDrive ® and Google Drive™, you can add them to your course. You may choose multiple files from cloud storage to add to your Course Content page in one action. The files you add are copies.
What is status window?
A status window appears to show the progress of the file upload. You can also add files from cloud storage, such as OneDrive. You can edit the file's settings, including the display name, alternative text, and display behavior.
How to review files before importing into a course?
You can review the list of selected files before you import into your course. Review the Item Name, Date Modified, and Size to confirm that these are the correct files. Forgot something? You can add more items to the list. Select Back to Content Collection to continue browsing.
Can you upload files in Ultra?
You can upload files in the editor in certain areas of an Ultra course. For example, you can include an image or a document to help students understand your instructions or initial prompt.
Can you add images to Ultra?
Insert images in the editor. In some areas of an Ultra course, you can use the editor functions to add images along with text content. You can add images that are hosted online or you can upload an image from your local drive. If you add a large image, it's a good idea to include the image as a separate text link.
Introduction
When creating questions for your Blackboard Test, you may wish to add Audio or Video files for students to respond to.
Upload Audio or Video
These instructions describe how to upload a video or audio file saved on your computer into Blackboard to appear in a test question. For example, an audio language clip that you want students to listen to and answer questions about.
Embed Videos
In the Blackboard text editor use the Embed symbol to add the html Embed Code
How the Media is Displayed
The media will display in the question text area. You can change where this is placed as with all media in the Blackboard Text editor.

Introduction
Upload Audio Or Video
- These instructions describe how to upload a video or audio file saved on your computer into Blackboard to appear in a test question. For example, an audio language clip that you want students to listen to and answer questions about. In the Test Canvas and when creating a question: Click the Add Content symbol Select Insert Local files (for files you have on your com…
Embed Videos
- In the Blackboard text editor use the Embed symbol to add the html Embed Code From the <> Embed code in the video from the source video – this can be a video hosting site such as Youtube or MS Stream videos Click Save
How The Media Is displayed
- The media will display in the question text area. You can change where this is placed as with all media in the Blackboard Text editor.
Popular Posts:
- 1. what is blackboard
- 2. how to delete a discussion post on blackboard
- 3. how to unsubmit an assignment on blackboard
- 4. how to delete a thread on blackboard
- 5. how to resubmit an assignment in blackboard
- 6. how to double space on blackboard
- 7. how to use blackboard
- 8. how to edit a discussion post on blackboard
- 9. how to submit on blackboard
- 10. how to delete a submission on blackboard