How to Add an Image to Blackboard
- Log into Blackboard and navigate to where you would like to add the image,...
- In the content editor toolbar, click the Insert/Edit Image icon...
- Under the General tab, click the " Browse My Computer " button to navigate to...
- Please remember to add an Image Description and a Title to...
On the personal information page, click 'Personalize My Settings. ' Select the 'Use custom avatar image' on the 'Personalize My Settings' page, browse your computer for your picture, and click 'Submit' once uploaded. Your new avatar image should now appear next to your name in the Global Navigation menu.
Full
AnswerHow to add a photo to Blackboard?
Adding Vertical or Horizontal Space will add space around the image. (10-20 pixels is recommended) Click Insert when satisfied. To edit an inserted image, right-click the image and select Image from the popup menu. How to Insert an …
How to add a background to a photo?
Sep 01, 2021 · https://utlv.screenstepslive.com/s/faculty/m/BlackboardLearn/l/185518-uploading-a-profile-picture-to-blackboard. Display Options: Under Display Options, choose the option labeled “Use Custom Avatar Image” · Attach File: Click Browse Local Files to upload an … 6. Add an Image to an Item in Blackboard. Add an Image to an Item in Blackboard
How do you compress an image?
Sep 02, 2021 · 1. Browse your computer and select your image/photo to resize. 2. Select the new size for your picture – … 9. Adding a Profile Picture into Blackboard Collaborate. https://canvas.rice.edu/courses/13873/pages/adding-a-profile-picture-into-blackboard-collaborate. This section provides an overview on how to add a profile picutre. Adding a Profile Picture. …
How do you insert pictures?
To add an image in a Blackboard post: Click the Add Image button to see the Insert/Edit Images screen; Click Browse My Computer; Select your image to add to Blackboard. Try to keep your images small. (Instructions: Windows 10 or MacOS) Enter a Title and Description; You can also adjust some aspects of the image from the Appearance tab; Click Insert to finish
How to add a picture to a blackboard?
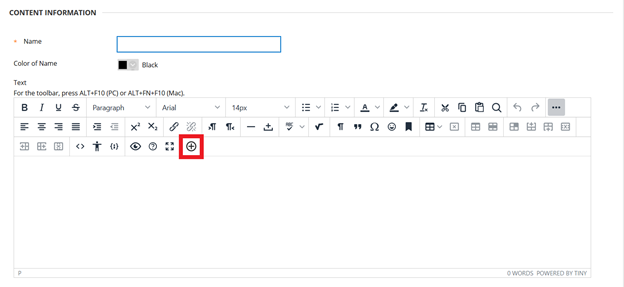
Follow these instructions to add an image to any Blackboard item: 1 Log into Blackboard and navigate to where you would like to add the image, such as in a discussion or an assignment. 2 In the Message area, click + to add content. If you do not see the + button click the three dots in the top right to display all rows of icons. 3 Under the Add Content tab, click the Insert Local Files button to navigate to the image you would like to add. You can also choose to add the file to Kaltura here if you would like to use it easily in other posts! 4 You can right click on the image and click Image to add an Alternative Description for accessibility. 5 Check to see if your image is displaying correctly. You may choose to resize your image by selecting the image and dragging one of the corners larger or smaller. 6 When you are happy with the way your item looks, click Submit to save the changes to your Blackboard item.
How to resize an image in Accessibility?
Check to see if your image is displaying correctly. You may choose to resize your image by selecting the image and dragging one of the corners larger or smaller. When you are happy with the way your item looks, ...
Uploading a Profile Picture, Part 1
Zoom: Image of the Blackboard Learn Header with the user's name in the upper right hand corner outlined, and users are instructed to click on the name.
Uploading a Profile Picture, Part 2
The notification panel will appear onscreen, similar to the image above. At the bottom of the page, click the Settings button.
Uploading a Profile Picture, Part 4
Zoom: Image shows the Personal Information screen, with the Personalize My Settings link highlighted, with instructions to click on the link.
Uploading a Profile Picture, Part 5
Zoom: This image has the following steps annotated: 1.Display Options: Under Display Options, choose the option labeled "Use Custom Avatar Image"2.Attach File: Click Browse My Computer to upload an image and select a file from your computer.3.When finished, click Submit at the bottom of the screen.
Confirmation
A purple status bar with the message: Success: My Settings updated will appear at the top of the screen, and the selected image will now appear next to your name in Blackboard.
Popular Posts:
- 1. what is blackboard
- 2. how to delete a discussion post on blackboard
- 3. how to unsubmit an assignment on blackboard
- 4. how to delete a thread on blackboard
- 5. how to resubmit an assignment in blackboard
- 6. how to double space on blackboard
- 7. how to use blackboard
- 8. how to edit a discussion post on blackboard
- 9. how to submit on blackboard
- 10. how to delete a submission on blackboard