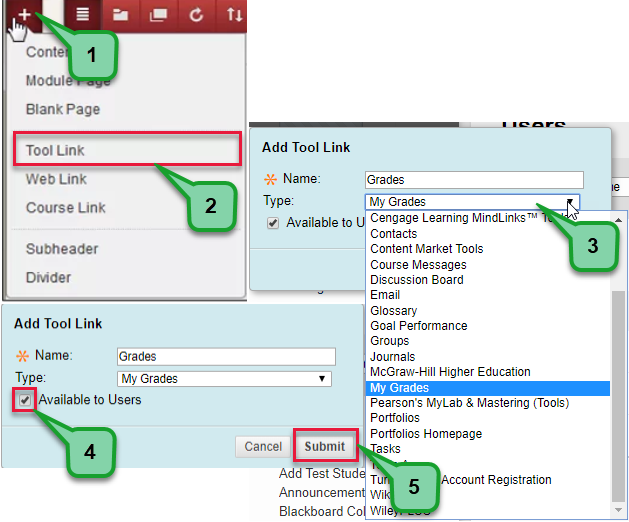
How do I create a Grade Center Column?
1. Click the Create Column button at the top of the Grade Center. 2. Enter the name of the column in the Column Name field. Note: Any field that has an asterisk next to it is required. In this case, the only required entries are the Column Name and Points Possible. 3. Select the Primary Display. (Score, Text, Percentage, Letter, Complete/Incomplete)
How do I add text to a grading column?
Click on the Plus Sign above the course menu. Select Divider from the menu. The divider will then appear at the bottom of the course menu and can be repositioned into the desired location. Prev: Adding a Subheader to the Course Menu. Next: Adding A Course Link to The Course Menu.
How do I use the external grade column?
wikis and blogs, Blackboard gives you the option of automatically adding a new grade column to the . Grade Center. Manually Created Columns . Manually created columns are used for graded items completed outside of Blackboard. To manually create a new column: 1. Click on the . Grade Center . under. Control Panel. 2. Select . Full Grade Center. Adding Grade Columns to
How do I edit a column in Blackboard?
Locate the column you wish to edit and click the chevron in the column header. Select Edit Column Information from the menu.Jan 10, 2019
How do I add a divider in Blackboard?
0:000:39Adding a Divider in Blackboard Learn - YouTubeYouTubeStart of suggested clipEnd of suggested clipMove your cursor over to the plus icon located in the upper left-hand column of your course menu.MoreMove your cursor over to the plus icon located in the upper left-hand column of your course menu. Then select divider. Now you'll see a horizontal line show up at the bottom of the. Page.
How do I organize my grade columns in Blackboard?
0:071:36Rearranging and Organizing Columns in the Grade Center - YouTubeYouTubeStart of suggested clipEnd of suggested clipOrganization you will see your Grade Center here top to bottom if you want to rearrange the columnsMoreOrganization you will see your Grade Center here top to bottom if you want to rearrange the columns for any reason you point to the crosshair. Hold your left mouse button down and drag.
How do I make columns in Blackboard?
Under the control panel click the Grade Center bar on the menu and then select Full Grade Center. Once inside the Grade Center, click Create Column on the Action Bar. On the Create Grade Column page, enter the Column Name and optional Description. [Enter a brief, descriptive name.
What is course divider?
A divider allows instructors to create a line that divides the course menu into sections.Jul 11, 2018
Where is the column Organization Page blackboard?
Click Manage and select Column Organization. From this area you can see the point values, due dates, and categories of each of the columns. From this screen you can also rearrange your grade center, change the column category, and hide or show columns to students and yourself.Dec 20, 2020
What is a frozen column in Blackboard?
Freezing columns allows you to scroll through the Grade Center keeping certain columns frozen as you scroll through content.Mar 30, 2018
How do I manage my gradebook in Blackboard?
Click anywhere in a cell to access the management functions or assign a grade. Select the cell or grade value to edit an existing grade or add a new entry. After you assign a value, click anywhere outside the grade area to save. View submissions.
How do I add a letter grade column in Blackboard?
Set Grade Center Columns to display the letter grade Select the column you wish to display the letter grade, click on the chevron icon next to the column, and click on Edit Column Information. Select Letter option from the Primary Display drop down menu. Click Submit.Dec 21, 2020
How do I create a weighted column in Blackboard?
Locate the Weighted Total column in the Grade Center. Click the Action Link (drop-down arrow) in the column heading, then select Edit Column Information from the menu. If you do not have a Weighted Total column, create one by clicking Create Calculated Column > Weighted Total. Required: Fill in the column name.
How do I make two columns in Blackboard?
Select the Type of Calculated Column You Want to CreateClick the Create Calculated Column button to display the drop-down menu of options.Select the type of Calculated Column you want to create from the list of four types available.Dec 15, 2021
Faculty Guides and Documentation
Here you will find documentation and tutorials for the various software and services supported by UT Online. If you are unable to find the information for which you are looking, please reach out to our help desk using the information on the left side-bar.
Adding a Divider to the Course Menu
A divider allows instructors to create a line that divides the course menu into sections. This guide will demonstrate how to create a divider in Blackboard.
How many characters can a column name be?
The name cannot be longer than 15 characters.
What happens if you enter 0 as a grade?
If you enter “0” as a value for points possible and enter the grade as the grade will display as entered, formatted as a number with two decimal places. If you enter a grade as a percentage it will display as entered without the % sign.
Does the grade center work?
The Grade Center does not always work as expected. In particular, values may be interpreted differently from what you anticipate. Subsequently, any calculated columns (such as the Total and Weighted Columns) or Column Statistics information should be checked for accuracy. It is good practice to maintain a back-up record of your course grades and related assignments and tests on your personal computer. We recommend that you download the Grade Center information regularly, and check all calculations for accuracy.
What are the three types of columns in the Grade Center?
Three types of columns. In the Grade Center, three types of columns appear: user, calculated, and grade . Each column has a menu with options. The options that appear vary based on the type of column. When you create or edit columns, you can select settings to display the data you want in the Grade Center.
Can you edit a grade column?
You can edit a grade column to rename it, associate it with a different category, and associate it with a rubric and grading period. You can also determine if students will see the results in My Grades, and include or exclude the column in calculations.
Can you delete a column in Last Access?
Last Access. Availability. You can't delete or edit default user columns. You can hide all but the first user column in the grid. If you need to hide the first column, you can rearrange the user columns on the Column Organization page. But, at least one user column must show.
Can you change the name of a column in the grade center?
Each column's menu displays options that are specific for that column. In the Grade Center, you can't change the Item Name of columns created automatically for gradable items, such as tests and assignments. You can edit the name of a gradable item in your course and the name will change in the Grade Center.
Manual Grade Columns
Blackboard Help has excellent instructions on creating a manual grade column.
Create Calculated Column
See this Blackboard Help article for d etails on creating calculated columns. If you would like to create a column with an Average, a Minimum/Maximum, a Total, or a Weighted Total select “Create Calculated Column”.
Editing a Grade Center Column
Zoom: Image of the Full Grade Center with the following annotations: 1.Locate the column you wish to edit and click the chevron in the column header.2.Select Edit Column Information from the menu.
Editing the Column Information
Note: Columns for different assignment types may have different available options.
Editing the Due Date
The section labeled Dates allows instructors to modify the due date for the grade column.
Editing the Column Options
Zoom: Image of the options section with the following annotations: 1.Include this Column in Grade Center Calculations: Select Yes to include the column in any future Grade Center calculations.
Three Types of Columns
- In the Grade Center, three types of columns appear: user, calculated, and grade. Each column has a menu with options. The options that appear vary based on the type of column. When you create or edit columns, you can select settings to display the data you want in the Grade Center. You also can hide and show columns, associate columns with categories and grading periods, and r…
About User Columns
- In a new course, six default user columns appear in the Grade Center grid: 1. Last Name 2. First Name 3. Username 4. Student ID 5. Last Access 6. Availability You can't delete or edit default user columns. You can hide all but the first user column in the grid. If you need to hide the first column, you can rearrange the user columns on the Column Organization page. But, at least one user col…
External Grade Column
- The results in the external grade column are shared with your institution as your students' grades for your course. You decide which column is set as the external grade. In new courses, the default total column is the default external grade column, and the External Gradeicon appears in the column header. You can't delete the default total column until you set another column as the ext…
Menu Options
- Each column's menu displays options that are specific for that column. Example: Edit column names In the Grade Center, you can't change the Item Nameof columns created automatically for gradable items, such as tests and assignments. You can edit the name of a gradable item in your course and the name will change in the Grade Center. On the Edit Column page for auto-created …
Automatic Deletion of Grade Columns
- If you delete a content folder in a content area that contains graded items with no attempts, the corresponding columns are also deleted from the Grade Center. More on deleting containers and content
Popular Posts:
- 1. what is blackboard
- 2. how to delete a discussion post on blackboard
- 3. how to unsubmit an assignment on blackboard
- 4. how to delete a thread on blackboard
- 5. how to resubmit an assignment in blackboard
- 6. how to double space on blackboard
- 7. how to use blackboard
- 8. how to edit a discussion post on blackboard
- 9. how to submit on blackboard
- 10. how to delete a submission on blackboard