Content areas are the top-level course areas. You create and manage them on the course menu. Point to the plus sign above the course menu. The Add Menu Item drop-down list appears. Click on Content Area.
Create a new Content Area
- Within your module, select the + at the top of the Course Menu. ...
- From the drop down menu, choose Content Area.
- Type in the name of your new Contant Area. ...
- Locate your new Content Area at the bottom of the current Course Menu and above the Course Management options.
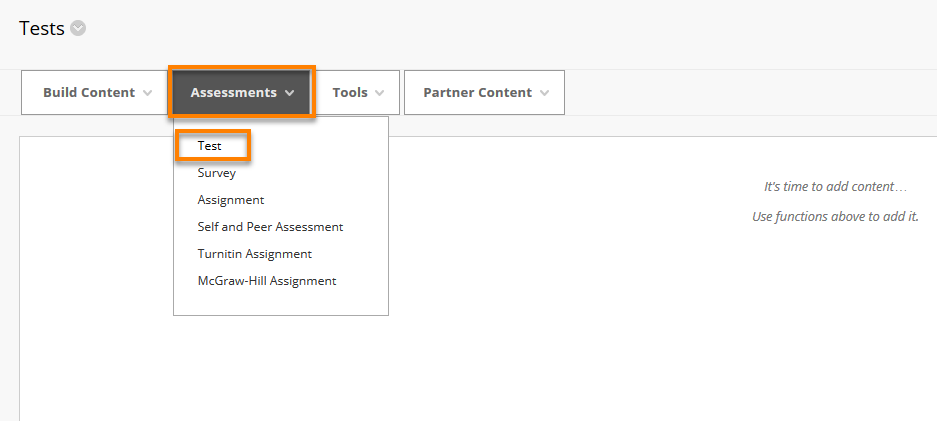
How do I add files to a Blackboard course?
Create Content. Content Collection. Reuse Content. Release Content. Mobile-Friendly Courses. Best Practices. Build a Glossary. Bulk Delete Course Materials. On this page.
How can I access valuable learning materials on Blackboard?
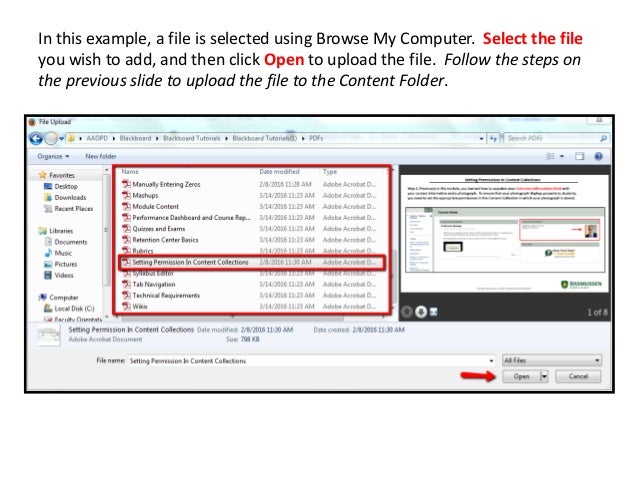
Create an Item: In your Blackboard course, open the Content Area where you'd like to add the file (s), such as Outline. On the Content Area page, click Build Content and select Item from the menu. On the Create Item page, enter a Name for the item.
How do I add content to my course?
May 16, 2018 · To add a content area, follow the steps listed below: In the course menu, hover over the Add Menu Item button (denoted by the + sign) at the top of the course menu. Select Content Area from the menu that appears.
How do I change the name of a Blackboard course menu?
In the Course Management Control Panel under Content Collection, the first item listed is your course's public file storage area. The second item listed, with your NAU ID, is your private file storage area. The Content Collection is the place where all files that you brought in from outside Blackboard are stored. (Content pages created with Blackboard's internal editor are not visible …
How do I organize course content in Blackboard?
You can rearrange the order of content items (or folders) within a course content area, simply by dragging each item to the desired position. Hover over the left-hand edge of an item and your mouse pointer will change to a four-headed arrow. Use this to drag and reposition the item or folder.Feb 28, 2019
How do I create sections in Blackboard?
Add sectionsFrom Site Manager, find the channel you want to add a section to.Select New Section.Type a Section Name.Type a Menu Name. The menu name appears in the navigation on the end-user website.Select a Section Configuration from the menu. ... Optionally, add contact information.Select Save.
What is a content area in Blackboard?
A Content Area allows course content to be organized into folders, files, graphics, assignments, tests, external links, and Blackboard Learn tools. You can create multiple Content Areas for your course and place them on the Course Menu.
What type of items can you add to a content area in Blackboard?
An item can contain text, attached files, web links, images, and more. Descriptive text can be added as well. If you're not copying content from a previous Blackboard course you can start by creating a content area which is a new page in your course with a corresponding left menu link.
How do I create a master course in Blackboard?
Create a courseOn the Administrator Panel, in the Courses section, select Courses.Point to Create Course and select New. You can merge existing sections, allowing instructors to manage multiple sections of the same course through a single master course. ... Provide the course information. ... Select Submit.
How do I combine course sections in Blackboard?
Merge coursesOn the Administrator Panel in the Courses section, select Courses.Point to Create Course and select Merge Enrollments.Edit the course properties as if you're creating a new course.Select Browse next to Add Child Courses and select the courses to be merged.Select Submit.
What is course content example?
Any informational material that is required for participation or understanding content such as assigned readings, video recordings, exams, and any other material needed for learning.
How do I create a content folder in Blackboard?
Add a FolderClick on the “Build Content” action menu button to expose a listing of content types to choose from.Select “Content Folder” listed under the “New Page” heading.Name the folder and decide when to make it available to students. ... Click “Submit” to complete the creation process.
What is the difference between content area and module page in Blackboard?
Unlike the content folder, a learning module will give you and your students a table of contents that automatically lists the content you put within the module. You can enforce sequential viewing of the items in the learning module, so students will need to access the items in the order than you determine.Jul 29, 2021
How do you organize your learning content?
If you want to organize content sequentially, there are different ways to present information to students so they can maximize their learning: Description/List: A list is an easy to recognize manner of presenting information. ... Problem/Solution: ... Simple to Complex: ... Familiar to Unfamiliar:
How do I upload content to Blackboard Collaborate?
Share audio and video streams and filesFrom a Chrome browser, open the Collaborate panel and select the Share Content tab.Select Share Application/Screen.Select the Chrome Tab option. ... Select the Share audio check box.Choose the tab you want to share from the list.Select Share.
How do you create training content?
Step 1: Conduct a needs analysis for your corporate training solution. Step 2: Evaluate existing content for your training content development process. Step 3: Incorporate the prior knowledge of learners. Step 4: Create a course outline.Jun 2, 2020
What is content container?
In a content container, you create content from menus for content items, tests, assignments, and links to tools. As you create content, you can set its options, such as availability. You can create content and make it unavailable to students until you're ready for them to view it.
Can you make content unavailable to students?
You can create content and make it unavailable to students until you're ready for them to view it. You can also limit which content items students see based on date, time, individual users, course groups, and their performance on graded items. Example: Release an assignment after a test is taken.
What is a newly created content area?
A newly created content area is an empty container. Select the link to the content area to add content. New courses contain several default content areas, such as "Information" or "Content.". These default content areas are empty, and you can choose to add content to them, rename them, or delete them.
What is content area?
Content areas are the top-level containers that provide your course structure. Typically, courses contain multiple content areas. Folders can contain content items and other containers, such as a lesson plan or other folders. Learning modules can contain content items and other containers. You can add a table of contents ...
Why use folders in a class?
Use folders to reduce scrolling and help students find materials easily. You want to limit the number of nested folders used so that students can access content with as few steps as possible. You can add a description that outlines the contents of the folder.
What is a chronological content area?
Chronological: Each content area contains a week's worth of readings, assignments, lecture notes, and discussions. By content type: Each content area contains similar content types, such as all the lectures for the entire course. By subject area: Each content area contains lecture material and readings on a specific subject, along with assignments, ...
Can you add a table of contents to a lesson plan?
You can add a table of contents and require sequential viewing of its content. Lesson plans can hold lesson profiles, instructional objectives, and the content items students need to complete a lesson. You create folders, learning modules, and lesson plans within an existing content area or another container.
Can you create folders in a content area?
After you create a folder, you can add content and additional sub-folders to it. For example, in a content area, you can create folders for each week of your course.
What is a course folder?
The course folder may be used as a sandbox for each course's instructors, teaching assistants, and course builders to create and share documentation amongst themselves. Additional permissions do not have to be applied because these roles already have default Full permission for their courses.
Can administrators create a course ID for a non-existent course?
To enable this, administrators can create a course ID or organization ID for a non-existent course , for example 'BotanyLevel1', and then enroll all users who will interact with content for ...
Can you manually add a folder to a course?
Folders cannot be manually added to the courses or organizations top level folders, but subfolders may be added using Add Folder once inside the specific course or organization folder.
How to add content to Blackboard?
To create a Content Item, follow these steps: On your Blackboard course menu, click on any of the Content Areas such as Outline. On the Content Area page, hover over Build Content, then click on Item under Create.
How to copy a course on Blackboard?
Open your ORIGIN course, the course FROM which you want to copy. Go to the Control Panel, click on Packages and Utilities, and click on Course Copy. On the Course Copy page, click Browse next to Destination Course ID.
How to embed a video in Blackboard?
To embed a video file you have on your computer, follow these steps: Open your Blackboard course and click on any Content Area such as Syllabus . On the Content Area page, click Build Content, then choose Item . On the resulting form, Name your item and proceed to the Content Editor window. On the third row of the Content Editor tools, ...
How to set a date and time restriction on Blackboard?
To set a simple Date/Time restriction on content: Open your Blackboard course and find the content that you want to edit. Put your mouse on the content's name, click the downward arrow that appears to the right, and then click Edit. Choose Yes to make the content available .
Can you use third party cookies on Blackboard?
Troubleshooting. Allowing Third-party cookies. If you receive an error in Blackboard or cannot access videos or tools like Collaborate Ultra, Echo360, or VoiceThread , you may need to configure your browser's cookie settings to allow third-party cookies. It is best to restart your computer after updating any settings.
Can you paste a document into Blackboard?
Yes, you can paste text from an external source into Blackboard; however, you will have the best results if you type your text directly in the editor and format it with the available options. You may see formatting issues when you paste text from a website or a Word document directly into the editor.
Can you edit auto transcripts on Blackboard?
You can also edit the auto-transcript and apply it as captions. First, you would need to create an Echo360 course section on Blackboard and upload your video to it. Auto-transcripts are then made available about 30 minutes after the video is published to the course section.
Creating a New Content Area, Part 1
In the course menu, hover over the Add Menu Item button (denoted by the + sign) at the top of the course menu.
Creating a New Content Area, Part 2
You will now see a screen similar to the one above labeled Add Content Area.
Where is the course menu on Blackboard?
The course menu on the upper left side of the screen is the main course navigation tool. To customize the course menu, click on the + button and a menu appears. Tool Link lets you create a shortcut to any frequently used Blackboard tool, such as the Discussion Board, the Calendar, etc.
What does the blackboard icon mean?
A file's icon in Blackboard gives you useful information about the file's type. A generic looking icon such as the one above indicates that the file was imported from outside the Bb Learn system.
Is there a best practice for online courses?
There is no single best practice for all courses. As more and more work is done online, however, courses should shift away from the use of downloadable files (such as Word and PowerPoint documents) and towards the use of content that is directly readable online, in the browser. Even PDFs, which require a plug-in or helper application in order to be viewed, may create an access barrier for some students and should, therefore, be converted to web pages where practical. Content that has been converted to web pages is easiest to keep up-to-date, and least likely to cause access barriers.
Can I copyright an image?
Right-click on almost any web page graphic and your web browser can save a copy of the image to your computer.#N#Be mindful about copyrighted images. Under the concept of "fair use," you can use copyrighted images for educational purposes, but it's polite to include a photo credit and a link to the source of your images.
Can you copy and paste from Word into Bb Learn?
Hover over any tool to see its function. Paste from Word: You can copy/paste text directly from Microsoft Word into Bb Learn. Such content can be easily edited later in Blackboard. This works much better than using Word to convert the document to HTML because Blackboard strips out the bad code when pasting in.
What is content area?
After you create a content area, you can create content items within it to present your course material. You can include content such as folders, text, file attachments, links to websites, tests, assignments, and multimedia. NOTE: When performing the instructor functions, ensure Edit Mode (button on top right hand side of the screen) is ON.
What is a folder in a course?
Folders are a type of course area that you can use to organize content. You create folders in existing content areas. After you create a folder, you can add content and additional sub-folders to it. For example, in a content area, you can create folders for each week of your course.
What is alt text?
Alt text (alternative text) is a short phrase describing any visual components on a web page. Alt text is interpreted by screen readers and helps describe what some users cannot see. You can link to files already in Course Files or the Content Collection -OR- browse for one on your computer.
What is a ZIP file?
The system saves an archived course as a ZIP file—a compressed file containing the course's content. ZIP files are also called "packages.". You can restore a ZIP file on the same or a different server. When to use: Archive a course to maintain a record of your course—a point-in-time backup.
Can you copy and move a course link?
Some content items have copy and move restrictions. For example, you can only copy and move a course link to another area within the same course. You cannot copy assignments, tests, and surveys, but you can move them within the same course. • Copying content does not delete it from the original location in your course.
Can you use file name or link title?
You can use the file name or provide a link title for each.In our example, a link title appears for each. Files Appear: The links to the files appear exactly where you want. As you refine your content or need to update material, you can continue to add files, images, web links, mashups, and links to multimedia.
Can you reuse a file in a course?
Therefore, you can delete links to files in your course, yet the files themselves remain in the repository, where you can link to them again. Also, if you modify or move a file to another folder after you link it in your course, the link will not be broken.
Can you copy a course into another course?
You have options when making a copy. You can copy one course's content to create a new course. You can copy all or part of the content into a new course or an existing course. This is a good way to copy part of one course into another without overwriting any of the existing course's content.
Organize Course Content
- Administrators can make the Courses folder in the Content Collection available to instructors, content designers, and students.
Use The /Courses Or /Organizations Folders
- The /courses and /organizationsfolders can be used in several ways: 1. As a sandbox for instructors, teaching assistants, and course builders to create and share documentation amongst themselves, which may be linked to from inside the course for sharing with the course members. 2. As a space for students to directly access or collaborate on some of the course content. 3. T…
Use The /Courses Or /Organizations Folders as A Sandbox
- The course folder may be used as a sandbox for each course's instructors, teaching assistants, and course builders to create and share documentation amongst themselves. Additional permissions do not have to be applied because these roles already have default Full permission for their courses. After content is created in the course folder, it may be linked to from inside th…
Allow Students Selective Access to Course Or Organization Folders
- Instructors may want students to have access to the course folder to collaborate on group projects or write to collective documentation. For this to happen, permission should be extended to students in the course on the top-level course folder-named using the course ID. Sub-folders can be made selectively unavailable by removing student permission to these private folders.
Provide Storage, Workspace, and Access For Content Collections
- Realistically, many institutions have groups of users who are not members of the same courses or organizations who should have access to the same content. To enable this, administrators can create a course ID or organization ID for a non-existent course, for example 'BotanyLevel1', and then enroll all users who will interact with content for that topic as instructors, course builders o…
Create Folders in The Course Content Area
- The course and organization folders use existing IDs (course IDs and organization IDs) to create subfolders. For example, if a course has a course ID of Biology100, the course folder in the Content Collection is automatically named Biology100. Folders cannot be manually added to the courses or organizations top level folders, but subfolders may be added using Add Folderonce i…
Access The Course Content Area
- Administrators should consider who has access to courses folders. By default, the system is set up to give full permission to the instructor, teaching assistants, and course builders. This also means that the folder is generated the first time one of these users opens on the Content Collection tab. To edit these default role designations, go to Content Area Management on the A…
Popular Posts:
- 1. what is blackboard
- 2. how to delete a discussion post on blackboard
- 3. how to unsubmit an assignment on blackboard
- 4. how to delete a thread on blackboard
- 5. how to resubmit an assignment in blackboard
- 6. how to double space on blackboard
- 7. how to use blackboard
- 8. how to edit a discussion post on blackboard
- 9. how to submit on blackboard
- 10. how to delete a submission on blackboard