- Tab to an item's move icon.
- Press Enter to activate move mode.
- Use the arrow keys to choose a location.
- Press Enter to drop the item in the new location.
Full Answer
How do I organize course content on Blackboard?
Create content. Tab to an item's move icon. Press Enter to activate move mode. Use the arrow keys to choose a location. Press Enter to drop the item in the new location.
What is the blackboard content collection?
You create your individual pieces of content in content containers: content areas, learning modules, lesson plans, and folders. In a content container, you create content from menus for content items, tests, assignments, and links to tools. More on the types of content you can add. As you create content, you can set its options, such as availability.
How can I access valuable learning materials on Blackboard?
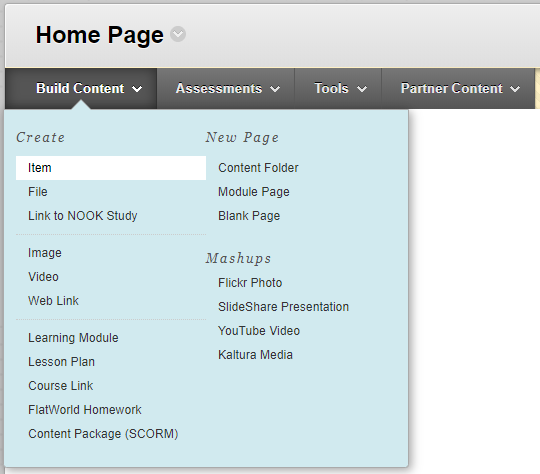
Create course content folders using Build Content/Content Folder. Create course content pages using Build Content/Blank Page. Content pages created by the internal editor use the icon shown above. Hint: If you build a folder first, then go into the folder and choose Build Content/Blank Page, the page will be created within that folder.
How do I create a grade column in the blackboard Grade Center?
Click on the link to enter the page and then click “Build Content” in the upper left hand corner of the page. Choose “Item” from the drop down menu and upload your syllabus. You may want to add a separate item to this page that displays just the course schedule by adding an item and then cutting and pasting the schedule into the text editor.

How do I create a content in Blackboard?
0:043:04Add Content to the Course Content Page in Blackboard Learn with the ...YouTubeStart of suggested clipEnd of suggested clipFirst let's look at the create item menu. You can create tests assignments or discussions. CreateMoreFirst let's look at the create item menu. You can create tests assignments or discussions. Create learning modules and folders to organize your content and create documents and links.
How do I add content to a Blackboard module?
QUICK STEPS: adding items to a Learning ModuleIn Edit Mode, on the Course Menu, click the Content Area containing the Learning Module.On the Content Area page, click the Learning Module's title.On the Learning Module's Action Bar, point to Build Content and click Item.On the Create Item page, enter a Name.More items...
How do I organize content in Blackboard?
Folders are used to organize course materials. Instructors can create a series of folders for each unit, chapter, week, or by topic. Once a folder is created, course materials and additional sub-folders may be added to it. Any of the Content types available in Blackboard's content area may be added to a folder.Dec 26, 2020
What are content types in Blackboard?
Students select a file title to download it. You can also expand or create a folder and upload files. Supported file types include DOC, DOCX, HTM, HTML, MP3, MPG, PDF, PPT, PPTX, XLS, XLSX, RTF, TXT, ZIP, and most image types.
What is course content example?
Any informational material that is required for participation or understanding content such as assigned readings, video recordings, exams, and any other material needed for learning.
What is content of the module?
Content is organized into modules using the Content Tool. Content items are referred to as 'topics'. Modules can contain as much or as little content as needed, and one or more sub-modules. Each iCollege course will likely have many modules.
What is a content folder in Blackboard?
Content areas, such as Users, Courses, Institution, and Library, are folders stored under the root folder. A folder is automatically available to the user who created it, and may also be visible to other users if you create it in the course area.
Where is the content area in Blackboard?
The new content area is created at the bottom of the upper part of the left menu. You can drag it by the left edge to reposition if desired. Click on the new left menu link to enter the content area. Open a course area, such as a Content Area, Learning Module, or folder.
How do I create a content folder?
To create a Content Folder: In the Course Content area, locate where you would like to create a folder and select the plus sign > Create. On the Create Item panel, select Folder. Edit the name of the folder by selecting it or using the pen icon.
What is the difference between content area and module page in Blackboard?
Unlike the content folder, a learning module will give you and your students a table of contents that automatically lists the content you put within the module. You can enforce sequential viewing of the items in the learning module, so students will need to access the items in the order than you determine.Jul 29, 2021
What course material means?
Course materials include, but are not limited to, lectures, lecture notes, and materials, syllabi, study guides, bibliographies, visual aids, images, diagrams, multimedia presentations, web-ready content, and educational software.
What is course structure?
The course structure refers to the choice of topics and the organization and sequencing of course content. Remember that the choice of topics and their organization should always support the learning objectives for the course.
Where is the course menu on Blackboard?
The course menu on the upper left side of the screen is the main course navigation tool. To customize the course menu, click on the + button and a menu appears. Tool Link lets you create a shortcut to any frequently used Blackboard tool, such as the Discussion Board, the Calendar, etc.
What does the blackboard icon mean?
A file's icon in Blackboard gives you useful information about the file's type. A generic looking icon such as the one above indicates that the file was imported from outside the Bb Learn system.
Is there a best practice for online courses?
There is no single best practice for all courses. As more and more work is done online, however, courses should shift away from the use of downloadable files (such as Word and PowerPoint documents) and towards the use of content that is directly readable online, in the browser. Even PDFs, which require a plug-in or helper application in order to be viewed, may create an access barrier for some students and should, therefore, be converted to web pages where practical. Content that has been converted to web pages is easiest to keep up-to-date, and least likely to cause access barriers.
Can I copyright an image?
Right-click on almost any web page graphic and your web browser can save a copy of the image to your computer.#N#Be mindful about copyrighted images. Under the concept of "fair use," you can use copyrighted images for educational purposes, but it's polite to include a photo credit and a link to the source of your images.
How to add contact information to a course?
To add your information, click the plus sign in the upper right-hand corner of the course menu and click “Tool Link.” Then, click on “Contacts” in the pop up window and name your link (something like “Instructor Information”). Enter the page by clicking on the link’s name in the course menu and then click “Create Contact” to add your information. There is a guide available that explains how to resize your profile picture and add an avatar.
How to upload a syllabus to a course?
To upload your syllabus, add a course content link to the main course menu named “Course Syllabus/Information.” Click on the link to enter the page and then click “Build Content” in the upper left hand corner of the page. Choose “Item” from the drop down menu and upload your syllabus. You may want to add a separate item to this page that displays just the course schedule by adding an item and then cutting and pasting the schedule into the text editor.
What are the essentials of a course?
Every course must have a few essential elements: an announcement, instructor information, a syllabus/ course schedule, course content organized into weekly units, and a grade center. Each of these elements should be accessible from the main course menu that appears to the left of your course page.
How to add a link to a course?
To add a link to the course menu, click on the plus sign in the upper left-hand corner of the course menu and add the type of link you’d like to add to your course menu. The most basic type of page you will use the most often is a “Content Area.”.
What is an announcement in a course?
Announcements allow you to provide general information to your students, give updates. and create reminders. You have the option to display announcements after or until a particular date and to email a copy of the announcement to all course users.
Does CUNY SPS have accessibility?
To help make higher education available to as many students as possible, CUNY SPS supports course design that upholds the principles of accessibility and universal design. See the Accessibility Module or the quick guide on “Accessibility and Universal Design in Learning” for more details, but when building your course site, keep the following guidelines in mind to ensure your Blackboard site is accessible to all learners:
Optimize Your Online Presence with Blackboard
We provide non-profits and associations with a turn-key, reliably hosted web content management system. We partner with organizations to ensure they get the most out of their investment through best-in-class web design templates and superior customer support.
Improve Member Experience on Your Website
Blackboard Web Community Manger is a powerful web hosting platform with a variety of templated design options that are highly customizable to your organization’s cause and mission. We help organizations create fully responsive websites to better engage with your members, amplify your mission, and attract supporters.
II. The Course Menu
- Caution: Never delete the Course Content link from the course menu; this deletes not just the link but the content itself, and this action cannot be undone! You’ll only get one warning!
- The course menu on the upper left side of the screen is the main course navigation tool. To customize the course menu, click on the +button and a menu appears.
- If you’re building a new course from an empty course shell, you should first create a Course Content Area, which will be the container for all course materials, by clicking the + button and choosin...
- Tool Link lets you create a shortcut to any frequently used Blackboard tool, such as the Discussion Board, Messages, etc.
IV. Using The Text Editor
- Paste from Word: You can copy/paste text directly from Microsoft Word into Bb Learn. Such content can be easily edited later in Blackboard. This works much better than using Word to convert the doc...
- Saving Changes: Nothing is saved until you click the Submit button at either the top or bottom of a page so get in the habit of submitting changes frequently to avoid losing work.
- You can hide a page from students using the Optionsbelow the text editor window.
- Notice something that’s missing? There’s no simple way in Blackboard to link from one content page directly to another page somewhere else in the course. We’ve submitted that as a feature request,...
VI. Rearranging What Students See
- Drag and drop to re-order files and folders in the Course Content area and to rearrange the links in the Course Menu.
- When Edit Mode is ON, all files and folders in the Course Content area have an Action Linkbutton to the right of their name. Click on that button to access a menu with the option to Move, Edit, or...
VIII. The Content Collection
- In the Course Management Control Panel under Content Collection, the first item listed is your course’s public file storagearea.
- The second item listed, with your NAU ID, is your private file storagearea.
- The Content Collection is the place where all files that you brought in from outsideBlackboard are stored. (Content pages created with Blackboard’s internal editor are not visible here.)
- Take some time and organize your Content Collection. Organize this area into folders by course module or by file typeto keep it from becoming a mess because, if you don’t organize it, Blackboard wi...
X. Accessible Design
- All course content should be designed for universal access. Media (audio and video) should have a text transcript. All important course graphics should have image descriptions. If you have questions about how to make your course more accessible, contact e-Learning and/or Disability Resourcesfor assistance.
Popular Posts:
- 1. how to use turnitin to upload assignment on blackboard
- 2. how to get email nofification from blackboard emails
- 3. blackboard how to tell if student watched video
- 4. unh blackboard housing
- 5. how to change your profile picture on blackboard wsu
- 6. how to quickly add grade columns blackboard
- 7. harding university blackboard
- 8. winslow homer blackboard
- 9. how to create a banner in blackboard wiki oage
- 10. nsu blackboard