Faculty - How to Rearrange Menu Items, Course Content, Grade Center Columns in Blackboard
- Click the up and down arrow at the top right of the area you want to rearrange. ...
- Click the item you want to move.
- Click the up or down arrow at the bottom of the list to move the item.
How do I rearrange items on Blackboard?
How do I rearrange my menu items in Blackboard? Click and hold the left mouse button to enable the reordering feature. Reorder Without Drag-and-Drop – The Course Menu also includes simple button controls for reordering items, which can be used instead of the drag-and-drop method.
How do I customize the content menu on the Blackboard course menu?
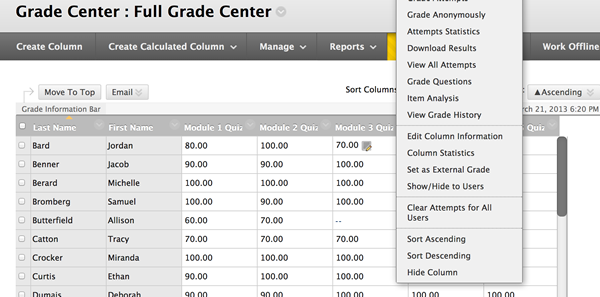
In Blackboard, new content goes to the bottom of the screen and new Grade Center columns go to the far right of the screen. After you add your content, you can rearrange the items to the order you want. 1. Click the up and down arrow at the top right of the area you want to rearrange. You will see this up and down arrow throughout Blackboard. In the course menu.
How do I reorder items on the course menu?
Oct 28, 2021 · Click Submit to apply the change. Blackboard Course Menu Refresh Button. If you are still unable to reorder your items, click on the Refresh … 9. Reordering Menu Items in Blackboard. Reordering Menu Items in Blackboard
How do I move a course menu item to another page?
Oct 09, 2021 · 6. Customizing Your Course Menu in Blackboard Original – NIU. https://www.niu.edu/blackboard/customize/menu.shtml. They can be found by clicking the up and down arrow icon above the Course Menu. From the panel that pops up, select the item you wish to move, then click on the … 7. What to Do When Drag and Drop is Not Working in Your …

How do I customize my Blackboard?
Select Teaching Style from the Customization section of the Control Panel to customize the course style in the following ways:Change the course entry point. ... Select a Menu Style. ... Select a default content view – Icon Only, Text Only, or Icon and Text.Add a banner to the top of the course Home Page. ... Click Submit.
How do I change the view on Blackboard?
Go to Courses on the Admin Panel and search for the course you want to edit. In the list of results in the Course View column, you can see the view for each course. In the course's menu, select Edit, and then choose the course view. A course must be unavailable to change the course view option.
How do I create a new menu in Blackboard?
How to add a Blackboard menu itemEdit Mode. Check that Edit Mode is turned ON. ... Course Menu. Look at your Blackboard course menu. ... Eight choices. You are presented with eight options for adding to your menu. ... Set Menu Item Name. Enter a Name. ... Positioning. Your new menu item will be created.
How do I organize classes in Blackboard?
Organize Your Blackboard Course List by SemesterLogin to Blackboard.Put your cursor on the words My Courses, then click the gear icon on the right side. ... The first checkbox is Group by Term. ... You can stop now and click Submit to save your changes.More items...
What is the difference between Blackboard and Blackboard Ultra?
The Ultra Course View is cleaner with a more modern design and easy-to-use workflows. It also has powerful new tools that are not available in the Original Course View, like Discussion Analytics. There are some features of the Original Course View that are not available in the Ultra Course View, however.
Is there gallery view in Blackboard Collaborate?
Watch a video introduction of Gallery view For a detailed description of what is portrayed in the video, open the video on YouTube, navigate to More actions, and select Open transcript. Video: Gallery View in Blackboard Collaborate introduces Collaborate's Gallery view.
Where is the course menu in Blackboard?
The course menu is the panel on the left side of the interface that contains links to all top-level course areas. Instructors can also provide links to the tools page, individual tools, websites, course items, and module pages. Instructors control the content and tools available on the course menu.
How do I customize my blackboard ultra course page?
To change the course view: Select the list or grid view to change the display on the Courses tab. Click on the down arrow to select the courses to display (current courses, term, past courses) • Use the search bar to search for your course. Change the image in the Grid View for your course by selecting the menu option.
Where is the menu on blackboard?
1. The course menu is located on the upper left menu bar on the Course Home Page. The course menu allows navigation through the course by clicking on “Home Page,” “Information,” “Content,” “Discussions,” “Tools,” or “Help.” 2.
How do I change the order of courses on Blackboard?
Reordering courses can be done by dragging and dropping them into position. You do this using the Drag and Drop Arrows. b. To reposition a course in the list, click on the Drag and Drop Arrow beside the course.Aug 3, 2018
How do I edit a class on Blackboard?
View or edit course propertiesOn the Administrator Panel in the Courses section, select Courses.Search for a course.On the Courses page, open a course's menu and select Edit.Edit the course properties. You can't change the course ID.Select Submit.
How do you change the color of a course in Blackboard?
Tell meGo to the course's Control Panel.Select Customization -> Teaching Style.Under the Style section, choose Text Color for the links.Use the color switcher to choose your color or enter FFFFFF (white) for its Color Value. ... Click Apply to save the color.More items...•May 14, 2018
Reordering the Course Menu by Drag and Drop, Part 1
Locate the course menu item that you want to move, and hover your cursor over the link. You will notice an up and down arrow appear to the left of the link.
Reordering the Course Menu by Drag and Drop, Part 2
Click and drag the menu item to the desired location. Release your mouse to place the link in the desired location
How to move an item to a new location?
With your keyboard, you can move an item to a new location and move an item into a folder. Tab to an item's move icon. Press Enter to activate move mode. Use the arrow keys to choose a location. Press Enter to drop the item in the new location. In an item's row, open the menu to access the Edit and Delete functions.
What does Ally do after you add content to a course?
After you add content to a course, Ally creates alternative formats of the content based on the original. For example, if the original content is a PDF, Ally creates audio, electronic braille, and ePub formats of the same content. These formats are made available with the original file so everything is in one convenient location.
Can you make each piece of content visible?
You can easily set each piece of course content as visible or hidden from students . You can make this setting when you create each piece of content, or you can make a change after the content appears in your course.
Can you delete a course from a folder?
You can delete an item from your course or hide it from students to preserve the information. Students can't access hidden items on the Course Content page. If you delete a folder or learning module that has content, the content is also removed from the Course Content page.
Permissions
To copy an item, you need read and write permission for the file and its destination folder. To move an item, you need read, write, and remove permissions for the file and the folders you're moving the content between.
Copy a file or folder
In the Content Collection, go to the folder that contains the file or folder you want to copy.
Move a file or folder
In the Content Collection, go to the folder that contains the file or folder you want to move.
Course Menu in Ultra Course View
The course menu is not available in Ultra Course View. Instead, all content, assessment, and tools are organized in a single list view. We recommend creating Folders or Learning Modules for each week or topic in your course to organize your materials.
Overview of Course Menu
Add Menu Items – Faculty have the option to customize the Course Menu by clicking the "plus" icon (+), which opens up a list of resources that can be added to the Course Menu.
Popular Posts:
- 1. what is blackboard
- 2. how to delete a discussion post on blackboard
- 3. how to unsubmit an assignment on blackboard
- 4. how to delete a thread on blackboard
- 5. how to resubmit an assignment in blackboard
- 6. how to double space on blackboard
- 7. how to use blackboard
- 8. how to edit a discussion post on blackboard
- 9. how to submit on blackboard
- 10. how to delete a submission on blackboard