- Once in a Blackboard course, choose a content area (such as Course Content) where you want to add the file.
- Hover over the Build Content button, and choose Item or File, from the drop-down list.
- Enter the Item Name and optional description.
- In the Attachments area, click the Browse Content Collection button to search the Content Collection for the resource that you intend to link to.
- Navigate to the file location by hovering your mouse over Browse and navigate to an area such as My Content or Shared Content.
- Check the box next to the resource file you wish to link to, then click Submit.
- Click the Submit button again to make the item available in your course. What is Blackboard content?
Create a file
- In the Content Collection, go to the folder where you want to create a new file.
- If you have appropriate permissions to add a file, you'll have the option Upload.
- Select Upload Files.
- Select Browse My Computer to upload a file from your computer. -OR- ...
- Select Submit to finish the upload.
How do I Make my Blackboard course content accessible to students?
In Course Files, go to the folder where you want to add the zip package. Select Upload > Upload Zip Package. Browse for the file and select the encoding type, if applicable. Select Submit. Go to the course area where you want to add the file. In the Build Content list, select File.
How do I add the content collection to my course?
You can add files from the Content Collection right on the Course Content page. Select the plus sign wherever you want to add files. In the menu, select Content Collection to browse the files available to you and add them to your course. You can also find the Content Collection in the Import Content panel.
What is the content collection in Blackboard Learn?
Select the course ID of the current course listed beneath the Content Collection header. Step 1 - Select Upload Files You will now see a screen labeled Course Content.
How do I access existing files for my course?
Use an item's Permanent URL to add a link in your course to a file or folder in the Content Collection. Navigate to the course where you want to add a link to the file or folder. On the Course Content page, select where you want the link to appear and select the plus sign. Select Create to open the Create Item panel and select Link. Type a title and optional description. Paste the …
How do I use content collection in Blackboard?
To access the Content Collection in Blackboard, log into your Blackboard course and go to the Control Panel. In the Control Panel, click on Content Collection to view links related to the Content Collection: Click on the Course ID to access the Content Collection for the current course.Mar 6, 2019
How do I upload a file to Blackboard?
Browse for filesIn the Course Files folder where you want to upload the files, point to Upload and select Upload Files.On the Upload Files page, select Browse and open the folder on your computer with the files and folders to upload. Select the files.The files and folders appear in the upload box. ... Select Submit.
What is the difference between a module page and a content folder in Blackboard?
Unlike the content folder, a learning module will give you and your students a table of contents that automatically lists the content you put within the module. You can enforce sequential viewing of the items in the learning module, so students will need to access the items in the order than you determine.Jul 29, 2021
Why can't I upload files to Blackboard?
There are problems with adding attachments to student email or uploading files in Blackboard with the internet browsers Edge, Internet Explorer, and Safari. Files may not upload/attach or may be blank, completely empty. We recommend using Chrome or Firefox. Do not use Edge, Safari or Internet Explorer.Feb 9, 2021
How do I upload a PDF to Blackboard?
Upload PDF to Content CollectionIn the course click Content Collection in the Course Management menu.When the Content Collection menu expands, click the name of the course.Click Upload.Click Upload Files.Jan 3, 2022
How do I add content to a blackboard module?
QUICK STEPS: adding items to a Learning ModuleIn Edit Mode, on the Course Menu, click the Content Area containing the Learning Module.On the Content Area page, click the Learning Module's title.On the Learning Module's Action Bar, point to Build Content and click Item.On the Create Item page, enter a Name.More items...
Where is the content folder in Blackboard?
Entire content areas are folders stored under the top-level folder.
How do I add a module to Blackboard?
Add a course module page Select the Add Menu Item icon above the course menu to access the menu. Select Module Page and type a name. Select the Available to Users check box if you're ready for students to see it. After you submit, a link to the new module page appears at the bottom of the course menu.
Step 1
Once in a Blackboard course, choose a content area (such as Course Content) where you want to add the file.
Step 2
Hover over the Build Content button, and choose Item or File, from the drop-down list.
Step 4
In the Attachments area, click the Browse Content Collection button to search the Content Collection for the resource that you intend to link to.
Step 5
Navigate to the file location by hovering your mouse over Browse and navigate to an area such as My Content or Shared Content.
Step 6
Check the box next to the resource file you wish to link to, then click Submit.
Step 7
Click the Submit button again to make the item available in your course.
What does Ally do after you add content to a course?
After you add content to a course, Ally creates alternative formats of the content based on the original. For example, if the original content is a PDF, Ally creates audio, electronic braille, and ePub formats of the same content. These formats are made available with the original file so everything is in one convenient location.
How to upload a file on a computer?
Select the plus sign wherever you want to upload files . In the menu, select Upload to browse for files on your computer. The files appear in the content list. Open a file's menu to edit the file name, align with goals, replace the file, or add a description.
Can you add files to a course?
Add files from cloud storage. If you already have files stored in the cloud, such as in OneDrive ® and Google Drive™, you can add them to your course. You may choose multiple files from cloud storage to add to your Course Content page in one action. The files you add are copies.
What is status window?
A status window appears to show the progress of the file upload. You can also add files from cloud storage, such as OneDrive. You can edit the file's settings, including the display name, alternative text, and display behavior.
How to review files before importing into a course?
You can review the list of selected files before you import into your course. Review the Item Name, Date Modified, and Size to confirm that these are the correct files. Forgot something? You can add more items to the list. Select Back to Content Collection to continue browsing.
Can you upload files in Ultra?
You can upload files in the editor in certain areas of an Ultra course. For example, you can include an image or a document to help students understand your instructions or initial prompt.
Can you add images to Ultra?
Insert images in the editor. In some areas of an Ultra course, you can use the editor functions to add images along with text content. You can add images that are hosted online or you can upload an image from your local drive. If you add a large image, it's a good idea to include the image as a separate text link.
Accessing the Course Content Collection
To access the course content collection, go to the Blackboard Control Panel:
Step 1 - Select Upload Files
Zoom: Image of the Course Content screen with an arrown pointing to the Upload files option with instructions to click on Upload and then select Upload Files.
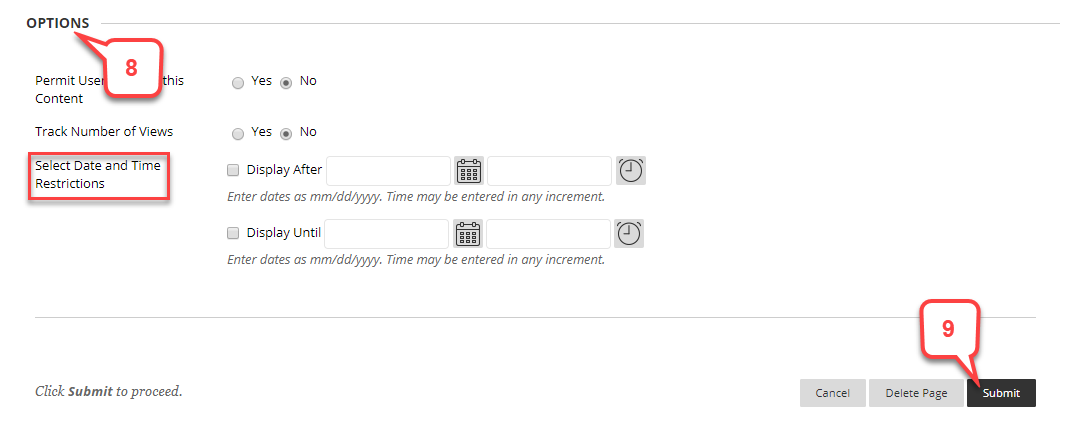
Step 2 - Select the File to Upload and Set the Options
Zoom: Image of the Upload Single File with the following annotations: 1.Click Choose File to use your computer's file management system to select the file you wish to upload.
Confirmation
Once you click the Submit button, you will be taken back to the Course Content screen first shown when you should now see your file listed and there should be a purple confirmation bar at the top of this screen informing you: Success: Item added or Success: File overwritten.
How to create a link to a file?
Create a link to a file or folder 1 Navigate to the course where you want to add a link to the file or folder. 2 On the Course Content page, select where you want the link to appear and select the plus sign. 3 Select Create to open the Create Item panel and select Link. 4 Type a title and optional description. Paste the URL that you copied from the Content Collection item and select Save. 5 The new link appears on the Course Content page. Make the link visible to students when you are ready.
How long does a signed URL expire?
Find the settings at Admin Panel > Content Management Settings > Cloud Storage Signed URL Settings. Set an expiration time between 180 minutes and 1440 minutes (24 hours).
Can I use the Content Collection with my courses?
Yes, you can use the Content Collection to organize, share, and reuse content.
File and folder storage
With Ultra courses, you can access existing files for your courses from the Content Collection. Open the Course Content folder in the Content Collection menu and choose a course folder. You can create links to any of the files and folders in your course.
Edit permissions on your files
Use these steps to add Read permission for students to files and folders in the Content Collection. Read permission allows students to access the items you link to in your course.
Create a link to a file or folder
Use an item's Permanent URL to add a link in your course to a file or folder in the Content Collection.
Edit and overwrite files
You can edit and overwrite individual files in the Content Collection and maintain the links to those files in your courses.
What happens if versioning is disabled?
If versioning is disabled, no history of past versions will be stored after the file is overwritten.
How to find version of a file?
To access a file's versions, go to the folder that contains the file. Select Versions from the file's menu, or select the number that appears in the Versions column next to the file. The Manage Versions page lists the following information about each version: The version number as a hyperlink.
Can you overwrite a file in Content Collection?
If you want to replace an existing file in the Content Collection, you can overwrite it on the Overwrite File page. Overwriting a file doesn't change the name of the file. You must have read, write, and remove permissions for a file to overwrite it.
What is tracking log?
The IP address of the computer used to access the file. If a user interacts with a file the same way multiple times, the tracking log will only record the first operation . For example, if a user opens and reads the same document multiple times, only the first operation will be recorded.
Can WebDAV read multiple files?
Some WebDAV clients may perform multiple operations when used with the Content Collection. For example, when a file is read, a read operation may appear twice in the tracking log, even though the user has only read the file once.

Popular Posts:
- 1. what is blackboard
- 2. how to delete a discussion post on blackboard
- 3. how to unsubmit an assignment on blackboard
- 4. how to delete a thread on blackboard
- 5. how to resubmit an assignment in blackboard
- 6. how to double space on blackboard
- 7. how to use blackboard
- 8. how to edit a discussion post on blackboard
- 9. how to submit on blackboard
- 10. how to delete a submission on blackboard