How do I add a menu item to my blackboard course?
Add Menu Items About the Course Menu. The course menu includes the links to content, Blackboard tools, and external resources. You can add , delete, rename, and show/hide items for students. There...
How do I add zoom to my blackboard course menu?
How to add Menu Items (Buttons) in Blackboard. Select the Add Menu Item icon above the course menu to open the menu. Select the type of content to create and type a name. Select the Available to Users check box if you’re ready for students to see it. Select Submit.
How do I link a user to a blackboard module page?
1. Select the content area where you want to add the item (ex. Start Here, Syllabus, Course Materials) 2. Click the Build Content button. 3. From the drop down menu, select Item. 4. Type a name for the item in the Name field. Note: The Name field is a required entry. 5. Enter a description if desired. 6. Scroll down to Attachments.
How do I customize the course menu?
Mar 17, 2020 · Navigate to your course in Blackboard. Click on the add menu item button on the course menu. Enter a name for the link, such as Zoom Meetings or Class Meetings and click on the checkbox for available to users. Select Zoom Meetings from the list of available tool types. The menu will now show the new link:
How do I add a menu item in Blackboard?
How to add Menu Items (Buttons) in BlackboardSelect the Add Menu Item icon above the course menu to open the menu.Select the type of content to create and type a name. ... Select the Available to Users check box if you're ready for students to see it. ... Select Submit.Apr 27, 2020
How do I add a button to Blackboard?
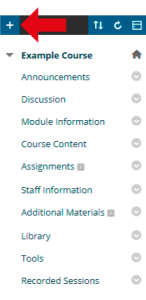
0:252:53How-to Create and Manage Menu Buttons in Blackboard - YouTubeYouTubeStart of suggested clipEnd of suggested clipTo create menu buttons click the plus sign symbol that appears at the top of your left-handMoreTo create menu buttons click the plus sign symbol that appears at the top of your left-hand navigation bar. Here. This should open a drop-down menu.
How do I edit course menu in Blackboard?
They can be found by clicking the up and down arrow icon above the Course Menu. From the panel that pops up, select the item you wish to move, then click on the small up or down arrow buttons to move the item to the desired place in the list. When done, click the Submit Button.
How do I add tools to Blackboard?
Make sure Edit Mode is ON. Click the (plus sign) icon above the Course Menu. Select the Tool Link....Select the Tool Link.Enter a Name for the link.From the Type drop-down list, select the tool to add.Select whether the tool will be Available to Users.Oct 16, 2020
What is a blackboard navigation?
The Blackboard system navigation menu gives you direct access to tools that might be used within your courses, like the calendar, messages, and grades tool. For each of these tools, it's important to note that they may remain accessible to you on this menu even if they are not in use by your instructor.
Where is the course menu on blackboard?
The course menu is the panel on the left side of the interface that contains links to all top-level course areas. Instructors can also provide links to the tools page, individual tools, websites, course items, and module pages. Instructors control the content and tools available on the course menu.
How do I open course menu on blackboard?
1. The course menu is located on the upper left menu bar on the Course Home Page. The course menu allows navigation through the course by clicking on “Home Page,” “Information,” “Content,” “Discussions,” “Tools,” or “Help.”
How do I customize my blackboard ultra course page?
To change the course view: Select the list or grid view to change the display on the Courses tab. Click on the down arrow to select the courses to display (current courses, term, past courses) • Use the search bar to search for your course. Change the image in the Grid View for your course by selecting the menu option.
Where is the Tools section on Blackboard?
Go to Original Course View page. Your instructor controls which tools are available.
Where are course Tools in Blackboard Ultra?
In the Ultra experience, most tools appear in these areas: Tools page in the base navigation. Inside a course....Manage toolsInstitution Page.Profile.Activity Stream.Calendar.Messages.Grades.
What are the tools in Blackboard?
In the list where your name appears, select Tools to access the global functions that are outside a course. The cross-course Blackboard tools you're familiar with are available on the Tools page, such as the Content Collection, goals, enterprise surveys, and portfolios.
What is content item?
Create Content Items or Documents. You can create content that combines a variety of materials to view together, such as text, multimedia, and attachments. You can create a content item to present a combination of content that serves as a handout or document with visual aspects. You can create content items that are as simple as one line ...
What are some examples of content items?
For example, in one content item, you can include introductory text for a lesson, an image for your students to view and interact with, and links to web resources. The materials are all presented together in the content list.
What is a course content page?
On the Course Content page, you can create a document or page to present a combination of content. For example, you can include introductory text for a lesson, an audio file of a lecture, and an image. When students select the document title, the materials you added are all presented together on one page. Students see the content just as you see it, without the editing options.
How to edit a file in Chrome?
To edit the file's alternative text or display behavior, select the file in the editor and then select the Edit Attachment icon. In most browsers, you can select where the files that you open in courses are downloaded. For example, in Chrome, navigate to Settings > Advanced > Downloads.
What does Ally do after you add content to a course?
After you add content to a course, Ally creates alternative formats of the content based on the original. For example, if the original content is a PDF, Ally creates audio, electronic braille, and ePub formats of the same content. These formats are made available with the original file so everything is in one convenient location.
How to upload a file on a computer?
Select the plus sign wherever you want to upload files . In the menu, select Upload to browse for files on your computer. The files appear in the content list. Open a file's menu to edit the file name, align with goals, replace the file, or add a description.
Can you add files to a course?
Add files from cloud storage. If you already have files stored in the cloud, such as in OneDrive ® and Google Drive™, you can add them to your course. You may choose multiple files from cloud storage to add to your Course Content page in one action. The files you add are copies.
What is status window?
A status window appears to show the progress of the file upload. You can also add files from cloud storage, such as OneDrive. You can edit the file's settings, including the display name, alternative text, and display behavior.
How to review files before importing into a course?
You can review the list of selected files before you import into your course. Review the Item Name, Date Modified, and Size to confirm that these are the correct files. Forgot something? You can add more items to the list. Select Back to Content Collection to continue browsing.
Can you upload files in Ultra?
You can upload files in the editor in certain areas of an Ultra course. For example, you can include an image or a document to help students understand your instructions or initial prompt.
Can you add images to Ultra?
Insert images in the editor. In some areas of an Ultra course, you can use the editor functions to add images along with text content. You can add images that are hosted online or you can upload an image from your local drive. If you add a large image, it's a good idea to include the image as a separate text link.

Popular Posts:
- 1. what is blackboard
- 2. how to delete a discussion post on blackboard
- 3. how to unsubmit an assignment on blackboard
- 4. how to delete a thread on blackboard
- 5. how to resubmit an assignment in blackboard
- 6. how to double space on blackboard
- 7. how to use blackboard
- 8. how to edit a discussion post on blackboard
- 9. how to submit on blackboard
- 10. how to delete a submission on blackboard